
Easy Painted Rocks: A Creative Adventure for Parents and Kids
Hey there, fun-loving families! ? Are you searching for a creative and low-cost activity that will brighten your day and leave you with adorable keepsakes? Look no further because painting rocks is the way to go! Rock painting is a perfect craft to bond with your little ones while unleashing their inner artists. So grab your paintbrush, find some rocks, and get ready for a colorful adventure with this easy-to-follow guide!
What You’ll Need to Start Your Rock Painting Journey
- Rocks: Smooth, flat rocks are the best canvas for your masterpieces. You can find them in your backyard, at a park, or even purchase them from a craft store or garden center.
- Paint: Acrylic paints are vibrant, quick-drying, and durable – perfect for our artistic endeavor! Make sure to get a variety of colors for more creative options.
- Brushes: A selection of paintbrushes in different sizes will help you and your kids paint both large, easy-to-fill areas and intricate details.
- Primers and Sealers: Primers prepare the surface of the rocks for painting, and sealers protect your art from the elements if you decide to display the rocks outdoors.
- Paper towels and water: Keep these on hand for quick cleanups and rinsing brushes between colors.
- Palette or Paper Plate: A place to mix paints and dip your brushes is a must-have.
- Protective Covering: Newspapers, a tablecloth, or a plastic sheet will protect your surfaces from any paint spills.
Preparing Your Rocks for Painting
Before the fun begins, you’ll need to ready those rocks for painting. Here’s how:
- Wash the rocks with soapy water to remove dirt and debris, and then rinse them well. A clean surface will help the paint adhere better.
- Dry the rocks completely. You can let them air dry or pat them down with a towel if you’re eager to get started.
- Once dry, apply a primer to create a nice, smooth surface that will make your colors pop. Let the primer dry as per the instructions on the bottle.
Now that your rocks are prepped, it’s time to unleash the creativity!
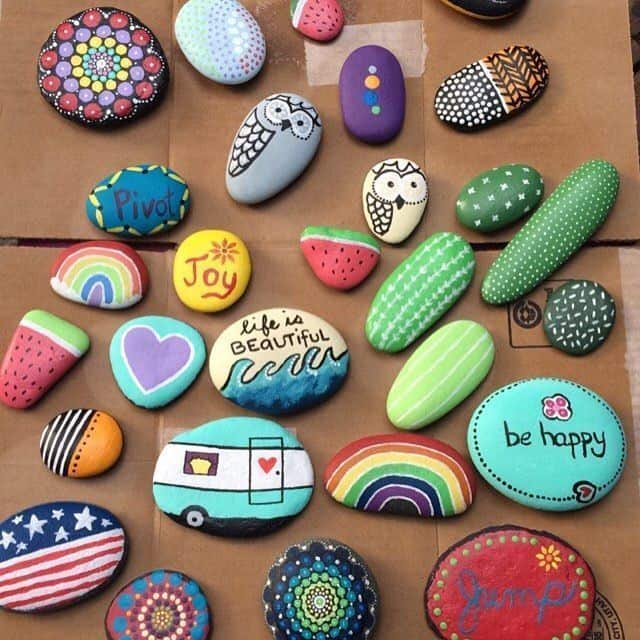
Getting Creative: Easy Painting Ideas for Kids
Rocks have the magical ability to turn into anything your imagination conjures up! Here are some easy painting ideas to inspire you and the kiddos:
- Bug Buddies: Simple shapes and bright colors can transform a rock into a cute ladybug, a cheerful bee, or a funky caterpillar.
- Beautiful Blossoms: Flowers are always a hit! Paint a colorful garden that never needs watering.
- Space Rocks: Turn ordinary stones into a shining star, a friendly alien, or even a miniature planet. The sky’s no limit!
- Under-the-Sea: Create an aquarium out of rocks with designs of fish, starfish, or cute octopuses.
- Pattern Play: Let young ones practice their fine motor skills by painting stripes, polka dots, or geometric shapes.
- Story Stones: Paint characters or objects that can be used to tell stories. They’re great as prompts to spark imagination.
Remember, there’s no right or wrong in art, so encourage your children to express themselves freely! And most importantly, have a blast together as a family. Stay tuned as we dive deeper into the rock art world and learn more tips and tricks to perfect your craft!
5 Things Parents Should Know When Preparing for Easy Painted Rocks
Welcome, awesome parents, to the delightful world of rock painting! ? This activity isn’t just about having fun, it’s about creating memories and masterpieces alongside your little rock stars. Before we roll up our sleeves and dive into the paint pots, here are five essential tips to help you lay the groundwork for a flawless rock painting experience.
1. Selecting the Perfect Rocks
Not all rocks are created equal when it comes to painting. Smooth, flat rocks make the best canvases because they’re easier for little hands to paint on and they display artwork beautifully. Venture on a rock hunt outdoors to make this part of the adventure, or conveniently pick up suitable stones from a local craft store. Remember, the size and shape can inspire what it will eventually become!
2. Setting Up Your Space
Before the first dollop of paint is squeezed out, make sure to cover your work area with old newspapers, a disposable tablecloth, or a plastic sheet. This simple prep step will make cleanup a breeze and keep your tables stain-free. Put on some old clothes or aprons to protect your wardrobes from becoming abstract art pieces as well!
3. Understanding Paint Dynamics
Acrylic paints are your go-to due to their bright colors, quick-drying properties, and durability. But knowing how to work with them is key. Teach your kids how to apply thin layers, letting each one dry before adding another, to avoid cracking and peeling. Also, using a palette or a paper plate can help mix custom colors and keep your painting process organized.
4. The Prime Importance of Priming
For vivid and long-lasting results, applying a primer is a critical step. It might seem like an extra task, but it’s well worth it. The primer smooths out the rock’s surface and keeps the colors true. Plus, it’s an opportunity to teach patience to the kiddos as you wait for it to dry before the actual painting begins!
5. Sealing the Deal
After all the creativity has been poured out onto the rocks, you’ll want to protect your projects, especially if they’re going to be part of your garden décor. Sealants come in handy here, providing a protective coat that wards off water and sun damage. This step also adds a professional touch to the finished creations, with options like glossy or matte finishes.
Now that you’re equipped with these five prep steps, you’re all set to start this amazing rock painting journey with your kiddos. Remember, it’s about more than just painting—it’s about spending quality time, learning new skills, and creating tangible memories that will last as long as your painted rocks! Let’s dip into the magic of colors and craft unforgettable moments together. ?
6. Rock Painting Techniques to Try
As your kids become more comfortable with the basics, introduce them to various painting techniques that can add texture and flair to their creations:
- Sponging: Use a sponge to dab on paint for a textured look.
- Stenciling: Create sharp designs by using stencils as a guide.
- Dot Painting: Small dots can create stunning patterns and mandalas.
- Stippling: Teach them how to use the tip of the brush to make a series of small dots for a stippled effect.
- Marbling: Swirl different paint colors together for a marbled masterpiece.
And let’s not forget, the porch or the garden can turn into a mini art gallery showcasing your family’s creativity. Painted rocks also make thoughtful, handcrafted gifts that friends and family will adore. Embrace this cost-effective hobby that’s as fun as it is enriching, and watch your children’s artistic confidence grow rock by rock!
Keep in mind, rock painting can be as much about the process as it is about the end product. Encourage conversations while painting, share stories, and maybe even come up with names for the newly created rock characters. It’s a bonding experience that enriches your family’s home with art and heart. Let the rock painting begin!
See more great Things to Do with Kids in New Zealand here. For more information see here
Disclaimer
The articles available via our website provide general information only and we strongly urge readers to exercise caution and conduct their own thorough research and fact-checking. The information presented should not be taken as absolute truth, and, to the maximum extent permitted by law, we will not be held liable for any inaccuracies or errors in the content. It is essential for individuals to independently verify and validate the information before making any decisions or taking any actions based on the articles.


