ANZAC Slice: A Sweet Homage to Tradition
Hello there, culinary comrades and sweet tooth enthusiasts! Are you looking for a delightful treat that’s not only easy to make but also holds a special place in history? You’ve come to the right place! Our guide to making the perfect ANZAC slice will have you whipping up a batch of this classic confection that’s both chewy and crispy, with an irresistible caramel flavor—all in the comfort of your own kitchen.
Before we dive into the nitty-gritty of baking, let’s take a moment to appreciate the history behind this Aussie and Kiwi favorite. The ANZAC slice is inspired by the ANZAC biscuit, a staple made lovingly by wives and mothers during World War I to send to their brave soldiers abroad. These treats were designed to last the long journey overseas, hence the exclusion of eggs which would spoil quickly. Today, the ANZAC slice carries the spirit of these original biscuits, with the same core ingredients: oats, golden syrup, and coconut.
Now, let’s get our aprons on and start creating some delicious history of our own! Our guide is perfect for busy parents who want to involve their little helpers, making the baking process not just about indulging in sweet treats, but also about imparting valuable lessons about history and tradition.
Essential Ingredients for Your ANZAC Slice
First things first, let’s make sure you have everything you need. The best thing about the ANZAC slice is its simplicity—no fancy ingredients or complex techniques. Just good, wholesome pantry staples:
- 1 cup of plain flour
- 1 cup of rolled oats
- 1 cup of desiccated coconut
- 1/2 cup of brown sugar
- 1/4 cup of golden syrup
- 150g unsalted butter
- 1/2 teaspoon of baking soda
- 2 tablespoons of boiling water
Preheat your oven to a cozy 160°C (320°F) and line a baking dish with parchment paper, so nothing sticks. It’s just the right environment for your ANZAC slice to get golden and gorgeous!
Step-by-Step Process: Mixing Tradition with Taste
Creating the perfect ANZAC slice is a breeze with these steps:
- Combine your dry ingredients (flour, oats, coconut, and brown sugar) in a large bowl, and give them a good mix—make sure there are no sneaky sugar lumps!
- In a small saucepan, melt together the butter and golden syrup over low heat. Simplicity at its finest.
- Mix the baking soda with boiling water, and add it to the melted butter mixture. Watch the fizz – it’s like a mini science experiment!
- Pour the buttery, golden syrup magic into the dry ingredients and mix until well combined. It’s all coming together now!
This delicious mixture is then pressed into your prepared baking dish and popped into the oven. But the baking is just the beginning—the sweet aroma filling your home is where the real magic happens.
Stay tuned for the full baking instructions and extra tips to perfect your ANZAC slice, plus some creative variations to keep everyone’s taste buds dancing. See you in a bit, where we will continue our baking adventure!

Five Things Parents Should Know When Preparing ANZAC Slice
1. Allergy Awareness
When baking with kids, it’s important to be aware of common allergies. The classic ANZAC slice recipe typically doesn’t include nuts, but it does contain gluten (in the flour) and dairy (from the butter). If you’re catering to children with allergies, look for suitable substitutes, such as gluten-free flour blends and dairy-free butter alternatives. Always read labels carefully to ensure that the ingredients are safe for everyone participating in the baking fun!
2. Kitchen Safety
An essential part of cooking with kids is emphasizing kitchen safety. Ensure that any little hands helping out understand the risks of a hot oven and stove. It’s a great opportunity to teach them how to properly measure ingredients, safely use kitchen equipment, and the importance of cleanliness. Moreover, always keep an eye on children when they’re near hot surfaces or handling the melted butter and syrup mixture.
3. Learning and Fun
Turning baking into an educational experience is not only fun but also enriches your children’s learning. Discuss the history of ANZAC Day, the significance of the ingredients, and how these slices have stood the test of time. Math skills come into play with measuring ingredients, and reading the recipe can help with their comprehension and following instructions. All these build a foundation for practical life skills – all while making tasty treats!
4. Texture and Taste Preferences
Every family member might have their own preference when it comes to the texture of their ANZAC slice – some might prefer it chewier, others crisper. You can control the texture by adjusting the baking time. Leaving the slices in the oven a bit longer will result in a crispier texture, while a shorter time will keep them chewy. Involve kids in deciding how they want their slices – it can be a democratic kitchen decision!
5. Portion Sizes and Storage
ANZAC slices are quite rich and indulgent, so when slicing them up, consider making bite-sized portions for smaller tummies. Also, let’s be eco-friendly by storing leftovers properly to minimize waste. ANZAC slices can last a long time if stored in an airtight container, and they can even be frozen for later indulgence. It’s a great way to teach children about portion control and food preservation!
Baking Instructions and Final Touches for Your ANZAC Slice
After combining your ingredients and pressing the mixture into the baking dish, it’s time to bake!
- Bake in the preheated oven at 160°C (320°F) for about 20 minutes or until golden brown.
- Remove from the oven and cool in the pan for about 10 minutes, then transfer to a wire rack to cool completely. Use this waiting time to clean up, or explore fun facts about ANZAC Day.
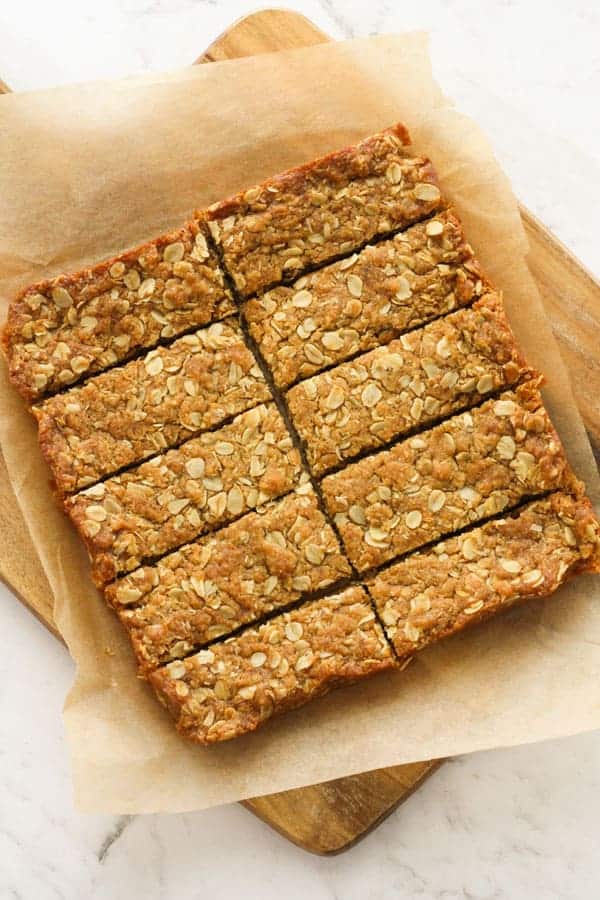
- Once your ANZAC slice is cool, cut it into squares or bars using a sharp knife. If you’ve got little bakers on board, let them help count the pieces or select their special piece.
A dash of extravagant drizzle can turn your ANZAC slice into a decadent dessert. Melt a little dark chocolate and let kids drizzle it over the top for an extra layer of yum. It’s all in the details!
So gather your ingredients and call in your little sous chefs—it’s time to bake, learn, and commemorate with a delectably sweet slice of history!
For more great fun click here. For more information see here
Disclaimer
The articles available via our website provide general information only and we strongly urge readers to exercise caution and conduct their own thorough research and fact-checking. The information presented should not be taken as absolute truth, and, to the maximum extent permitted by law, we will not be held liable for any inaccuracies or errors in the content. It is essential for individuals to independently verify and validate the information before making any decisions or taking any actions based on the articles.


