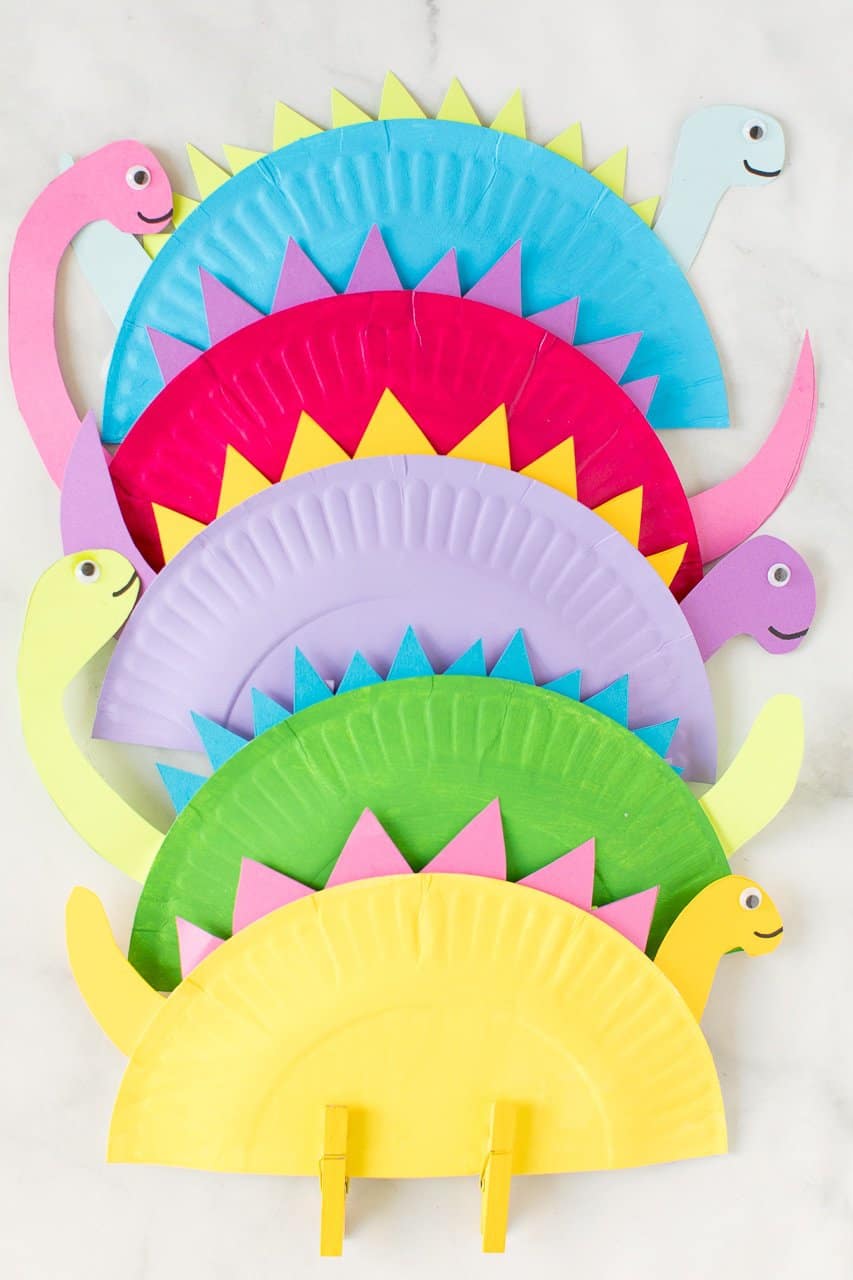
Jurassic Fun at Home: Easy Paper Plate Dinosaur Craft for Kids!
Hey there, awesome parents and dino enthusiasts! ? Get ready to roar with excitement as we dive into a world where your little ones can create their very own paper plate dinosaurs. This easy and fun craft is perfect for igniting the imagination of your budding paleontologists and crafting enthusiasts. Let’s unleash the prehistoric beasties lurking in your kitchen’s craft drawer and create some stompingly great dinosaur art!
Why Paper Plate Dinosaurs?
Paper plate crafts are not only budget-friendly but also incredibly versatile. With just a few simple supplies that you probably already have at home, you and your kiddos can transform plain paper plates into a whole herd of colorful dinosaurs. What’s not to love about a craft that’s easy to set up, clean up, and can keep those tiny hands busy? Plus, this craft gives you a fantastic opportunity to teach your little ones about different types of dinosaurs in a hands-on way!
Supplies You’ll Need:
- Paper plates (the flimsier, the better for cutting)
- Non-toxic paint (think dino colors like green, brown, or grey)
- Paintbrushes or sponges
- Scissors (safety scissors for the little ones!)
- Colored paper or cardstock
- Googly eyes (because everything’s better with googly eyes)
- Glue sticks or liquid glue
- Markers or crayons
- Stapler (for adult use)
Let’s Get Crafting!
Follow these simple steps, and you’ll have a prehistoric pal (or two) in no time:
- Choose Your Dino: Decide what type of dinosaur you want to make. Will it be a tall Brachiosaurus, a fierce T-Rex, or perhaps a spiky Stegosaurus? Feel free to look up images online for inspiration or let your child’s imagination run wild.
- Paint Time: Color your paper plate to match your chosen dinosaur. You might need to let the first coat dry and then add more layers for a vibrant color. Remember to cover your work surface with newspapers or a tablecloth to keep things tidy.
- Cut the Shapes: While the paint is drying, you can cut out additional parts of the dinosaur, like the head, tail, and legs, from the colored paper or cardstock. Younger crafters may need adult supervision or assistance with this step.
The steps above just lay the wonderful groundwork for our dinosaur crafting adventure. Stay tuned as we’ll be delving deep into the details on how to assemble your crafty creature and add all those special touches that will bring your dino to life!
Bringing Your Dino to Life
Once your painted plate and cut-out parts are ready, it’s time to assemble your Jurassic masterpiece! This is where your creativity can really shine, as you mix and match colors and shapes to personalize your dino buddy. And don’t forget, googly eyes make everything infinitely better! The next steps will guide you through this thrilling part of the crafting journey, ensuring that you have a fabulous time while making memories that will last for millennia (or at least until the paper plate starts to fade).
With so many possibilities for customization, your children can make a whole gallery of paper plate dinosaurs, each with its own unique personality. Imagine the pride in their eyes when they see their colorful creations hanging on the wall or sauntering across the kitchen table!
Ready for more Jurassic-sized fun? Keep on crafting, and remember – the real magic happens when you and your kids let your imaginations stomp into the wild world of dinosaurs. There’s nothing quite like seeing your child’s face light up with the joy of creation, especially when it’s a friendly paper plate dinosaur friend they can call their own. Stay tuned for our next section where we’ll bring your dino to life with some spectacular accessories and play ideas!

Jurassic Fun at Home: Easy Paper Plate Dinosaur Craft for Kids!
Welcome all dino lovers and crafty families! Prepare yourselves for some prehistoric amusement as we embark on a creative expedition crafting our very own paper plate dinosaurs. This activity is ideal for those rainy days when the indoors becomes a haven for budding creativity. With minimal materials and boundless potential for fun, these paper plate dinosaurs are sure to be a hit!
What Makes Paper Plate Dinosaurs So Great?
Paper plate crafts are amazingly cost-effective and can be made with everyday items found around your home. They also provide an excellent opportunity for hands-on learning and fine motor skill development. But wait, there’s more! By crafting these ancient creatures, you’ll spark conversations around history, nature, and science, turning craft time into an educational journey!
5 Things Parents Should Know Before Starting:
- Prep Is Key: Gather all your materials beforehand, and cover your crafting area with old newspapers to make cleanup a breeze.
- Safety First: Ensure the scissors and any other tools are kid-friendly, and always supervise to prevent boo-boos.
- Mind the Paint: Have wet wipes or a cloth on hand for any unexpected dinosaur paint tracks that venture off the paper plate.
- Foster Creativity: There’s no right or wrong when it comes to art! Encourage your kids to explore their own ideas for their dinosaur designs.
- Patience with Glue & Paint: Remember, some parts need time to dry; setting expectations upfront prevents smudging disappointments.
Supplies You’ll Need for Dino Crafting:
- Paper plates
- Green, brown, and grey paint
- Brushes
- Scissors
- Colored paper
- Googly eyes
- Glue
- Markers
- Stapler (with adults’ help)
Creating Your Prehistoric Pals:
Follow along as we create our paper plate dinos, step by easy step. Get ready for some crafting magic!
- Choosing Your Dinosaur: Decide with your kiddos what types of dinosaurs they want to create. Maybe they’ll want something ferocious or perhaps something more serene.
- Painting Time: Let your kids unleash their inner artists as they paint their plates. Hang them up to dry or use a hairdryer for quicker drying times.
- Cutting Out Shapes: This is where parents might need to step in, especially for the little ones. Pre-cut shapes can also be a great way to keep things moving swiftly.
Assembling Your Dinosaurs:
With all your pieces painted and cut, the assembly of your dinosaur can begin! Glue the body parts onto the paper plate, add those all-important googly eyes, and watch as your child’s creation comes to life.
Your paper plate dinosaurs aren’t just crafts; they’re the start of a wonderful storytelling adventure. Watch as your kids forge narratives for their dinosaurs, exploring lush Jurassic jungles from the living room floor!
Keep those imaginations roaring and join us in our next crafting escapades. With each fold, cut, and color, your little ones are learning and growing, and what could be more wonderful than that? The joy of watching your child bring a paper plate dinosaur to life is priceless and just a glue stick away!
See more great Things to Do with Kids in New Zealand here. For more information see here
Disclaimer
The articles available via our website provide general information only and we strongly urge readers to exercise caution and conduct their own thorough research and fact-checking. The information presented should not be taken as absolute truth, and, to the maximum extent permitted by law, we will not be held liable for any inaccuracies or errors in the content. It is essential for individuals to independently verify and validate the information before making any decisions or taking any actions based on the articles.


