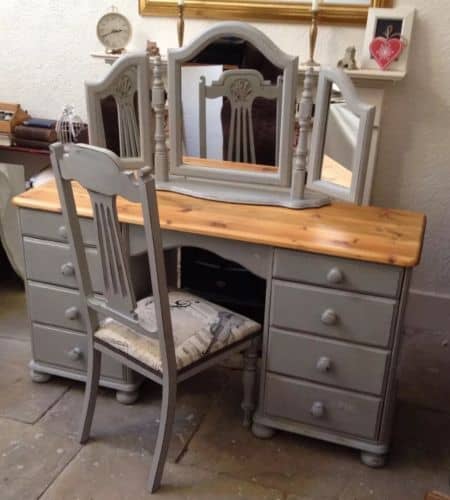
Join the Upcycling Revolution: A Parents’ Guide to Refashioning a Dressing Table
Hey there, creative parents! Are you looking to add a touch of personality and style to your little one’s room without breaking the bank? Upcycling a dressing table could be the fantastic, eco-friendly project you’ve been searching for. With a little imagination and a few simple supplies, you can transform a tired, old dressing table into a whimsical, and practical piece that reflects your child’s unique personality. Let’s embark on this upcycling journey together!
Why Upcycle a Dressing Table?
Before we dive into the how-to’s, let’s chat about the wonderful benefits of upcycling an old dressing table:
- Eco-friendly: Upcycling furniture reduces landfill waste and makes the most of existing materials. It’s a win-win for the environment and your home!
- Cost-effective: Instead of splurging on new furniture, repurposing what you have saves money and allows for more budget to be allocated elsewhere (like new art supplies for the kiddos!)
- Customizable: You have free rein to create a piece that’s completely one of a kind, matching your child’s interests and the room’s decor.
- Family Activity: Involve the kids! This project can serve as a fun and educational weekend activity, helping them to express their creativity while teaching them valuable DIY skills.
Choosing the Right Dressing Table
Now, let’s select the perfect candidate for upcycling. You might already have an old dressing table at home, or you could scout out thrift stores, garage sales or online marketplaces for a second-hand piece. Here’s what to look out for:
- Solid Structure: Choose a dressing table that is sturdy and has good bones. It doesn’t have to be perfect, but you want something that won’t wobble or collapse under a little weight.
- Surface Condition: Don’t worry about scratches or the finish, as painting and decorating will cover most imperfections. However, avoid tables with significant water damage or mold.
- Size and Storage: Consider the size of the room and the amount of storage you need. Drawers are a bonus for hiding away toys and crafts!
Gathering Your Supplies
Alright, it’s time to grab your tools and get ready! Here’s a basic list of what you might need:
- Sandpaper or a sanding block
- Primer and paint (eco-friendly options are great for kids’ rooms!)
- Brushes and rollers
- Decorative knobs or handles
- Wallpaper or contact paper for drawer lining or as a decorative accent
- Sealant or varnish (non-toxic varieties are available)
Remember, the materials you choose will depend on the final design you’re envisioning. Feel free to let your imagination soar!
Prepping Your Dressing Table
Now that we have all our supplies, it’s time for some prep work.
- Start by giving your dressing table a good clean. Remove all the dirt and grime that might interfere with your paint.
- If your table has hardware, remove it. You can choose to upcycle these as well, or replace them entirely with new, quirky pulls and knobs.
- Sand down the surface to create a smooth base for the primer and paint. If you’re using chalk paint, you may not need to sand as much, but always refer to the paint instructions to be sure.
- Apply a good quality primer, especially if the wood is dark or stained. This will ensure that your paint color truly pops and lasts a long time.
We’re creating more than just a piece of furniture; we’re building a memory and a custom piece that can be cherished for years. Stay tuned as we delve deeper into the transformation process and share fun, practical tips to make your upcycled dressing table truly remarkable!

Five Things Every Parent Should Know When Preparing for an Upcycle Dressing Table Project
Upcycling can be a rewarding experience, but adequate preparation is key. Here are five important tips for parents to keep in mind:
1. Set a Clear Vision
Before beginning, have a clear idea of how you want the finished dressing table to look. Gather inspiration from magazines, Pinterest, or home decor blogs. Knowing the style, color scheme, and functional changes beforehand will make the process smoother and more enjoyable.
2. Check for Safety
Ensure the dressing table is free of harmful elements such as lead paint, especially if it’s an antique. Purchasing a lead test kit from a hardware store is worth the investment for peace of mind. Always prioritize non-toxic, child-safe materials when choosing paint and sealants.
3. Allocate Enough Time
Upcycling isn’t a process to be rushed, especially when involving kids. Allocate sufficient time for each step of the project, including drying times for paint and varnish. This reduces stress and makes the project a fun learning opportunity rather than a race against the clock.
4. Dress for the Mess
This might get messy! Dress yourself and the kids in old clothes and have gloves available. Setting up a dedicated workspace with drop cloths can minimize the cleaning up afterwards and keep your home tidy.
5. Tool Safety
If power tools are required for any part of the project, always prioritize safety. Explain and demonstrate safe practices to older children and ensure they’re supervised. Keep younger children away from the tools altogether, providing them with safer tasks instead.
Ready, Set, Paint!
Once you’ve prepped your space and briefed the team on safety, it’s time to unleash your creativity! Painting the dressing table can be the most transformative step. Here’s where kids can really get involved—allow them to pick colors or help with stenciling patterns. Use long, even strokes to avoid drips, and allow plenty of drying time before adding a second coat or moving on to sealing.
Adding Personal Touches
Replacing old knobs with fun, colorful ones, lining drawers with patterned paper, or adding a custom-designed cushion to the stool can add delightful personal touches. This is a chance to infuse the piece with your child’s personality—maybe they want a superhero theme or a fairy tale wonderland. With upcycling, the sky’s the limit!
Ultimately, the goal is to create something functional, charming, and infused with the love of a family project. It’s not just about a fresh coat of paint; it’s about fresh perspectives and teaching kids the value of repurposing and reimagining items that already exist. So, let’s get those creative juices flowing and dive into this upcycling adventure together!
The Finishing Touches
As your whimsical new piece dries and takes shape, step back and admire your collaborative hard work. Add your final touches, like sealing the paint to ensure durability. Once everything is dry, reassemble any removed parts, attach new hardware, and position it proudly in its new home.
Congratulations, you and your little upcycling team have now given a tired dressing table a second lease on life. It’s not just refurbished; it’s reinvented with love, creativity, and an eco-conscious spirit. Enjoy your beautiful, personalized dressing table, and remember the fun and bonding that came with its creation. Happy upcycling!
See more great Things to Do with Kids in New Zealand here. For more information see here
Disclaimer
The articles available via our website provide general information only and we strongly urge readers to exercise caution and conduct their own thorough research and fact-checking. The information presented should not be taken as absolute truth, and, to the maximum extent permitted by law, we will not be held liable for any inaccuracies or errors in the content. It is essential for individuals to independently verify and validate the information before making any decisions or taking any actions based on the articles.


