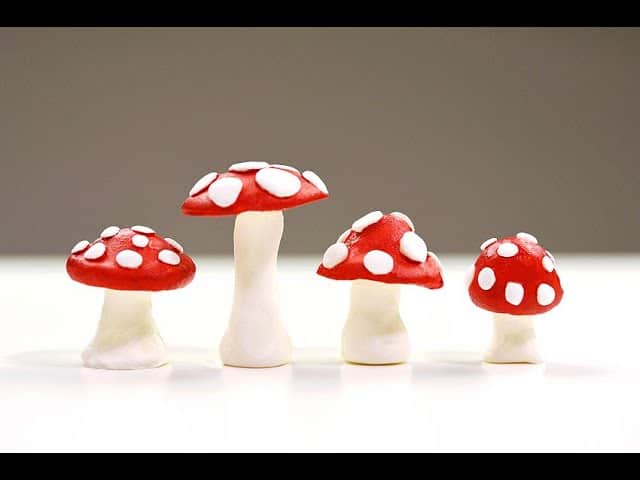
Magical Moments with Clay: Creating Enchanting Mushroom Crafts with Your Kids
Hey there, creative families! ? Are you looking for a delightful new activity to share with your little ones? Look no further than the whimsical world of clay mushrooms! Not only are these charming creations a fantastic way to spend quality time together, but they also promote fine motor skills, unleash imagination, and introduce your children to the natural world through playful art. So, roll up your sleeves and prepare for some enchanting craft time—we’re about to dive into the step-by-step guide to making your own magical clay mushrooms!
Why Choose Clay Mushrooms for Craft Time?
Clay mushrooms stand out as a perfect craft for parents and kids alike for a bundle of reasons. They’re safe, easy to make, and the end result is as cute as a button (or should we say, a mushroom cap?). Here’s why you and your little elves will love this DIY project:
- Encourages Creativity: Designing and painting clay mushrooms allows your children to express their creativity and come up with unique decoration ideas.
- Boosts Fine Motor Skills: Working with clay can enhance your child’s dexterity and coordination as they shape, mold, and add details to their creations.
- Eco-Friendly Fun: Many clays are natural and biodegradable, making this an environmentally friendly activity that’s good for the Earth.
- Teaches Patience: As clay needs to dry and sometimes bake, kids learn the valuable lesson of patience and the joy of anticipation while waiting to see their finished artwork.
The Essentials: Gathering Your Materials
Before you begin your craft, you’ll want to ensure you’ve gathered all the necessary supplies. Here’s a checklist for your upcoming clay mushroom adventure:
- Air-dry clay or oven-bake clay: Select a clay type that’s best suited to your schedule and level of convenience. Air-dry clay is great for a no-fuss project, while oven-bake clay can be a fun science lesson in polymer changes!
- Rolling pin or a smooth bottle: To roll out the clay for your mushroom caps and stems.
- Mushroom shape cutters or templates: These can be homemade or store-bought. You can use a variety of household items to create shapes if you don’t have cutters.
- Paints and brushes: After drying, it’s time to bring your mushrooms to life with some vibrant colors!
- Protective mats or newspapers: Keep your work surface clean and mess-free.
- Gloss varnish or sealant (optional): To give your finished mushrooms a shiny protective coat.
Now that you have everything ready, it’s time to start crafting! Put on your favorite aprons, and let’s make some magic!
Creating Your Clay Mushrooms: The Process
Creating your own clay mushrooms is a wonderful process that involves a few key steps. Here, we’ll break down each stage so you can follow along without any toadstool trouble!
First things first, you’ll want to prep your workspace. Lay out your protective mats or newspapers and gather your little ones around the table. Then, open up your clay and let the fun begin!
Step 1: Kneading and Rolling Your Clay
Encourage your kids to knead the clay with their hands until it’s soft and pliable. This is an excellent exercise for developing hand strength and enjoying the sensory experience. Once it’s ready, use your rolling pin or bottle to roll out a flat sheet of clay about ¼ inch thick. Remember, this doesn’t have to be perfect—the quirks add character!
Step 2: Cutting Out Shapes
Now for the magical part: cutting out your mushroom shapes. If you have cutters, press them firmly into the clay to create the outline of your mushroom caps and stems. Alternatively, you can hand-shape your pieces or use templates to cut around with a clay knife or a simple butter knife (with supervision for the little ones, of course). Gently peel away the excess clay—you can store this in an airtight container for future projects.
As you form your mushrooms, be sure to enjoy this time with your kids, discussing the different shapes and sizes mushrooms come in and how each one will have its special character. Imagine the stories these little mushrooms might tell if they could talk!
Step 3: Assembling Your Mushrooms
Now you’ll assemble the stems and caps of your mushrooms. If your clay is the adhesive type, simply press these parts together. If not, you might need a dab of water or slip (clay mixed with water) to help them stick. Smooth out any seams with your fingers or a small tool to ensure your mushroom stands proud and strong.
And voilà! You’ve formed your basic clay mushrooms, and it’s now time to let them dry according to the instructions for your specific type of clay. It might be a few hours to overnight for air-dry clay or a short bake in the oven for polymer clay. Once they’re dry and hard to the touch, your kids can paint them with all the colors of a fairy tale forest!
Stay tuned for our next steps, where we’ll guide you through the painting and sealing process to complete your charming mushroom craft. Plus, don’t miss out on our top tips for displaying your creations in a fairy garden or as part of your room decor. Crafting together is all about making memories and having a blast—so let those good times roll!

5 Things Parents Should Know Before Crafting Clay Mushrooms with Kids
1. Safety First: Non-Toxic Materials
When selecting clay for your little ones, always opt for non-toxic options. It’s crucial to check the labels to ensure that the clay is safe for use by children. Additionally, keep your crafting area well-ventilated if using oven-bake clay, as certain types can emit fumes when heated. Safety scissors, blunt knives, or plastic clay tools should be the go-to for cutting and shaping, to protect those tiny fingers.
2. Manage Expectations: Embrace Imperfections
It’s important to reassure your kids (and yourself!) that the beauty of handmade crafts lies in their imperfections. Some mushrooms might be lopsided, and others might have quirky textures—all of these features add to the charm! Boost your children’s confidence by celebrating their efforts rather than striving for ‘Pinterest-perfect’ results.
3. The Mess Factor: Prepare to Get Dirty
Clay crafting can be messy, so dress for the occasion! Have your kids wear old clothes or aprons, and set up in an area that’s easy to clean. Keep a damp cloth or some baby wipes handy to tidy up any spills as you go. Preparing for the mess can make the experience more enjoyable for everyone involved.
4. Drying Time: Plan Your Day Accordingly
Whether using air-dry or oven-bake clay, remember that there’s a waiting period involved. Use this time to discuss how drying helps to strengthen their creations, or plan another activity to keep your little sculptors occupied. Remember to factor in the drying time when planning your crafting session.
5. Beyond Crafting: Educational Opportunities
Creating clay mushrooms is not just fun; it’s educational, too. Seize the opportunity to teach your kids about different types of mushrooms, where they grow, and how they contribute to our ecosystem. You might even plan a nature walk to look at real mushrooms—making sure to explain the importance of not touching wild mushrooms for safety reasons. Incorporating an educational twist turns craft time into an immersive learning experience!
Let the Painting Begin!
Once your clay mushrooms are dry and ready for painting, set up your paints, pour a little water into cups for rinsing brushes, and lay out some paper towels for any mishaps. Acrylic paints are a great option for vibrant, long-lasting colors. Encourage your kids to experiment with mixing paints to find the perfect shades for their fantastical fungi! For tiny tots, you might consider using non-toxic pigment sticks or markers for easier handling.
Sealing the Deal: Protecting Your Creations
If you choose, you can apply a gloss varnish or sealant to protect your painted mushrooms and add a professional touch. This also makes them more durable, especially if you plan to use them as garden decor. Make sure to select a sealant that’s appropriate for the type of clay you’ve used.
Displaying Your Masterpieces
Once the final touches are complete, find the perfect spot to show off your hard work. Whether nestled among houseplants, adorning a child’s bedroom shelf, or taking center stage in a homemade fairy garden, your clay mushrooms can add a playful and personalized touch to your home decor. Also, they could become cherished keepsakes to remind you of this special time spent together!
Remember, crafting with your kids is not just about the final product—it’s about laughing, learning, and creating everlasting memories. So grab that clay and let your family’s collective creativity bloom. Who knows? The clay mushrooms you craft today may inspire a lifelong love of art and nature in your little ones. Happy crafting!
See more great Things to Do with Kids in New Zealand here. For more information see here
Disclaimer
The articles available via our website provide general information only and we strongly urge readers to exercise caution and conduct their own thorough research and fact-checking. The information presented should not be taken as absolute truth, and, to the maximum extent permitted by law, we will not be held liable for any inaccuracies or errors in the content. It is essential for individuals to independently verify and validate the information before making any decisions or taking any actions based on the articles.


