Creative Fun for Kids: Painting with Shaving Cream
Hello there, amazing parents! Are you looking to add a splash of color and a dollop of fun to your child’s playtime? You’ve come to the right place! Painting with shaving cream isn’t just super entertaining; it also helps with sensory development and unleashes creativity in your little ones. Let’s dive into this fluffy world of imagination and explore how you can transform an ordinary day into a masterpiece of memories with your kids!
Why Painting with Shaving Cream is a Must-Try Activity
Before we unveil the secrets to this magical activity, let’s understand why it’s so beneficial for children:
- Sensory Exploration: Shaving cream painting is a tactile experience that allows children to feel different textures, fostering sensory development.
- Motor Skills Development: As they mix colors and move their hands across the canvas, children refine their fine motor skills and hand-eye coordination.
- Creative Expression: There’s no right or wrong way to create with shaving cream, giving children the freedom to express themselves artistically.
- Easy and Inexpensive: No need for fancy supplies — shaving cream and food coloring are all you need to get the artistic ball rolling.
- Clean-up is a Breeze: Believe it or not, shaving cream makes for easy clean-up. It’s foam, after all, so it can double as a cleaning agent for your little artists.
What You’ll Need to Get Started
Excited yet? Here’s a quick checklist of supplies for this fluffy fun:
- A can of shaving cream (opt for unscented and sensitive skin types to minimize the risk of irritation)
- Food coloring (liquid or gel works great)
- A tray, baking sheet, or any flat surface to use as a canvas
- Tools for mixing and spreading (spatulas, spoons, or even toy cars work well)
- Paper or cardboard to print your masterpieces
Creating Your Shaving Cream Art Station
Find a spot in your home where your little artists can be free to create. Whether you choose the kitchen, patio, or bathroom, make sure the surface is flat and easy to clean. Lay out the supplies, and you’re almost ready to begin!
Step-by-Step Guide to Shaving Cream Painting
Let’s break down the process into simple steps to ensure the best experience for you and your kids.
Step 1: Prepare the Canvas
Spread a layer of shaving cream on the tray to form a smooth, flat surface. No mountain peaks or valleys — we’re aiming for a blank canvas akin to a pillowy cloud.
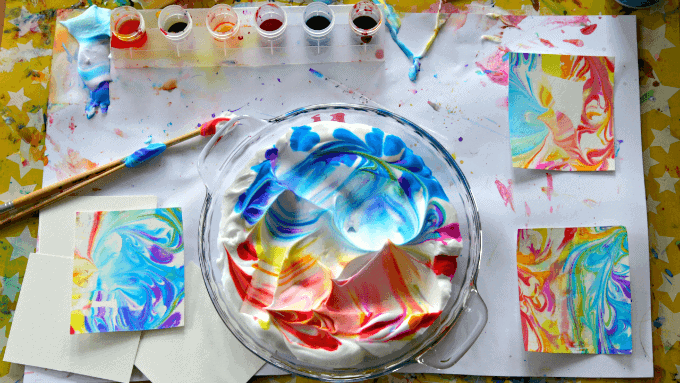
Step 2: Color Mixing Magic
It’s time for a mini-science and art lesson! Let the kids drop their favorite food coloring shades onto the shaving cream. Encourage them to experiment with color mixing: blue and yellow make green, red and blue make purple; it’s delightful learning in action! Then, take a utensil or finger to swirl the colors together, creating a marbled effect.
Step 3: Make an Impression
Place a piece of paper or cardboard on top of the shaving cream and gently press down to ensure all areas are in contact with the colorful fluff. The suspense is building — what will the revealed print look like?
Step 4: The Grand Reveal!
After a moment of anticipation, lift the paper to see the vibrant transfer of colors. Each print is as unique as the young artist crafting it, and just like snowflakes, no two are ever the same! Do not worry if it’s not perfect; it’s about the fun and exploration.
Stay tuned as we will unfold even more delightful tips and tricks to enhance your shaving cream painting adventure, along with frequently asked questions that pop up when parents embark on this joyful journey.
Get your cameras ready — not only will the art be worth capturing, but the beaming faces of your kids covered in a bit of beautiful mess certainly will be too! Happy painting!
Creative Fun for Kids: Painting with Shaving Cream
Hey there, super parents and guardians! Ready to watch your kids swirl into a world of colors and creativity? Painting with shaving cream is the ultimate fun activity that’s perfect for developing sensory skills, motor skills, and an eye for art. Trust me, your budding Picassos are going to love this!
Things Parents Should Know Before Diving In
Before we get our hands (literally) into this shaving cream painting guide, here are five essential things you should keep in mind:
1. Safety First!
Make sure the shaving cream you choose is safe for your child’s skin. Go for hypoallergenic options if you can. Always supervise your little ones during the activity to prevent any cream from wandering into little mouths or eyes.
2. Dress for Mess
Chances are your kids (and maybe you!) will get a bit messy during this creative process. Have them wear old clothes or an apron and cover your workspace with newspapers or a tablecloth to protect surfaces from the colorful chaos.
3. Choose the Right Space
Work in an area that’s easy to clean – like a tiled floor or a plastic mat. Bathrooms and kitchens are great choices, as you can rinse off any excess mess quickly.
4. Embrace Imperfections
Every piece your child creates is perfect in its own way. Encourage them to enjoy the experience rather than striving for a “perfect” art piece. This is about expression, not precision.
5. Color Control
Limit the number of colors at the start to avoid ending up with a uniformly brown or grey mix. Teach them to appreciate the beauty of distinct swirls and patterns that result from just a few colors combining.
Now that you’re armed with these top tips, let’s set up our art station and dive into the fluffy, cloud-like world of shaving cream art – where each print tells a different story, and every story is a little sticky, a little messy, but a whole load of fun!
Choosing and Using Supplies Wisely
Alright, let’s make sure you have everything you need:
- Trusty Shaving Cream: Go for the barbershop classic—smooth, foamy and unscented.
- Vivid Food Coloring: Liquid or gel, bright colors work best. Have a variety to keep things interesting.
- The “Canvas”: A tray or a baking sheet will hold your cream “paint.” If it’s flat and washable, you’re good to go!
- Sculpting Tools: Think outside the box – cookie cutters, combs, forks – they all make for unique designs.
- Capture the Creation: Cardstock or thick paper will embrace and showcase your child’s wonderful whimsy.
The Shaving Cream Painting Process:
Let’s march through these kid-friendly steps together:
Step 1: Set the Scene
Prep your “canvas” with a luscious layer of shaving cream. Think of it as the foundation of your child’s frothy creation. Smooth it out – no need for fancy artist’s tools, a simple piece of cardboard will do!
Step 2: Dropping in Some Drama
Now, watch as your kiddo’s eyes widen with wonder when you let them drip and drop food coloring across the cream. Reds, blues, greens, and yellows – it’s a raindrop dance party!
Step 3: Swirling into a Swish!
Let them take a toothpick, popsicle stick, or even their little fingers to swirl the colors into majestic designs. Encourage gentle motions – think wafting butterflies, not buzzing bees!
Step 4: The Magic Transfer
Press the paper down gently, capture the creamy chaos, and peel back to reveal a print that’s as beautiful and unique as a snowflake in a winter wonderland!
Next up, your FAQs answered and some top-notch tips to make shaving cream painting a beloved repeat activity in your household. Keep your smiles wide and your cameras at the ready, because these moments are the ones that paint our memories the most vibrant of hues. Let’s get painting, friends!
See more great Things to Do with Kids in New Zealand here. For more information see here
Disclaimer
The articles available via our website provide general information only and we strongly urge readers to exercise caution and conduct their own thorough research and fact-checking. The information presented should not be taken as absolute truth, and, to the maximum extent permitted by law, we will not be held liable for any inaccuracies or errors in the content. It is essential for individuals to independently verify and validate the information before making any decisions or taking any actions based on the articles.