How to Draw the Easter Bunny: A Step-by-Step Guide for Creative Parents
Hop into the spirit of Easter with your little ones as we delve into the delightful world of Easter Bunny drawings! Whether you’re a parent looking to engage in a fun and festive activity or a guardian eager to encourage creativity, this guide is the perfect start — don’t worry about your artistic skills! We’ll cover every hop… I mean, step of the way. ?
Gathering Your Supplies
Before we start our artistic adventure, let’s make sure that we have all the necessary supplies on hand. Here’s what you’ll need:
- Paper (preferably thicker stock for durability)
- Pencils (HB or 2B are great for initial sketches)
- An eraser (for those little oops moments)
- Colored pencils, markers, or crayons (for bringing your bunny to life)
- A comfortable and well-lit space to draw in
Gather your little artists and let the creativity flow!
Step-by-Step Drawing Guide
Now that we have our supplies ready, let’s hop into the drawing process. Don’t worry about perfection — the uniqueness of your Easter Bunny adds to its charm.
Step 1: Basic Shapes
Begin with simple shapes to form the foundation of your bunny. Sketch a circle for the head and an elongated oval for the body, slightly overlapping at one side.
Step 2: Ears and Facial Features
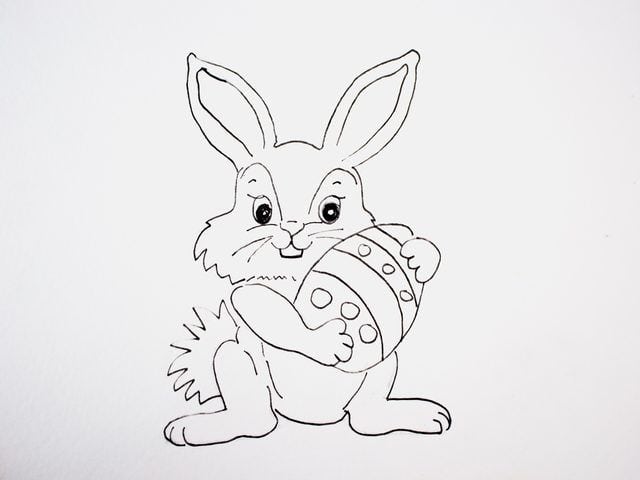
Add two long ovals on top of the head for the ears — one standing up straight, and another with a slight bend (for that adorable floppy look). For the face, draw two smaller circles for the eyes, a triangle for the nose, and a line with three whiskers on each side.
Step 3: Paws and Tail
On either side of the body, sketch two ovals for the paws, one slightly overlapping the body on each side. Don’t forget the fluffy tail! Add a small, round puff at the back.
Step 4: Fine Details
Go back to the ears and add curved lines inside to represent the inner ear. Outline the eyes and nose, and add a tiny mouth. Give your bunny’s paws some character by adding small lines for the fingers.
Step 5: Bringing Your Bunny to Life
Now that your sketch is complete, it’s time to erase any unnecessary lines and start adding colors! Feel free to get creative with your color choices — pastels are always a hit for Easter-themed drawings.
Adding the Final Touches
With your Easter Bunny drawn and colored in, add some festive details to complete your masterpiece. Perhaps your bunny is holding a decorated egg, sitting in a field of grass with some flowers, or simply has a cute bowtie or ribbon. Let your imagination and the spirit of Easter guide you!

Five Things Parents Should Know in Preparing for Easter Bunny Drawings
The fun of drawing an Easter Bunny with your kids is not just in the final product, but in the joy of preparing and spending quality time together. To make sure the experience is more giggle than wriggle, keep these five tips in mind:
1. Patience is Key
Remember that children can be easily distracted or might not follow instructions as you expect. Embrace this and enjoy the process, even if it leads to unconventional bunny creations.
2. Quality Time Over Perfection
It’s not about drawing the perfect bunny; it’s about engaging with your child and nurturing their creativity. Be present, encourage them, and most importantly, have fun together!
3. Embrace the Mess
Art can be messy, especially with enthusiastic little ones. Cover your workspace with newspapers or a plastic sheet, wear old clothes, and prepare for a little cleanup afterward.
4. Adapt to Each Child’s Pace
Every child is different. Some might pick up a pencil and start right away, while others need more guidance. Take cues from your child and adapt the drawing session accordingly.
5. Preparation is Everything
Gather all supplies beforehand to avoid having to hunt for an eraser mid-bunny ear. Having everything at hand will help you keep focus on the joy of drawing rather than logistics.
Now that you’re armed with these helpful hints, the journey to creating adorable Easter Bunny drawings is all set to be smooth sailing — or should we say, smooth hopping? Let’s dive in!
How to Draw the Easter Bunny: A Step-by-Step Guide for Creative Parents
Hop into the spirit of Easter with your little ones as we delve into the delightful world of Easter Bunny drawings! Whether you’re a parent looking to engage in a fun and festive activity or a guardian eager to encourage creativity, this guide is the perfect start. Don’t worry about your artistic skills; we’ll cover every hop… I mean, step, along the way. ?
Gathering Your Supplies
Before we embark on our artistic adventure, let’s ensure we have all the necessary supplies at the ready. Here’s a quick checklist:
- Thicker stock paper for durability
- 2B pencils for initial sketches
- An eraser for corrections
- Colored pencils or markers for coloring
- A well-lit space for comfortable drawing
Gather your little artists around and let the creativity begin!
Step-by-Step Drawing Guide
Supplies are ready? Let’s hop to it! Remember, the uniqueness of your Easter Bunny is what makes it special.
Step 1: Start with Basic Shapes
Every great drawing begins with simple shapes. Start with a circle for the head and an overlapping oval for the body.
Step 2: Ears and Face
Add the iconic bunny ears with two long ovals. Sketch in the face with circles for the eyes, a triangle nose, and a whisker-lined smile.
Step 3: Paws and Fluffy Tail
Overlay ovals on the sides for paws and don’t skip the adorable round tail at the back.
Step 4: Add Those Details
Detail the ears with inner lines, define the eyes and nose, and draw in the mouth and paws.
Step 5: Color Your Creation
Erase any guide lines and bring your bunny to vibrant life with colors. Pastel shades add a charming Easter touch.
Final Touches to Your Easter Bunny
Now, let’s make your Easter Bunny one-of-a-kind. Accessories like an Easter egg, a sprinkling of flowers, or a snazzy bowtie will add the final flourish to your drawing. Let your and your child’s imagination bloom!
See more great Things to Do with Kids in New Zealand here. For more information see here
Disclaimer
The articles available via our website provide general information only and we strongly urge readers to exercise caution and conduct their own thorough research and fact-checking. The information presented should not be taken as absolute truth, and, to the maximum extent permitted by law, we will not be held liable for any inaccuracies or errors in the content. It is essential for individuals to independently verify and validate the information before making any decisions or taking any actions based on the articles.


