
Ultimate Guide to Slime Ingredients for Parents: Safe & Fun Play!
Hello, wonderful parents! Are you ready to embark on a gooey adventure that’s sure to bring giggles and squeals of delight from your kids? That’s right—we’re talking about making slime! Before you dive into this squishy, stretchy world, it’s important to know what goes into making the perfect batch of slime. So, let’s get our hands (a little) sticky with this comprehensive guide on slime ingredients!
Why Slime, You Ask?
Slime isn’t just a toy—it’s a sensory experience that promotes creativity, fine motor skills, and even science education! Plus, it’s a great bonding activity that you can do with your kids at home. But with the vast array of recipes and tutorials out there, how do you ensure you’re picking the right ingredients for safe and fun slime? Fret not, dear parent, for we’ve got you covered!
Basic Slime Ingredients
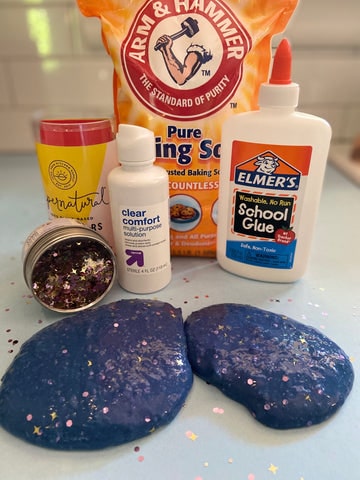
The foundation of any good slime recipe begins with a few basic ingredients. Here’s what you’ll typically need:
- PVA Glue – This is your slime’s backbone. Polyvinyl acetate glue, commonly known as school glue, gives slime its classic gooey texture.
- Borax Solution – A bit of borax mixed with water creates a chemical reaction with the PVA glue, turning your gluey mixture into slime. More on safety in a bit!
- Water – Good old H2O is essential for getting the consistency right. It also helps to activate the slime.
- Coloring Agent – Food coloring, paint, or even natural dyes give your slime that vibrant pop of color.
But don’t forget! While these are the basics, there’s a whole world of additives and variations to explore. Let your kiddo’s imaginations lead the way—whether that means adding glitter, foam beads, or even scents to their custom slime!
Let’s Talk Safety
We adore that sparkle in their eyes when they create something new, but safety is paramount. When dealing with materials like borax, it’s critical to supervise closely and follow recommended quantities. For those concerned about potential skin sensitivities or other safety issues, we’ll delve into alternative activators and how to choose non-toxic components for peace of mind!
Borax Alternatives
Feeling a bit wary of borax? No worries! Here are some parent-approved alternatives:
- Contact Lens Solution – Yep, you read that right. It contains boric acid and sodium borate, which can act similarly to borax when mixed with glue.
- Baking Soda and Saline Solution – These household items can also work wonders in slime-making, ensuring a safer play environment for everyone.
Throughout this guide, we’ll provide step-by-step instructions to ensure your slime adventure is not only full of joy but also perfectly safe for your little ones. From troubleshooting common slime-making issues to inspiring your slime recipes, we’re here to make this experience both delightful and secure.
Ready, Set, Slime!
Armed with the basics and safety tips, it’s time to roll up your sleeves and prepare for some good, clean fun—or should we say good, gooey fun? In the following sections, we’ll go over more detailed recipes, including measurements and variations for every type of slime imaginable, from classic goo to eco-friendly options. Get ready for an oozing good time!
Stay tuned as we share our favorite slime recipes and the secrets to creating the ultimate slime experience for you and your kids. Join us as we navigate through the sticky, exciting world of slime-making, ensuring that each squish, stretch, and squeeze is packed with laughter and learning.
Five Things Parents Should Know Before Preparing Slime Ingredients
1. Understanding the Science of Slime
It’s not just about mixing and mushing! Slime is the product of a chemical reaction. Knowing this can help you troubleshoot if things don’t go as planned. It’s a polymer, which means it flows like a liquid but also has properties of a solid. It’s a fantastic way to introduce basic chemistry to your kids!
2. Pre-Measure Your Ingredients
Preparation is key! For a stress-free slime-making session, measure out all your ingredients beforehand. This will prevent any fumbling mid-process and reduce the risk of incorrect proportions, which could lead to a slime fail. Having everything measured makes it easier for kids to take part in the process too.
3. Choose the Right Glue
All PVA glues are not created equal. Some may contain additives that aren’t conducive to making slime. Look for white school glue that’s labeled as PVA; these tend to work best for slime recipes. Clear glue can also be used for a different, transparent effect!
4. Slime Activator Ratios
Whether you’re using borax, contact lens solution, or baking soda and saline, the ratio of activator to glue is crucial. Too much activator and your slime will be hard and rubbery. Too little, and it’ll be too sticky. Start with less, as you can always add more if needed—finding that balance is part of the fun!
5. Protecting Surfaces and Clothing
Let’s face it, slime can get a little messy. Protect your surfaces with plastic covers or baking mats, and have your kiddos wear aprons or old clothes they don’t mind getting a bit messy. This way, you’ll have less to worry about, and can focus on the creative joy of slime-making.
Step-by-Step Slime Making Guide!
Classic Slime Recipe
- 1/2 cup of PVA White School Glue
- 1/2 cup of Water (to dilute the glue)
- Food Coloring (optional, as desired)
- 1/4 teaspoon Borax Solution (dissolve 1 teaspoon of borax powder in 1 cup of warm water)
- In a bowl, mix the glue with the water until well combined. Add a few drops of food coloring if you’re using it.
- Slowly add the borax solution, stirring continuously. Keep adding and stirring until the slime begins to form and pull away from the sides of the bowl.
- Knead the slime with your hands until it reaches the desired consistency.
- If the slime is too sticky, add a tiny bit more activator. If it’s too rubbery, add a bit more water. Knead well after each adjustment.
Experiment and have fun! Remember to store your slime in an airtight container to keep it fresh for as long as possible.
Slime-making is a fantastic way to blend playtime with learning, and with this guide, you’ll be well-equipped to dive into the wonderful, wobbly world of slime with your kids. Keep these tips and recipes handy, and you’ll be on your way to becoming a master slime-ologist in no time!
See more great Things to Do with Kids in New Zealand here. For more information see here
Disclaimer
The articles available via our website provide general information only and we strongly urge readers to exercise caution and conduct their own thorough research and fact-checking. The information presented should not be taken as absolute truth, and, to the maximum extent permitted by law, we will not be held liable for any inaccuracies or errors in the content. It is essential for individuals to independently verify and validate the information before making any decisions or taking any actions based on the articles.


