
Discover the Exciting World of DIY Popsicle Stick Catapults!
Hey there, awesome parents! Are you on the hunt for a super fun and educational activity that will not only keep your little ones engaged but also teach them a thing or two about physics? Look no further! Let’s dive into the whimsical world of popsicle stick catapults—a delightful project that strikes the perfect balance between learning and playtime. Ready, set, launch!
Why Popsicle Stick Catapults?
Before we start crafting, let’s explore why making a catapult out of popsicle sticks is an absolute hit with kids (and adults, too!). It’s not just about flinging objects across the room—though we admit, that is incredibly fun. Catapults teach kids about simple machines, energy transfer, and projectile motion, laying the groundwork for a love of science and engineering. Plus, there’s nothing quite like the sense of accomplishment that comes from building something with your own hands.
Gathering Your Supplies
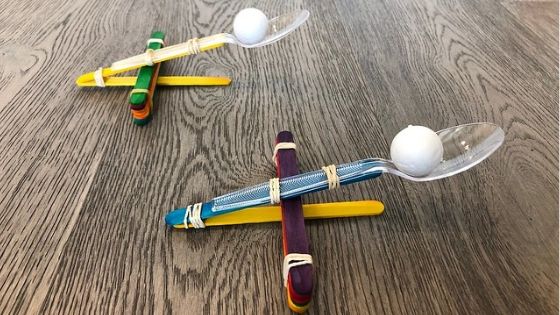
One of the best parts about this project is that it requires minimal and inexpensive materials, most of which you can find around the house. Here’s what you’ll need to create your very own popsicle stick catapult:
- A pack of popsicle sticks (around 10-15 sticks should do it!)
- Rubber bands (a variety for different tension strengths is helpful)
- A plastic spoon or a bottle cap (this will be the launching pad)
- A safe projectile (mini-marshmallows or pompoms are perfect for indoor launching)
Now that you’ve got your materials ready, let’s move on to the nitty-gritty of building your catapult!
Step-by-Step Guide to Making Your Catapult
Building a popsicle stick catapult is a fantastic way to introduce kids to basic engineering concepts. To ensure everyone has a blast while staying safe, follow these simple steps:
Constructing the Base
- Take 8 popsicle sticks and stack them one on top of the other. Secure both ends with rubber bands to form your base.
- Create a second stack with 2 popsicle sticks and secure only one end with a rubber band, creating a “V” shape with the non-bound ends.
Assembling the Launch Arm
- Attach your plastic spoon or bottle cap to one popsicle stick using rubber bands. This will become your launch arm.
- Slide the launch arm between the two popsicle sticks in the “V” shape you made earlier. The spoon should be on the outer side, facing away from the “V”.
Joining the Pieces
- Use several rubber bands to tightly bind the end of the launch arm to the top of the V-shaped stack. The spoon should be sticking out at a slight angle.
- Place the V-shaped stack on top of your base stack so that the bound end of the V is at the edge of the base and the spoon end is extended out. Secure the V-shaped stack onto the base with more rubber bands.
Ready for Launch
- Test your catapult by placing your projectile of choice into the spoon or bottle cap. Press down on the launch arm, aim, and let go! Now you’re a bonafide engineer!
Congratulations! You’ve just built a functional popsicle stick catapult. But wait, there’s more fun to be had. Keep reading to learn about the science behind catapults and how you can turn this activity into a full-fledged learning experience!
Remember, the key to a successful catapult launch lies in the tension of your rubber bands and the angle of your launch arm. Feel free to experiment with different configurations to see how they affect the trajectory and distance of your projectiles. This trial-and-error process is an excellent way for your kids to learn about hypothesis testing and iteration, setting a fundamental base for scientific thinking.
Now that you have your very own popsicle stick catapult, there are endless possibilities for games and experiments. From accuracy challenges to distance competitions, your newfound creation is a gateway to hours of entertainment and hands-on learning. Stay tuned for more tips on how to maximize the fun with your catapult, including game ideas, learning extensions, and ways to modify your design for even better performance. And always remember to have a fantastic time bonding with your kids while tinkering and learning together. Happy launching!
5 Essential Tips for Parents Preparing for Popsicle Stick Catapult Fun
As you gear up to build a popsicle stick catapult, it’s important to prepare for a smooth and enjoyable experience. Here are five tips to keep in mind:
1. Embrace the Mess
Projects involving glue, rubber bands, and flying objects can get a little chaotic. Choose a workspace that’s easy to clean and where a little mess won’t cause stress. Covering the table with newspaper or a disposable tablecloth can make for easy cleanup later.
2. Safety First
Even though we’re working with basic materials, it’s important to prioritize safety, especially with projects that involve launching objects. Ensure that the materials used are non-toxic and supervise the activity to ensure everyone understands safe catapult operation. No aiming at people or animals!
3. Customize the Experience
Consider the age and abilities of your children. You might need to simplify the design for younger kids by using fewer popsicle sticks or by preparing some parts in advance. For older children, challenge them by adding more complexity to the catapult’s design or turning it into a science experiment tracking distance and angles.
4. Stock Up on Supplies
You may want additional supplies on hand in case of breaks, tweaks, or if creativity strikes and you want to build multiple catapults. More rubber bands, popsicle sticks, and projectiles ensure the fun doesn’t have to pause for a supply run.
5. Patience is Key
Remember, the goal is to have fun and learn together. If the catapult doesn’t work on the first try, encourage your kids to think about what could be improved. Iteration is a big part of the engineering process and a valuable lesson in resilience and problem-solving.
By keeping these five tips in mind, you’re setting the stage for an awesome catapult-building adventure. Imagine the excitement of seeing your children’s eyes light up when they successfully launch their first projectile. You’re not just building a catapult; you’re building memories, fostering curiosity, and igniting a passion for learning!
Note: Follow the remaining steps and continually engage with your children about what they think is happening with each launch. Ask them questions to provoke thought: “Why do you think it flew farther this time?” or “What do you think will happen if we add another rubber band?” Giving them the chance to hypothesize and test their ideas deepens their understanding and enjoyment of the project.
Building a popsicle stick catapult is more than just a playful activity; it’s a doorway to discovery. Use this guide as a springboard for launching your kids into the fascinating world of physics and engineering, and watch as they soar to new heights of creativity and innovation. With a bit of preparation and these step-by-step instructions, you’re all set to build, learn, and laugh together. Load up your catapults and get ready for an experience that will catapult your family fun to the next level!
See more great Things to Do with Kids in New Zealand here. For more information see here
Disclaimer
The articles available via our website provide general information only and we strongly urge readers to exercise caution and conduct their own thorough research and fact-checking. The information presented should not be taken as absolute truth, and, to the maximum extent permitted by law, we will not be held liable for any inaccuracies or errors in the content. It is essential for individuals to independently verify and validate the information before making any decisions or taking any actions based on the articles.


