
Bring Magic to Your Home with a Charming Box Window Seat!
Welcome, wonderful parents! Are you looking for a way to transform that sunny nook in your home into a cozy, magical spot for your family to enjoy? ? Look no further than the charming box window seat! Not only does it provide a snug place for reading, daydreaming, and bonding, but it can also add extra storage space and increase the overall appeal of your room. Let’s embark on this exciting journey to create a delightful retreat right in the comfort of your own home!
What is a Box Window Seat?
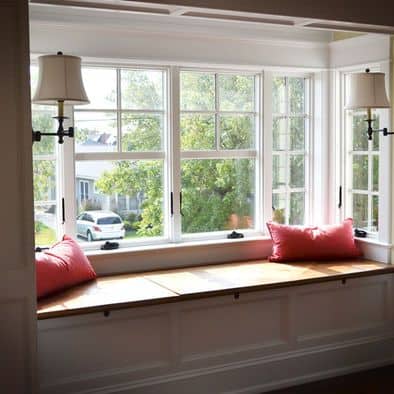
A box window seat is an adorable piece of built-in furniture that sits right under a window, usually consisting of a bench with storage beneath. It’s the perfect perch for enjoying the view outside, curling up with a good book, or simply relaxing with a cup of tea. It’s no wonder that this nifty addition is gaining popularity among families looking to enhance their living spaces!
Step-by-Step Guide to Making Your Box Window Seat Dream Come True
Creating a box window seat doesn’t have to be a daunting task. With this step-by-step guide, you can confidently tackle this family-friendly project and enjoy the fruits of your labor for years to come. Here’s how to get started:
Dream Up Your Design
First things first, let your imagination soar and conjure up the box window seat of your dreams! ? Will it feature a classic look with crisp white cushions and simple lines? Or perhaps a whimsical theme with vibrant colors and playful patterns? The design possibilities are endless and can range from modern to rustic, depending on your preferred style.
Measure Twice, Cut Once
Before you dive in, arm yourself with a trusty tape measure and carefully assess the window area. You’ll want to note the dimensions accurately to ensure your finished product fits like a glove. It’s crucial to measure the width, depth, and height of the space where your box window seat will live. Remember, an inch can make a world of difference, so measure meticulously!
Choose Your Materials Wisely
Selecting the right materials is a game-changer when it comes to building a sturdy and beautiful box window seat. Look for high-quality wood such as plywood or MDF (medium-density fiberboard) to serve as the base of your project. For the seating cushion, opt for dense foam that will remain comfortable and hold its shape over time. And for that cozy touch, find a delightful fabric to cover the cushion, one that complements your home’s decor and can withstand the energy of your little ones.
Gather Your Tools and Supplies
Every crafting adventure requires the right tools. For this DIY project, you’ll likely need a saw, drill, screws, brackets, wood glue, and a staple gun. Additionally, gather supplies like sandpaper, paint or varnish, and your chosen fabric and foam for the cushion. It’s a great idea to create a checklist so you can tick off each item as you procure it, ensuring you’re ready for the assembly phase!
Congratulations, you’re all set up for success! In this next section, we will delve into the nuts and bolts of constructing your box window seat, discussing how to assemble it, create the perfect cushion, and add those finishing touches that make all the difference.
So, stick around as we continue crafting the ideal box window seat – a warm and welcoming space where your family can create countless cherished memories. ???
Five Things Parents Should Know in Preparing for a Box Window Seat
- Safety First: When designing your box window seat, consider the safety of your little ones. Ensure that the seat is structurally sound and that there are no sharp edges or corners. If the seat is high, think about adding a sturdy rail or cushioned barriers to prevent falls. Safety hinges on the lid of the storage compartment can prevent little fingers from getting pinched.
- Functionality Meets Fun: A box window seat can be more than just a seat; it’s a potential hub for storage! Plan for built-in drawers or a lift-up bench top to stow away toys, books, or seasonal clothing. This helps maintain a clutter-free space and teaches kids the importance of organization.
- Light and Ventilation: Pay attention to the placement of your window seat. Ideally, it should capitalize on natural light, which is perfect for reading or playing. However, ensure that the seat does not obstruct any ventilation sources or heating units, and consider the type of window treatments that will complement the seat and your family’s needs for privacy and light control.
- Durable and Washable Materials: Kids will be kids, meaning spills and stains are inevitable. Choosing durable, easy-to-clean materials for your seat cushion and any upholstered elements can save you lots of headaches. Removable covers are a bonus, as they can easily be thrown into the wash.
- Incorporate Personal Touches: Involve your children in the process of creating the window seat. Let them pick out fabrics or decide on the paint color. You could even include a special nameplate or hand-painted designs to give the window seat a personal touch that reflects your family’s unique style and personality.
Assembling Your Box Window Seat
With your materials, tools, and a well-thought-out plan in place, it’s time to start assembling your box window seat. Begin by constructing the frame according to your measurements. Use your saw to cut your wood to size and then piece together the base frame with the help of screws and wood glue for added stability.
Once your frame is assembled, attach it securely to the wall using brackets. This adds an essential layer of safety, ensuring that the bench won’t tip over. After the base is secure, you can add dividers if you’ve opted for separate storage compartments. Next, cut the lid or seat part of the bench and attach it with safety hinges.
Sanding and Finishing
Before adding cushions and pillows, give your bench a good sanding to smooth out any rough spots. Then choose either paint or varnish, depending on your desired look. Apply your finish liberally, making sure to protect the floors and surrounding areas from drips or spills. Allow ample drying time for the best results.
Creating the Perfect Cushion
Now for the fun part – making it cushy and comfy! If you’re not comfortable cutting the foam yourself, many fabric stores can cut it to size for you. Wrap the foam in your selected fabric and secure it with a staple gun, or sew a cover with a zipper for easy removal.
Adding the Finishing Touches
Your box window seat is almost ready! Accessorize with an array of soft pillows, a cozy blanket, and perhaps some cute baskets or bins for the storage compartments. These elements not only add to the comfort but also to the seat’s visual appeal.
Lastly, take a step back and admire your work. You’ve just created a beautiful and practical addition to your home that will provide a special place for your family to gather, grow, and create memories. With each cushion pat, book read, or game played on this window seat, you’ll appreciate the effort and love that went into making it.
Remember, the most important aspect of this project is that it’s not just about creating a piece of furniture, but crafting a little nook of happiness for your home. Enjoy every moment shared on this new, cozy corner. ??
Now that you’re equipped with the knowledge and steps to make a box window seat, it’s your turn to bring to life this heartwarming piece of home comfort. The delightful moments that will unfold upon it are just waiting to happen. Happy building!
See more great Things to Do with Kids in New Zealand here. For more information see here
Disclaimer
The articles available via our website provide general information only and we strongly urge readers to exercise caution and conduct their own thorough research and fact-checking. The information presented should not be taken as absolute truth, and, to the maximum extent permitted by law, we will not be held liable for any inaccuracies or errors in the content. It is essential for individuals to independently verify and validate the information before making any decisions or taking any actions based on the articles.


