
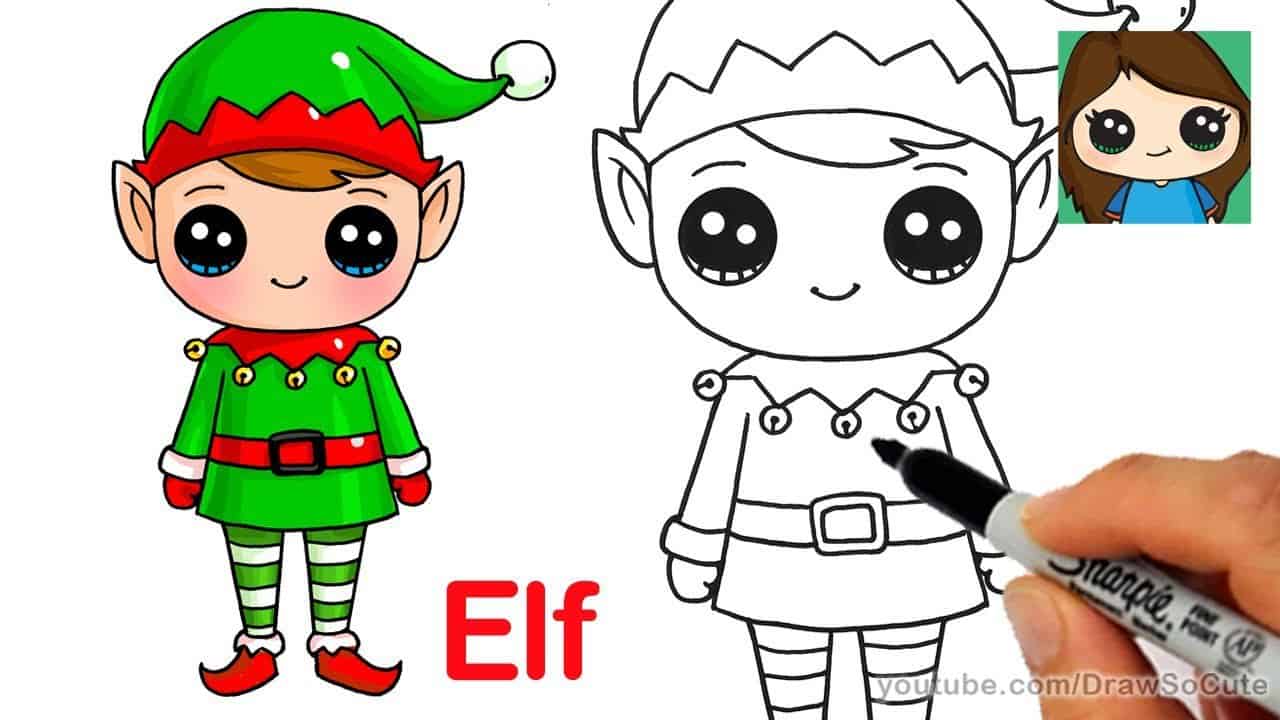
Drawing of Elf: A Magical Guide for Parents and Kids
Hello, enchanting parents and creative kids! Have you ever wanted to add a touch of magic to your family art projects? Well, grab your pencils and crayons because we’re about to embark on a delightful journey into the world of elf drawing! Elves are not just for the festive season; they’re fantastic friends who can sprinkle a little enchantment and creativity into our lives all year round.
Why Drawing with Your Kiddos is Pure Magic
Drawing with your children isn’t just a wonderful way to bond—it’s also a fantastic avenue to help them develop fine motor skills, boost confidence, and ignite their imagination. Plus, who doesn’t love the whimsy of elves with their pointy ears and mystical charm? So, let’s dive into the elfin kingdom and explore how you and your little artists can create your very own elf drawings!
Understanding the Elf Concept
Before we start sketching, let’s get acquainted with what makes an elf an elf. It’s more than just the pointy ears—elves come with a rich history in folklore and fantasy, which can inspire our drawings. Elves can be mischievous or kind, nature guardians, or skilled archers. Their appearance and attire often reflect their magical roles. Together, we can decide what kind of elf you will bring to life on paper.
Getting Started with Basic Shapes
Like any good story, our drawing starts with the basics. We’ll begin our elf sketches by learning to create simple shapes that form the foundation for our character. Whether you’re a seasoned pro or a first-time illustrator, this method ensures that you and your mini-artist can easily start your elf-inspired art project.
The Significance of Proportions in Elf Drawing
Creating an elf that looks just right requires understanding proportions. You don’t want an elf with one ear bigger than the head, right? We’ll guide you step-by-step through drawing an elf’s face and body so that each part is in harmonious proportion to the others. This makes your elf drawing believable and full of character!
The Artist’s Toolkit: Supplies You’ll Need
- Pencil: The backbone of all great drawings starts with the right pencil. A standard HB pencil is perfect for creating light outlines that can be easily corrected or darkened later.
- Eraser: Mistakes are just part of the process! A good eraser helps clean up those happy accidents.
- Colored Pencils/Crayons: Elves are vibrant beings, and your drawings should be too! Have various colors at the ready for when the time comes to breathe life and magic into your artwork.
- Paper: A stack of standard drawing paper or even a dedicated sketchbook will be your blank canvas for creative exploration.
Tips for a Fun Drawing Session
To ensure an enjoyable drawing experience for you and your child, consider these quick tips:
- Set up a comfortable and well-lit workspace.
- Position yourselves so you can easily see each other’s work and share the fun.
- Keep your drawing session light and playful – it’s about the journey, not just the final drawing.
- Encourage your child to express their ideas and give their elf a unique personality.
Together, let’s turn this elf drawing adventure into pure joy and creative expression. Ready to start sketching? Fantastic! In our next section, we’ll walk through the step-by-step process to create a charming and whimsical elf drawing that your family will treasure. Remember, there’s no right or wrong in art – just endless possibilities and fun. Let the magic begin!
5 Things Parents Should Know Before Drawing an Elf
As we prepare to venture into the fantastical world of elf drawing, here are five essential tips to make sure your art adventure is as magical as can be:
- Patience is Key: Art is a process, and sometimes it might take a few tries to get it just right. Be patient with your child and yourself as you learn and grow together in your artistic abilities. Remember, the goal is to have fun and share a creative experience.
- Embrace Individuality: Encourage your child to let their imagination run wild. Their elf doesn’t have to look like anyone else’s. This is a great opportunity to explore their individual creativity and make an elf that is uniquely theirs.
- Exploring Themes: Elves are associated with a variety of themes and stories, from Christmas to fantasy tales. Introduce your child to different elfin lore to inspire their drawing. This can also be educational, exposing them to various cultures and literary traditions.
- Interactive Learning: Use elf drawing as a way to teach your child about artistic concepts such as color theory, shading, and texture. This hands-on experience is not only enjoyable but also serves as a valuable learning tool.
- Mess is Part of the Process: Prepare for a little bit of mess. Keep wipes or a cloth handy for any spills or smudges, and place a protective covering over your workspace if needed. It’s all part of the creative process!
Step-by-Step Elf Drawing Guide
Now, are you both ready with your artist’s toolkit? Let’s start with our step-by-step guide that will help you and your child draw an enchanting elf from the first stroke to the final touch of color.
Step 1: Sketching the Outline
Begin by guiding your child in drawing a simple oval shape for the elf’s head. Discuss proportions and gently assist them in sketching a balanced figure. Once you have the head, add a smaller oval for the body and two elongated shapes for the legs. This rough outline will serve as the base of your elf.
Step 2: Adding Details
With the outline in place, it’s time to add characteristic elfin features—those iconic pointed ears, a jovial face with bright eyes, and a friendly smile. Help your child understand where to position these features on the face for a lively expression.
Step 3: Crafting the Attire
Decide together what type of elf you’re creating. Is it a woodland elf wearing leaves and flowers, or perhaps a toy-making elf with a belt full of tools? Sketch out clothing and accessories that tell your elf’s story.
Step 4: Refining and Erasing Unwanted Lines
Use your eraser to clean up any unnecessary lines from your initial sketches. Teach your child the importance of refinement and how artists often go through several drafts before completing their masterpiece.
Step 5: Adding Color and Texture
It’s color time! Let your child’s imagination soar as they choose colors for their elf’s outfit, hair, and surroundings. Experiment with texture by showing them different strokes and shading techniques with colored pencils or crayons.
Encouraging Creativity and Storytelling
Once you both have finished drawing your elves, ask your child to give their elf a name and a backstory. This is a delightful way to encourage storytelling and creative writing skills.
This comprehensive guide should help you navigate your drawing journey with ease and joy. Drawing an elf together can become a treasured tradition, creating not just art, but memories that last a lifetime. Now, take this guide, spread out your drawing supplies, and let the creativity unfold! Happy drawing!
See more great Things to Do with Kids in New Zealand here. For more information see here
Disclaimer
The articles available via our website provide general information only and we strongly urge readers to exercise caution and conduct their own thorough research and fact-checking. The information presented should not be taken as absolute truth, and, to the maximum extent permitted by law, we will not be held liable for any inaccuracies or errors in the content. It is essential for individuals to independently verify and validate the information before making any decisions or taking any actions based on the articles.

