
Crafting Magic at Home: The Paper Plate Dream Catcher Guide for Parents
Hey there, awesome parents! If you’re looking for a delightful and creative activity to share with your kiddos, you’ve just stumbled upon a little goldmine. ? Today, we are diving into the whimsical world of paper plate dream catchers. These enchanting creations are not only a blast to make but also sprinkle a touch of magic and culture into your family’s craft time. So, let’s get those scissors and glue ready, and together, we’ll weave some colorful dreams!
What Is a Dream Catcher?
Before we get our hands all crafty, let’s talk about what a dream catcher is. Originating from Native American culture, dream catchers are believed to protect individuals from bad dreams and negative thoughts while they sleep. Traditionally, they consist of a handmade willow hoop, on which is woven a net or web, and are often decorated with sacred items such as feathers and beads.
Now, we’re going to adapt this beautiful concept using paper plates, which are easy for little hands to handle and incredibly versatile. It’s not just an art project; it’s also a remarkable way to discuss different cultures and the stories behind shared traditions. ?
Gather Your Supplies
Gearing up for any craft project is half the fun! Here’s what you’ll need to make your paper plate dream catcher:
- Sturdy paper plates
- Colorful yarn or string
- Pony beads in various colors
- Feathers for decoration
- Scissors
- Hole punch
- Markers, paint, or crayons for decorating
One of the joys of this project is how customizable it is. There are no limits to the colors and decorations you can use, so allow your kids to get creative and personalize their dream catchers with their favorite hues and embellishments.
Step by Step: Creating Your Paper Plate Dream Catcher
Now, let’s journey through the steps to create your perfect paper plate dream catcher:
Step 1: Prepare Your Plate
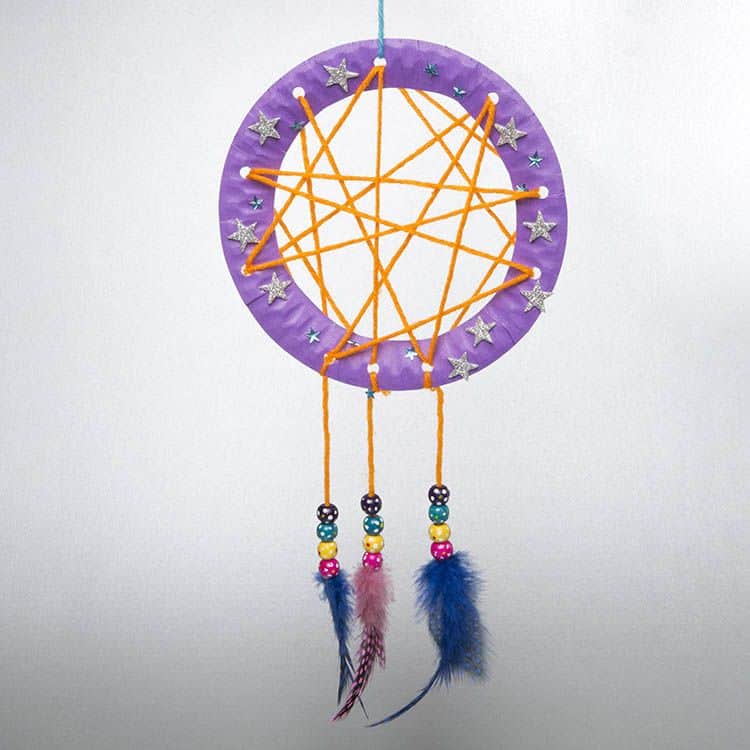
Start by cutting out the center of the paper plate to create a ring. This can be a little tricky, so it’s something you might want to do for younger children—or at least get it started for them. This ring will become the frame for your web, just like the willow hoops of traditional dream catchers.
Step 2: Weaving the Dream Web
Next, it’s time to weave the web. Pass the string through one of the holes and tie a knot to secure it. Weave the string across the plate to another hole, stringing a bead onto it before securing it with another knot. Continue this process, creating a pattern that resembles a spider’s web. As you weave, it’s a great opportunity to chat about patterns, motor skills, and of course, a little dream time storytelling.
Remember, the web doesn’t have to look uniform or perfect—its uniqueness is part of its charm. Encourage your children to take pride in their individual designs. Their web will catch their special dreams, after all!
There’s still more fun to be had, including adding feathers and decorating the frame. We’ll get into that in just a moment. But already, can you see it coming together? Those little hands are not just making crafts; they’re making memories to cherish. ?
Finishing Touches: A Dreamy Aesthetic
We’ve weaved the web, chuckled together, and perhaps even learned a little history, but we’re not finished yet. Stay tuned for the secrets of adding the dreamy details that give dream catchers their unique identity and flair. Grab your feathers and beads, because in the next chapter of this guide, we’re going to give our dream catchers the final, special touches that will make them ready for a cozy nighttime roost above the bed.
Ready to keep crafting our dreams into reality? Let’s make sure they are the most vibrant, joyful, and dreamy catchers ever woven – because in our homes, every dream and every giggle matters immensely. Now, take a quick break, have a giggle with your little ones, and get ready for some more magical crafting moments!
5 Things Parents Should Know in Preparing for Paper Plate Dream Catcher
1. Safety First
While crafting is fun, it’s crucial to keep safety in mind. Ensure scissors are child-friendly, supervise the use of hole punches, and be mindful of small beads that could pose a choking hazard. It’s all about creating a safe environment for creativity to bloom!
2. Embrace the Mess
Where there’s crafting, there’s mess, and that’s perfectly okay! Lay out newspapers or a plastic sheet to catch glue drips and paper scraps. Teach kids that mess is part of the creative process, and make clean-up fun by turning it into a game.
3. Encourage Individuality
There’s no “right” way to make a dream catcher. Encourage your kids to choose colors and patterns that speak to them, and remind them that their dream catcher is as unique as their dreams. This is a great exercise in self-expression and confidence-building.
4. Make it Educational
Use this craft as an opportunity to teach your children about the Native American culture where dream catchers originate. Explain the importance of honoring and understanding different traditions, and the value of incorporating elements from other cultures with respect and acknowledgment.
5. Prepare for Questions
Kids are curious, and they’re bound to ask questions about the significance of dream catchers, the materials used, and the crafting process. Be ready to engage in meaningful conversations and use this time to deepen your bond with your child.
With these preparations in mind, you’re all set to guide your children through crafting their paper plate dream catchers. Each step presents a new opportunity to explore creativity, culture, and togetherness. Enjoy every moment of this artistic adventure—and remember, the primary goal is to have fun and create lasting memories with your little dream weavers.
Now that you’re fully prepped, continue on for even more tips and tricks in this guide to deliver a magical dream catcher experience. With the basics covered, it’s time to get into the nitty-gritty of decoration and personalization. Prepare to be inspired by your child’s imagination as you watch their dream catcher come to life!
And remember, the process doesn’t stop at the craft table. Once your dream catchers are complete, find the perfect spot to hang them. Share bedtime stories about dreams and the importance of dreaming big. This paper plate craft might just begin as a crafting project, but it opens doors to conversations, learning, and dreams that soar beyond the stars. Let’s keep the magic flowing and our hands crafting as we transform simple paper plates into beautiful, dreamy masterpieces.
Watch your little ones beam with pride as their personalized dream catchers find a special place in their room. Through crafting, we’re not only creating gorgeous art pieces but also instilling in our children the belief that their dreams are valid, treasured, and worth protecting. Isn’t that what parenting is all about? So go ahead, embrace the journey of creativity, culture, and connection as you and your kids craft these charming paper plate dream catchers together.
See more great Things to Do with Kids in New Zealand here. For more information see here
Disclaimer
The articles available via our website provide general information only and we strongly urge readers to exercise caution and conduct their own thorough research and fact-checking. The information presented should not be taken as absolute truth, and, to the maximum extent permitted by law, we will not be held liable for any inaccuracies or errors in the content. It is essential for individuals to independently verify and validate the information before making any decisions or taking any actions based on the articles.


