Welcome to the Wonderful World of Shaving Foam Paint!
Hello, delightful parents! Are you ready to dive into a fluffy cloud of creativity with your little ones? Today, we’re whisking you away on an adventure into the colorful realm of shaving foam paint, an exciting and sensory-rich activity perfect for children of all ages. Let’s get those tiny hands messy, spark some imagination, and make some memories that will last a lifetime!
Why Shaving Foam Paint is a Must-Try for Your Kids
Shaving foam paint isn’t just another messy play idea; it’s developmental magic in a can! This activity promotes sensory exploration, inspires artistic expression, and helps develop fine motor skills. Plus, it’s a fantastic way to encourage scientific curiosity as your kids mix colors and create new shades!
What You’ll Need to Get Started
- Shaving foam – Opt for plain, unscented foam to keep it simple and safe for kids.
- Food coloring or washable paint – For a vibrant explosion of color.
- A mixing tray or baking sheet – A flat surface works best for this activity.
- Paintbrushes or craft sticks – For swirling and pattern-making.
- Paper or cardstock – Thick paper will hold your child’s creations beautifully.
- Protective clothing – Aprons or old shirts to keep the creative chaos contained.
- A can-do attitude – The most important ingredient!
Step-by-Step Guide to Creating Shaving Foam Paint Art
Now that you’re all set with your materials, it’s time to create some foamy masterpieces!
- Prepare Your Workspace – Lay down newspapers or a plastic tablecloth to protect surfaces. Place your mixing tray or baking sheet in the center, and arrange your tools and materials around it.
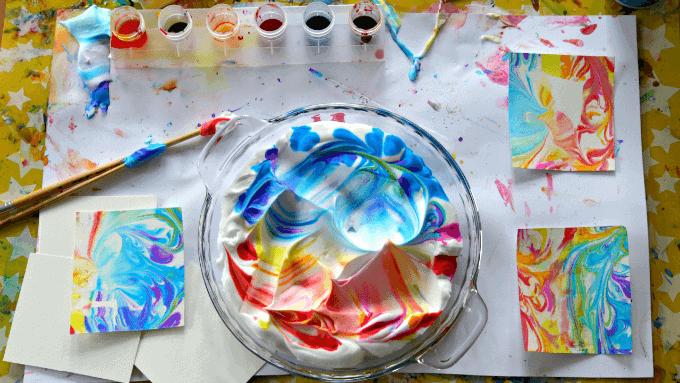
- Spray the Foam – Shake the shaving foam can well, and fill the tray with a layer of foam. You don’t need it to be too thick, just enough to cover the bottom.
- Add Color – Let your kids choose their favorite colors and add a few drops of food coloring or dollops of washable paint across the foam’s surface.
- Swirl and Mix – Using paintbrushes or craft sticks, encourage your children to gently swirl the colors together to create marbled patterns. Remember, it’s all about the process, not just the final product!
- Press the Paper – Once your child is happy with the design, place a sheet of paper gently on top of the foam. Press down lightly to make sure that the paint makes contact with the paper.
And voilà! You’re halfway through crafting a fluffy, vibrant piece of art. But wait – there’s more to this process, and I can’t wait to guide you through the final steps of revealing your child’s shaving foam paint masterpiece!
Stay tuned as we explore how to transfer the design onto paper and how to preserve these colorful creations properly. Because in the world of shaving foam paint, every parent becomes an art curator, and every child a pint-sized Picasso!
Keep those sleeves rolled up, and let’s continue this journey together, nurturing creativity and making every day an adventure in sensory play. After all, the best part of being a parent is watching your child’s imagination take flight – with the help of a little shaving foam and a lot of love!
5 Things Parents Should Know in Preparing for Shaving Foam Paint
Before you embark on this colorful journey with your kids, here are five essential tips to prepare for a smooth and enjoyable shaving foam paint experience.
1. Safety First
Ensure that the shaving foam and colorings you select are nontoxic and safe for children’s use. Although the materials used in shaving foam paint are generally harmless, keeping an eye on your little ones to prevent them from ingesting any supplies is always best.
2. Embrace the Mess
Shaving foam paint is inherently a messy activity. Prepare yourself mentally for the clean-up and set out all necessary cleaning supplies beforehand. This will help you stay relaxed and focused on the fun rather than worrying about the mess.
3. Trial and Error
Don’t stress about the artwork being ‘perfect’. Allow your children to experiment with the materials, even if it means the end result isn’t quite what was expected. Shaving foam paint is more about the process and sensory experience than the final product.
4. Appropriate Clothing
The last thing you want is to ruin a favorite outfit. Dress your kids in old clothes or provide art smocks to protect their garments from any potential stains. Remember that while some paint is washable, food coloring can sometimes leave a mark.
5. Timing is Everything
Pick the right time for this activity when you can be fully present with your children. Avoid squeezing it in between other tasks. Choose a moment when everyone can relax, laugh, and create together without feeling rushed.
Continuing Your Shaving Foam Art Adventure
Now that you’ve mastered making the prints, the next steps are just as important to ensure your little artist’s work shines through.
- Peel and Reveal – After pressing the paper onto the foam, it’s time to peel it back carefully to see the colorful pattern transferred onto the paper.
- Let it Dry – Set the paper aside to let the paint dry. This can take a little while, so patience is key!
- Scrape Away Excess Foam – Once the paint is dry, you’ll need to remove the excess shaving foam to reveal the crisp colors underneath. A ruler or a straight-edge tool works well for this step.
- Display with Pride – Find a spot in your home where you can display the artwork. Kids love seeing their creations valued and appreciated!
- Store for Posterity – If you want to keep the artwork for years to come, consider laminating it or placing it in a frame behind glass.
Remember, shaving foam paint offers vast possibilities for creative expression. With each new session, try introducing different tools like cookie cutters for patterns or combining it with other art techniques for even more diverse creations. The sky’s the limit when it comes to your child’s imagination paired with this delightful sensory activity!
As they learn and grow, they’ll develop a deeper appreciation for art, colors, and the joy of making something with their own two hands. So, gather your supplies, prepare for a bit of chaos, and most importantly, have tons of fun turning those fluffy foam piles into stunning works of art! Happy painting!
See more great Things to Do with Kids in New Zealand here. For more information see here
Disclaimer
The articles available via our website provide general information only and we strongly urge readers to exercise caution and conduct their own thorough research and fact-checking. The information presented should not be taken as absolute truth, and, to the maximum extent permitted by law, we will not be held liable for any inaccuracies or errors in the content. It is essential for individuals to independently verify and validate the information before making any decisions or taking any actions based on the articles.