? DIY Egg Tray Flowers: A Fun Upcycling Project for Parents and Kids ?
Hey there, creative parents! Are you looking for a delightful and eco-friendly craft activity to enjoy with your little ones? Look no further, because today we’re diving into the world of DIY Egg Tray Flowers! Not only is this project a hit with the kiddos, but it’s also perfect for teaching them about upcycling and the joys of making something beautiful from the seemingly mundane. Let’s roll up our sleeves and get crafty!
The Beauty of Upcycling Egg Cartons
Before we jump into the nitty-gritty, let’s quickly chat about why using egg trays for crafts is a blooming good idea. Egg cartons are often readily available, and instead of tossing them into the recycling bin, we can turn them into whimsical creations. Plus, working with different textures and materials can spark a child’s imagination, and it’s a wonderful way to nurture their dexterity and hand-eye coordination. Win-win, right?
Materials You’ll Need
Let’s gather our supplies! You’ll need:
- Egg cartons – Preferably the cardboard variety
- Scissors – Safety scissors for the kiddo crew
- Paint – Non-toxic, washable paints in your favorite colors
- Paintbrushes
- Pipe cleaners – These will serve as the stems of your flowers
- Glue – A glue stick or any kid-friendly glue will do
- Buttons or beads – To adorn the centers of your flowers
- A protective table cover or old newspapers
Tip: Feel free to get creative with additional decorations like glitter or stickers to give your bouquet that extra pizzazz!
Step-by-Step Guide to Making Egg Tray Flowers
Step 1: Prepare the Egg Cartons
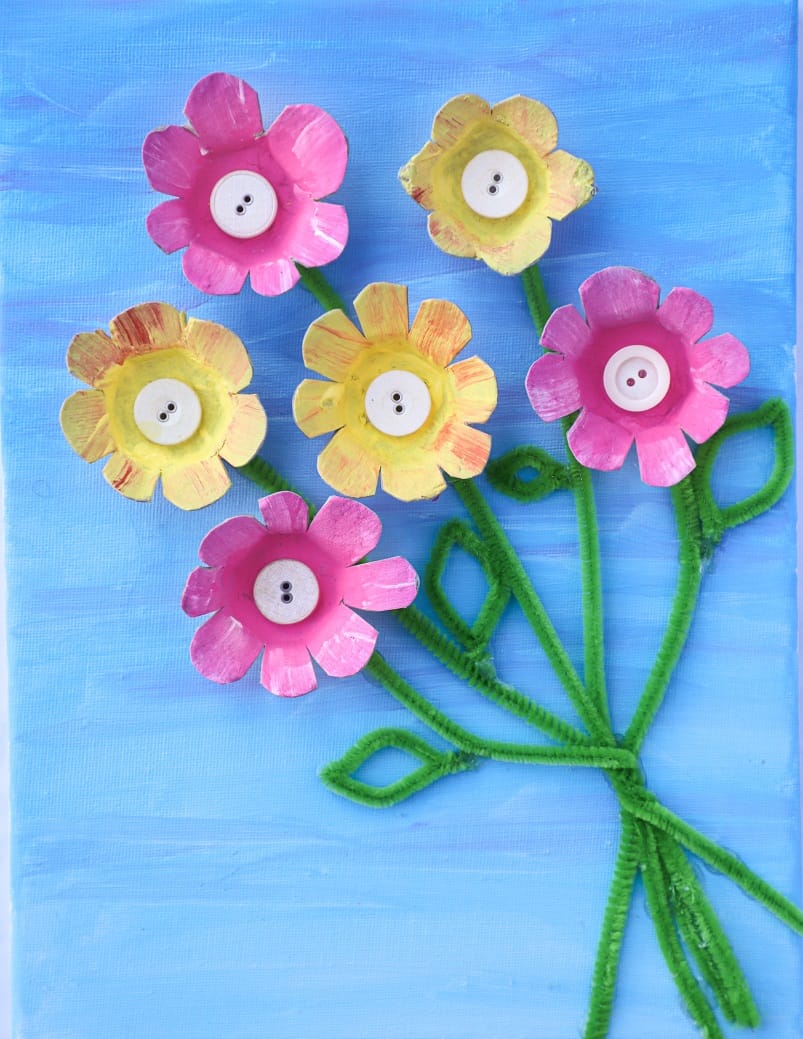
Begin by cutting out individual cups from the egg carton. This might be a bit challenging for tiny hands, so parental assistance is a must! Once you have your cups, trim the edges to create a more petal-like appearance. Don’t worry about perfection here – the more unique each flower is, the better!
Step 2: Paint Your Flowers
Now, let’s add some color to our garden! Hand over the paintbrush to your little artist and let them coat the carton cups with vibrant paints. You can mix colors to create an array of shades. Leave them to dry completely before moving on to the next step.
Step 3: Create the Flower Stems
While your petals are drying, it’s time to fashion the stems. Take the pipe cleaners and bend one end to form a small coil. This will prevent the flower top from slipping off once attached. If you want taller flowers, twist two pipe cleaners together for extra length!
Step 4: Assemble Your Egg Tray Bouquet
Attach the dried flower tops to the coiled end of the pipe cleaners. For added stability, you can put a small dab of glue. Then, decorate the centers of your egg tray flowers with buttons, beads, or any other sparkly treasures your child picks out! Voilà, you now have a lovely, handcrafted bouquet that’ll never wilt!
Stay tuned for the next part, where we’ll explore creative variations of egg tray flowers and ways to display your blossoming masterpieces around the home. Crafting with your kids can be a memorable and enriching experience, so enjoy every moment of this egg-citing journey into floral creation. Let’s get ready to give those egg trays a new lease on life!

5 Things Parents Should Know in Preparing for Egg Tray Flowers
Preparing for an egg tray flower-making session can be just as fun as the crafting itself! Here are five tips to ensure you have a smooth and enjoyable experience from start to finish.
1. Set Up the Crafting Area
Choose a spot with plenty of space and good lighting. Protect your surface with a table cover or newspapers to minimize the inevitable mess. Having a designated area also helps to keep the craft supplies organized and accessible.
2. Pre-Cut the Egg Cartons
Depending on the age and skill level of your children, you may want to pre-cut the egg carton cups for them. This allows for immediate creative engagement when they sit down to craft, and it keeps safety a top priority.
3. Choose the Right Paint
Opt for non-toxic, washable paints, as they’re safe for children and easier to clean up. Acrylic paint might offer vibrant colors and durability, but it can permanently stain clothes and surfaces. Consider aprons or old T-shirts to protect their clothing.
4. Embrace Imperfection
One of the joys of crafting with kids is watching their imagination take the lead. Encourage them to explore and not be concerned with making perfect petals or color choices. The uniqueness of each flower adds to the charm!
5. Dry Time is Important
Painting might be the most exciting part, but ensuring adequate drying time is crucial. Plan for breaks or a second crafting session to assemble the flowers after the paint has dried. This prevents smudging and keeps the finished product looking great.
Keep this guide handy as you and your kids embark on this journey of creativity and sustainability. Have fun, and don’t forget to capture the smiles and the masterpieces for a bouquet of memories to treasure!
See more great Things to Do with Kids in New Zealand here. For more information see here
Disclaimer
The articles available via our website provide general information only and we strongly urge readers to exercise caution and conduct their own thorough research and fact-checking. The information presented should not be taken as absolute truth, and, to the maximum extent permitted by law, we will not be held liable for any inaccuracies or errors in the content. It is essential for individuals to independently verify and validate the information before making any decisions or taking any actions based on the articles.


