
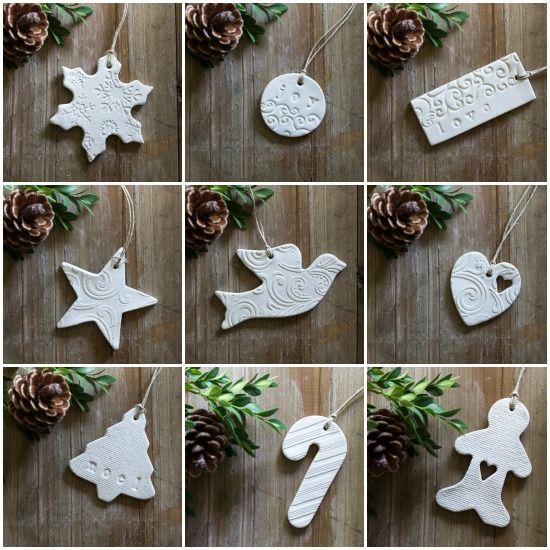
Crafting Joyful Memories: A Parent’s Guide to Clay Xmas Decorations
Hello there, festive crafters! ?? Are you ready to sprinkle a little DIY magic into your holiday season? Then you’re in the perfect place! Clay Christmas decorations are not only a joy to create but also a wonderful way to weave in some family fun during the festive rush. In this guide, we’ll take you through the merry process of creating your very own clay ornaments from scratch. Whether you’re a seasoned craft maestro or a beginner looking to start a new tradition, this step-by-step guide will have you decking the halls with boughs of handcrafted holly in no time!
Why Choose Clay for Your Xmas Decor?
Before we roll up our sleeves and dive into the nitty-gritty, let’s chat about why clay is such a fantastic choice for your Christmas decorations:
- Eco-friendly: Clay is a natural material, which means it’s a great sustainable option for those looking to reduce their environmental footprint this holiday season.
- Customizable: With clay, the possibilities are endless. You can shape, paint, and decorate your ornaments any way you like. It’s the perfect canvas for your holiday creativity!
- Durable: Unlike paper or other ephemeral materials, clay decorations can last for many Christmases to come, turning into cherished keepsakes that carry sentimental value.
- Family Activity: There’s something special about creating something with your own hands, especially when it’s a team effort. You and your kids will have a blast working on this together!
Getting Started: Gathering Your Materials
To ensure your crafting session is as smooth as Santa’s sleigh ride, gather all the materials you’ll need beforehand. Here’s your checklist:
- Air-dry clay or oven-bake clay (depending on your preference and time constraints)
- Rolling pin
- Cookie cutters (Christmas shapes like trees, stars, and snowflakes are perfect)
- Straw or a small tool to make a hole for hanging
- Paints (acrylic works well) and brushes
- Glitter, sequins, and any other decorative elements you fancy
- Mod Podge or clear varnish (for sealing your decorations)
- Ribbon or twine for hanging
Step-by-Step: Making Your Clay Xmas Ornaments
With everything at your fingertips, let’s get crafting! Follow these simple steps to create your holiday masterpieces:
- Kneading the Clay: Start by softening the clay in your hands. A good knead will make it more pliable and easier to work with. It’s a bit like warming up the car before a winter drive—necessary and beneficial!
- Rolling Out the Clay: Next, take your rolling pin and roll out the clay to an even thickness. Somewhere around a quarter-inch is ideal, as it’s thick enough to be durable but not so thick that it becomes clunky.
- Cutting Out Shapes: Now for the fun bit—press your cookie cutters into the clay to create your festive shapes. Make sure you press down firmly and wiggle it a little bit to ensure a clean cut.
- Creating Hanging Holes: Don’t forget to make a small hole at the top of each ornament using a straw or a small tool.
- Drying the Ornaments: If you’re using air-dry clay, follow the instructions on the package for drying times. If you’re using oven-bake clay, pop your creations in the oven according to the clay instructions. Safety first, so always keep an eye on your ornaments while they are heating!
- Decorating Your Ornaments: Once your ornaments are dried and cool, they’re ready to be decorated. Unleash your creativity with paint, glitter, and any other embellishments you’d like. Remember, there’s no right or wrong in art; it’s all about what brings you joy!
- Sealing the Deal: To protect your decorations, give them a coat of Mod Podge or clear varnish. It adds a lovely shine and ensures your crafts withstand the test of time (and curious little fingers).
And there you have it—your very own handcrafted clay Xmas decorations, ready to proudly display on your Christmas tree or around the home. Imagine your little one’s faces light up seeing their artwork become a staple of your holiday decor. It’s truly the gift that keeps on giving!
But wait, there’s more to explore! In the next section of our guide, we’ll cover the added flourishes and thoughtful touches that can elevate your clay Xmas decorations from charming to positively enchanting. So stick with us for more festive fun and inspiration!
5 Things Parents Should Know in Preparing for Clay Xmas Decorations
As we continue our exciting journey of crafting clay Xmas decorations, there are a few key things that savvy parents should keep in mind to help the process be as enjoyable and safe as possible for everyone involved. Let’s dive into the essential tips:
1. Choose the Right Type of Clay
Different types of clay can offer varying results, and picking the perfect one for your project can greatly affect the final outcome. Here’s a little guide:
- Air-dry clay is super convenient since it doesn’t require baking. It’s great for younger children or when using a kiln or oven is not feasible.
- Oven-bake clay provides a smoother, more professional finish and can be a fun, educational science lesson about heat and hardening for older kids.
2. Prep Your Workspace
Clay can be a bit messy, so it’s wise to cover your crafting area with newspapers or a wipe-clean tablecloth. Keep a small bowl of water handy to smooth out any imperfections in the clay, and don’t forget to have a damp cloth nearby for sticky fingers.
3. Embrace the Learning Curve
If you’re new to working with clay, give yourself and your children grace. It’s okay if the first few ornaments are a little wonky—they’ll be filled with character and love. The skills will come with practice, just focus on the fun!
4. Set Aside Adequate Time
Remember, good things take time. Craft sessions can last longer than anticipated, especially with creative little minds at work. Air-dry clay will also need time to set (usually 24-48 hours), so plan your crafting day ahead of any decoration deadlines.
5. Safety First!
If you’re baking your clay ornaments, the most important thing is to supervise the baking process closely, as temperatures and times vary. Always handle hot trays with care and ensure ornaments are completely cooled before painting and handling.
Adding the Finishing Touches
With your beautiful clay ornaments ready and waiting, it’s time to think about those final touches that make all the difference. Here are some ideas to take your decorations to next-level festivity:
- Personalize: Use letter stamps or hand-write names and dates on the ornaments before they dry. It’s a perfect way to commemorate the year or give as personalized gifts.
- Texture Fun: Before the clay dries, press different materials into it to create interesting textures. Think about using lace, leaves, or anything with a cool pattern that can leave an impression.
- Metallic Wows: A touch of metallic paint, especially gold or silver, can add a luxe feel to your handmade ornaments. It works wonderfully for highlighting details or for writing names.
- Glitter Galore: For that extra sparkle, mix glitter into your paint or sprinkle it on top while the paint is still wet. It’s the holidays, after all—more is more when it comes to shimmer!
- Ribbon Choices: Don’t underestimate the power of a pretty ribbon. Velvet, satin, or even burlap can give very different looks to your finished decorations.
By keeping these tips in mind and adding those special final flourishes, your ornaments will not just be decorations but will serve as fond memories that hang from your branches, telling stories and spreading cheer for many years to come. Happy crafting, dear friends—may your holiday be as beautiful and unique as your clay creations!

