
Shaving Foam Marbling: A Step-by-Step Guide for Creative Family Fun
Welcome, artsy parents and crafty kids! If you’re searching for a fun-filled and imaginative activity to enjoy with your little ones, look no further because shaving foam marbling is here to add a splash of color to your family’s creative endeavors. In this guide, we will walk through the exciting process of marbling with shaving foam, a mesmerizing art form that’s perfect for artists of all ages.
What is Shaving Foam Marbling?
Shaving foam marbling is a unique and playful art technique that involves spreading a layer of shaving foam on a flat surface, then adding drops of food coloring or acrylic paint on top. By swirling these colors around, you can create captivating, marble-like patterns that can be transferred onto paper, fabric, or other materials. It’s a fantastic way to introduce the concept of color mixing and pattern creation to your children, while also providing a sensory experience that’s both soothing and stimulating. Plus, it’s incredibly easy to clean up and safe for all ages!
Materials Needed for Shaving Foam Marbling
Before you start, gather all the necessary materials. You won’t need much, and most items can be found around your home or at a local craft supply store. Here’s what you’ll need:
- Shaving Foam – Any standard shaving foam will do; just make sure it’s the foam kind, not gel.
- Food Coloring or Acrylic Paint – These will add the vibrant colors to your marbling masterpiece.
- A Flat Tray – A baking tray or any shallow pan works perfectly as your workspace for the foam.
- Skewers or Toothpicks – Used for swirling the colors in the foam.
- Cardstock, Paper or Fabric – This is the medium that will receive your beautiful marbled design.
- A Ruler or Scraper – For removing excess foam from your marbled print.
- Paper Towels or Cleaning Cloth – To keep your workspace tidy throughout the process.
Preparing Your Space for Marbling
Create a clean and organized workspace before beginning. Marbling can be a bit messy, but with a few simple steps, you can ensure that clean-up is a breeze.
- Start by lining the area around your tray with newspaper or a plastic tablecloth to protect surfaces from any wayward paint or foam.
- Make sure to have paper towels or a cleaning cloth on hand to quickly address any spills or splashes.
- Choose an area that’s well-ventilated, especially if you’re working with younger kids. Shaving foam is generally safe, but good air circulation is always a good idea when working with art materials.
Step-by-Step Guide to Shaving Foam Marbling
With your workspace ready and your materials at hand, you’re all set to dive into the foamy depths of marbling. Here’s how to do it:
- Apply the shaving foam: Shake the shaving foam can well, and then apply an even layer to cover the bottom of your tray.
- Smooth out the foam: Use the back of a spoon or your scraper to level the foam, creating a smooth surface for your design.
- Add color: Squeeze drops of food coloring or acrylic paint onto the foam. A variety of colors will make your design pop, but don’t overdo it – too much paint can muddy your design.
- Create your pattern: Use skewers or toothpicks to swirl the colors gently. You can make swirls, zigzags, or any kind of abstract pattern you like. Encourage the kids to experiment and explore different designs.
Up to this point, you’ve set the stage for a memorable, artistic adventure with your kids. But the magic doesn’t stop here! Stay tuned to discover how to transfer your unique, vibrant foam patterns onto paper or fabric and create stunning artwork that captures the imagination.
Remember, shaving foam marbling isn’t just about the end product; it’s about the shared experience of creating something beautiful with your family. Ready for the next steps? Let’s keep the fun going and transform that colorful foam into true artistic masterpieces!

5 Things Parents Should Know in Preparing for Shaving Foam Marbling
- Safety First: While shaving foam marbling is generally a safe activity, it’s important to choose non-toxic paints and food colorings, especially when working with very young children who might be tempted to taste their creations. Keep a watchful eye on the little ones and ensure all materials are safe for their intended use.
- Embrace the Mess: Although inherently a bit messy, marbling can be a liberating and joyous activity. Embrace this aspect by preparing your workspace adequately, which will allow everyone to freely express their creativity without worry. Aprons or old clothes will keep everyone clean during the process.
- Mind the Marbling Medium: Thicker paper or cardstock works best for absorbing the paint and retaining the design. If you’re planning on using fabric, ensure it’s a light color and somewhat absorbent to showcase the marbling effect. Pre-tests on a small piece can help you adjust your technique accordingly.
- Color Combinations: Talk to your children about color combinations before they start. Explain how colors mix and can turn muddy if overdone. Encourage them to pick colors that blend well and discuss the color wheel if they’re old enough. Experimenting is part of the fun, but some guidance can prevent disappointment with the results.
- Setting Expectations: Part of the beauty of marbling is its unpredictability. Each print will be a surprise, which is a wonderful lesson in serendipity and acceptance for children. Help them understand that not every piece will turn out as expected and that’s perfectly fine—that each creation is unique and beautiful in its own way.
Completing Your Marbling Masterpiece
Congratulations, you’ve swirled and created beautiful patterns in the shaving foam, and now it’s time to make them permanent. Here’s how to transfer your design:
- Gently Place Your Paper: Lay a piece of cardstock, paper, or fabric gently on top of the foam. Pat it softly to ensure all areas come into contact with the paint without pressing too hard, which could distort your design.
- Lift and Scrape: Carefully lift the paper or fabric from a corner. Allow any excess foam to drip off or gently shake it. Then, use a ruler or a straight-edged object to scrape off the remaining foam, revealing your marvelous marbled pattern.
- Drying: Place your marbled print on a flat surface to dry. If using paper, you might want to weigh down the edges to prevent curling as it dries.
- Reuse Your Foam: The remaining foam in the tray can be used again! Simply smooth it out and add more color. This not only extends the fun but also promotes a resourceful approach to art-making.
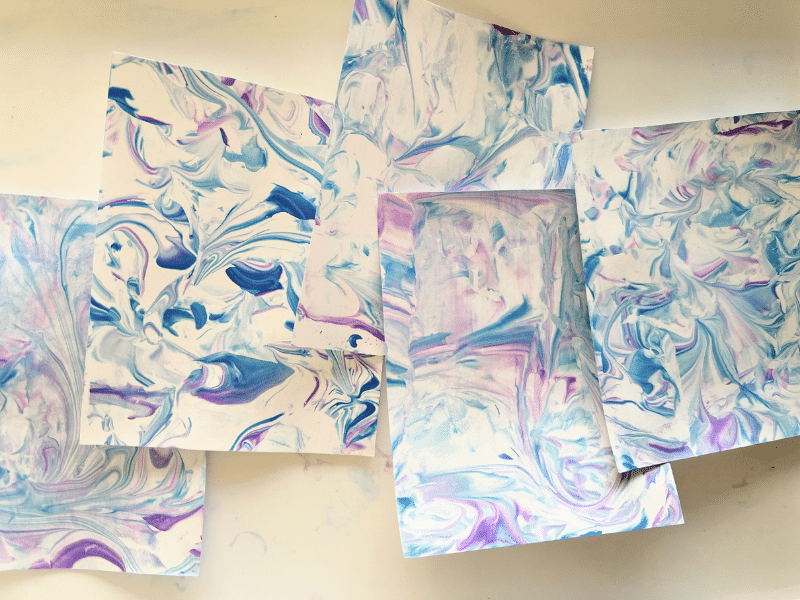
Each piece of marbled art will be a unique and joyful expression of creativity. This process offers endless possibilities, which makes it a fabulous activity to repeat on different occasions, exploring new patterns, colors, and surfaces each time.
Shaving foam marbling is a delightful way to bond as a family, make art, and create memories. It’s an exhilarating combination of tactile play, color exploration, and surprise that will undoubtedly leave everyone with smiles and a stack of beautiful, one-of-a-kind artworks. So, gather up your shaving foam, colors, and paper—it’s time to marble away!
See more great Things to Do with Kids in New Zealand here. For more information see here
Disclaimer
The articles available via our website provide general information only and we strongly urge readers to exercise caution and conduct their own thorough research and fact-checking. The information presented should not be taken as absolute truth, and, to the maximum extent permitted by law, we will not be held liable for any inaccuracies or errors in the content. It is essential for individuals to independently verify and validate the information before making any decisions or taking any actions based on the articles.


