
Create Stunning Marbleized Paper with Shaving Cream: A DIY Guide for Crafty Families
Hey there, creative parents and fun-loving kids! Are you ready to dive into a world of color and design that’s right at your fingertips, literally? We’re talking about the magical craft of marbling paper using nothing more than shaving cream and a few drops of food coloring or ink. Marvelous, swirling patterns await, so let’s get those sleeves rolled up for some arty action!
Not only is this project incredibly simple and affordable, but it’s also perfect for all ages – which means the whole family can enjoy making personalized stationery, custom wrapping paper, or even beautiful pieces to adorn your walls. So, let’s begin our journey into the whimsical world of marble paper art that will leave you wanting to marbleize everything in sight!
What You’ll Need
- Shaving cream (the foam kind, not the gel)
- Food coloring or water-based ink
- A shallow baking tray or dish
- White cardstock or thick paper
- A ruler or a straight-edged tool
- Wooden skewers or toothpicks
- Scraper or old credit card
- Paper towels or old rags for clean up
Before we roll up our sleeves and start, it’s good to note that this activity is mildly messy. But no worries! The joy of watching colors blend and take shape is well worth the cleanup. Plus, it’s an excellent opportunity for the kiddos to learn about the wonders of mixing colors and creating patterns.
Setting Up Your Workspace
Step 1: Prepare Your Area
Lay down newspaper or a plastic tablecloth to protect your table or workspace. Marbling with shaving cream can get a little wild, and we want to keep those unintended artistic expressions off your furniture!
Step 2: Fill Your Tray
Take your baking tray or dish and fill it with a layer of shaving cream. Aim for a layer thick enough to completely coat the paper you will be marbling but not too thick that it becomes wasteful.
Step 3: Smooth It Over
With your ruler or straight edge, smooth over the top of the shaving cream, creating a nice even surface. This will be the canvas for your color magic!
Creating Your Marble Masterpiece
Step 4: Add Your Colors
Now the fun really begins! Drop food coloring or ink in different spots across the shaving cream. You don’t need too much – remember, we’re going for subtlety. Alternate colors as you go along, but don’t be afraid to let the kiddos choose their favorite color combos.
Step 5: Make Swirly Patterns
Use your wooden skewers or toothpicks to gently swirl the colors around. Encourage the kids to make sweeping motions or delicate swirls to see what kinds of patterns emerge. Here’s where imagination really takes the lead!
Step 6: Press Your Paper
Lay your piece of cardstock or thick paper gently on top of the colored shaving cream. Lightly press down to ensure all parts of the paper are in contact with the cream but no need to submerge it fully. After a few seconds, carefully lift the paper and lay it cream side up on a clean part of your protected work surface.
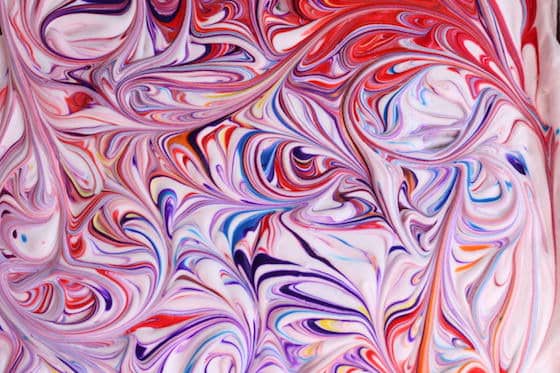
Step 7: Reveal Your Design
With your scraper or old credit card, gently remove the shaving cream from the paper in one smooth motion. Revel in the oohs and aahs as the hidden marbled patterns are revealed. What an art reveal!
Don’t worry if the first one doesn’t turn out perfect, this craft is all about experimentation and enjoying the process. Every piece will be unique, and that’s the true beauty of it. Marble paper with shaving cream is not just an art project; it’s a treasure trove of memories made with your kids, a bonding experience that transcends the beauty of the art you create together.
And there you have it, wonderful artists in the making! You’ve just created your very own marble paper with shaving cream. Now that your hands are a little stained and your hearts are full, let your masterpieces dry and start planning what you’ll do with them next. Will they be vibrant book covers, creative greeting cards, or simply works of art to brighten up your home? The possibilities are as boundless as your creativity!
Stay tuned, as we will explore even more tips and tricks to perfect your marble paper-making skills, and delve into different ways to use your delightful homemade paper. Crafting joy has never been so easy or looked so good! Keep those smiles broad and those hands messy, because creativity is right at your fingertips. Happy marbling!
5 Things Parents Should Know When Preparing for Marble Paper with Shaving Cream
1. Choose the Right Shaving Cream
For the best marbling effect, it’s important to pick the proper shaving cream. Opt for the foam kind, as gel types don’t spread well and won’t hold your color in place. A cheaper, generic brand will work just fine—no need to splurge on fancy shaving creams here!
2. Safety First: Non-Toxic Materials
Since little hands will be involved in this craft, ensure all materials are non-toxic. Water-based food coloring or ink is ideal. Check the labels for safety certifications, and even though it’s non-toxic, remind the kiddos that none of the materials are for eating, no matter how much like frosting that shaving cream looks!
3. Dress for a Mess
Marbling can be messy, so have everyone don their “crafting uniforms.” These could be old shirts, aprons, or smocks. Remember that food coloring and ink can stain, so choose something you don’t mind getting a bit colorful. It’s all part of the creative process!
4. Protect Your Surfaces
Whether you’re crafting on the kitchen table or a dedicated art desk, cover your surfaces with newspaper or a plastic tablecloth. This will make cleanup a breeze and prevent the shaving cream and colorants from leaving a lasting impression where you don’t want them.
5. Embrace Imperfection
Every piece of marble paper will be unique, and that’s the real beauty of this craft. Encourage your kids to embrace the quirks and imperfections in their marbled designs. It’s a great life lesson and a way to celebrate individuality and creativity in art.
Additional Tips for a Successful Marble Paper Experience
Quick Dry: Plan for drying space! Have a clean area ready where your marble paper can lay flat and dry without being disturbed. This is often the hardest part for eager little artists who can’t wait to use their creations.
Variety is the Spice of Life: Play with different colors and tools to incorporate various textures and effects into your marble designs. Combs, brushes, and even fingers can create exciting, intricate patterns.
Paper Matters: Cardstock works best for a sturdy creation, but you can experiment with various thicknesses and types of paper. Just remember that thinner papers may warp more from the moisture of the shaving cream.
Reuse and Recycle: If you have extra color-laden shaving cream, don’t toss it! You can use it to make another piece of marbled paper, combining and swirling the colors again for a new masterpiece.
Make it Educational: Turn this fun activity into a learning moment. Discuss with your children how colors mix to make new ones and how this method of paper marbling can resemble natural patterns found in stones like marble and in art throughout history.
See more great Things to Do with Kids in New Zealand here. For more information see here
Disclaimer
The articles available via our website provide general information only and we strongly urge readers to exercise caution and conduct their own thorough research and fact-checking. The information presented should not be taken as absolute truth, and, to the maximum extent permitted by law, we will not be held liable for any inaccuracies or errors in the content. It is essential for individuals to independently verify and validate the information before making any decisions or taking any actions based on the articles.


