
DIY Heating Pads: A Cozy Solution for Comfort and Relief
Hey there, wonderful parents! As the cooler months creep in or when aches and pains arise in your family, you might be looking for ways to keep everyone cozy and comfortable. Have you ever considered a homemade heating pad? Not only do they make snuggly companions during chilly evenings, but they’re also fantastic for soothing sore muscles after a busy day of being super-parents! Let’s dive into the warm and toasty world of DIY heating pads – your go-to guide for a quick and easy comfort fix right from your home!
Benefits of a Homemade Heating Pad
Making your own heating pad is not just about saving a few bucks – although that’s a huge plus – it’s also about crafting a personalized touch of relief. You can choose the size, fabric, and fillers to suit your family’s needs, making it a fun project even the kids can get involved in (with supervision, of course). Custom heating pads can target specific areas, conform to your body, and you can rest easy knowing that there are no added chemicals.
Gathering Your Materials
Before you start, a quick inventory is necessary:
- Fabric: Opt for soft, durable materials like flannel, cotton, or fleece for the outer layer. For the inner pouch, choose a sturdy fabric like muslin or an old cotton tea towel.
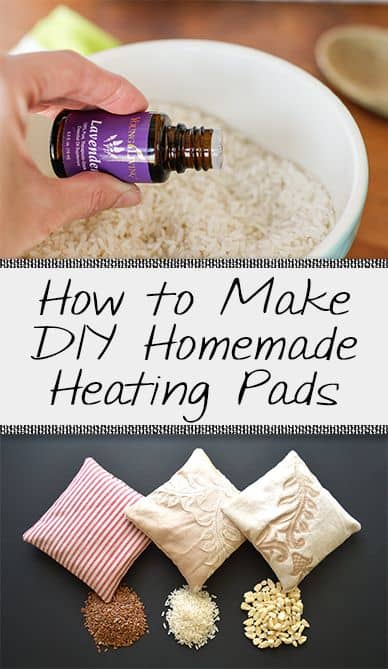
- Filling: Pick a grain that can retain heat, such as rice, corn, flaxseed, or cherry pits. Aromatic herbs or essential oils like lavender or chamomile can add a soothing fragrance.
- Thread: Durable thread will ensure that your pad lasts through many warm-up cycles.
- Sewing Essentials: A sewing machine is helpful but not necessary. A needle, thread, and a good pair of scissors will do.
- Measuring Tools: A measuring tape or ruler comes in handy to get the size just right.
Let’s Start Crafting!
Now that you’ve gathered your materials, it’s time to put your crafting skills to work. Here’s a step-by-step to create your wonderful heating pad:
- Measure Twice, Cut Once: Decide on the size of your heating pad. A good starting point is 12″x6″ for a hand-held pad or 24″x6″ for something larger. Use your measuring tools to cut two pieces of fabric to your desired size.
- Sew the Perimeter: Place the two fabrics right sides together and sew three edges, leaving one short side open. If you’re hand-sewing, a backstitch will give you strength. Remember to leave at least a 1/4-inch seam allowance.
- Turn and Fill: Turn the pouch right-side-out and fill it with your chosen grain. Don’t overfill – leave enough room for the material to move around and conform to your body.
- Close It Up: Once filled, tuck the edges of the open side in and sew it shut with a whip stitch or ladder stitch for a clean finish.
- Add Some Scent (Optional): If you’d like to incorporate some aromatherapy into your heating pad, you can sprinkle essential oils onto the filling or mix dried herbs in with it before sealing.
Heat it up by placing it in the microwave for 1-2 minutes (depending on the size and the microwave’s power). Check the temperature before using to ensure it’s not too hot, especially when using with children.
Now that you understand the essentials of creating a homemade heating pad, you can experiment with different shapes and sizes. Make a small one for little hands, a large wrap-shaped one for sore backs, or even a cute animal-shaped for the kiddos to snuggle with. Remember to always supervise children when using heating pads and check the temperature before use.
This sustainable, cost-effective solution is a perfect add-on to your family’s comfort arsenal. Next, I’ll guide you through different ways to use your new homemade heating pad, tips for care and maintenance, and some creative ideas to personalize each pad for your family members. Stay cozy and stay tuned for more toasty tips!
5 Things Parents Should Know in Preparing for Homemade Heating Pads
When taking on the task of creating your very own heating pads at home, there are a few important things to bear in mind. Here’s a guide to ensure you and your family can enjoy a safe and snug experience:
- Preventing Burns: Ensuring safety is key! Always check the heating pad’s temperature before applying it to the skin. If it’s for your little one, test it against your cheek or the back of your hand – if it’s too hot for you, it’s too hot for them. Start with shorter heating intervals and increase as needed.
- Choosing the Right Filler: The right filler makes all the difference for heat retention and comfort. While rice and wheat are popular, consider trying out flaxseed for its pleasant smell and excellent heat retention properties. Be sure to avoid materials that can catch fire or melt in the microwave.
- Microwave Matters: Microwaves vary in power, so heating times can differ. Start with the lowest time recommendation and add heat gradually. To maintain moisture and prevent scorching, you can place a small cup of water in the microwave alongside your heating pad.
- Hygiene and Care: Although you can’t toss the whole heating pad into the washing machine, you can keep it clean by making a removable washable cover. Just slip the pad into the cover before using, and then remove and launder as needed.
- Educating the Kids: Involve your children in the process, educating them about the safe use of the heating pad. Explain that just like anything else that gets hot, they need to use it wisely and always with an adult present. It’s a great opportunity to teach responsibility and safety at a young age.
Tips for Long-lasting Warmth and Care
Maintain the quality and longevity of your homemade heating pad with these handy tips:
- Storage: Keep your pad in a dry place to avoid mold and mildew. Do not store it in a plastic bag as this can trap moisture.
- Refresh Your Pad: After multiple uses, your pad may start to lose its freshness. You can revive it by adding a few more drops of essential oil or by replacing old filler with a new batch.
- Spot Cleaning: For minor spills or stains, simply spot clean with a slightly damp cloth and allow the pad to air dry completely before the next use.
- Microwave Safety: Never overheat your pad as it could burn the filler and the fabric. Always follow the recommended time and add more in short increments if needed.
- Regular Checks: Periodically inspect your heating pad for any signs of wear and tear. Stitches can come undone, so repair any leaks promptly to prevent filler from spilling out.
With a new heating pad in hand, the cozy possibilities are endless. Whether you’re unwinding from a long day or need a touch of warmth on a brisk evening, these homemade gems are sure to bring comfort to you and your family. Look forward to more soothing and crafty endeavors!
Get ready to spread warmth and love with a homemade touch!
See more great Things to Do with Kids in New Zealand here. For more information see here
Disclaimer
The articles available via our website provide general information only and we strongly urge readers to exercise caution and conduct their own thorough research and fact-checking. The information presented should not be taken as absolute truth, and, to the maximum extent permitted by law, we will not be held liable for any inaccuracies or errors in the content. It is essential for individuals to independently verify and validate the information before making any decisions or taking any actions based on the articles.


