
Craft a Prehistoric Pal: Your Ultimate Guide to Making a Paper Plate Dinosaur
Hey there, awesome parents! Are you looking to embark on a thrilling journey through time, right from the cozy comfort of your home? Well, buckle up, because today, we are diving into the Jurassic era—with none other than a paper plate dinosaur craft! This hands-on activity is not just a boatload of fun; it’s also a fabulous way to harness those nimble fingers and fire up those creative young minds of your little ones!
Now, before we unleash our inner craftosaurus, let’s talk about why this simple project is about to become your new favorite go-to activity. Not only does it require minimal materials—most of which you’ll find lying around your home—it’s an incredible way to your child’s fine motor skills, and understanding of the Mesozoic era. And the best part? There’s absolutely no need for a trip to the craft store!
Gather Your Dinosaur Crafting Supplies
We begin our prehistoric escapade by rounding up the essentials. Here’s a quick list to check off:
- Paper plates – The backbone of our dino creation!
- Paints and brushes – For that splash of color.
- Scissors – To shape our dino friend.
- Glue – To piece together our Jurassic masterpiece.
- Markers, crayons, or colored pencils – To add those final touches.
- Construction paper or cardstock – For sturdy features.
- Googly eyes (optional) – To bring your dino to life.
And hey, feel free to improvise! Crafting is all about creativity, so if you want to add glitter, stickers, or anything else that tickles your fancy, go for it!
Step-by-Step: Creating Your Dinosaur’s Dazzling Design
Once you’ve got all your supplies at the ready, it’s time to create some dino-mite magic!
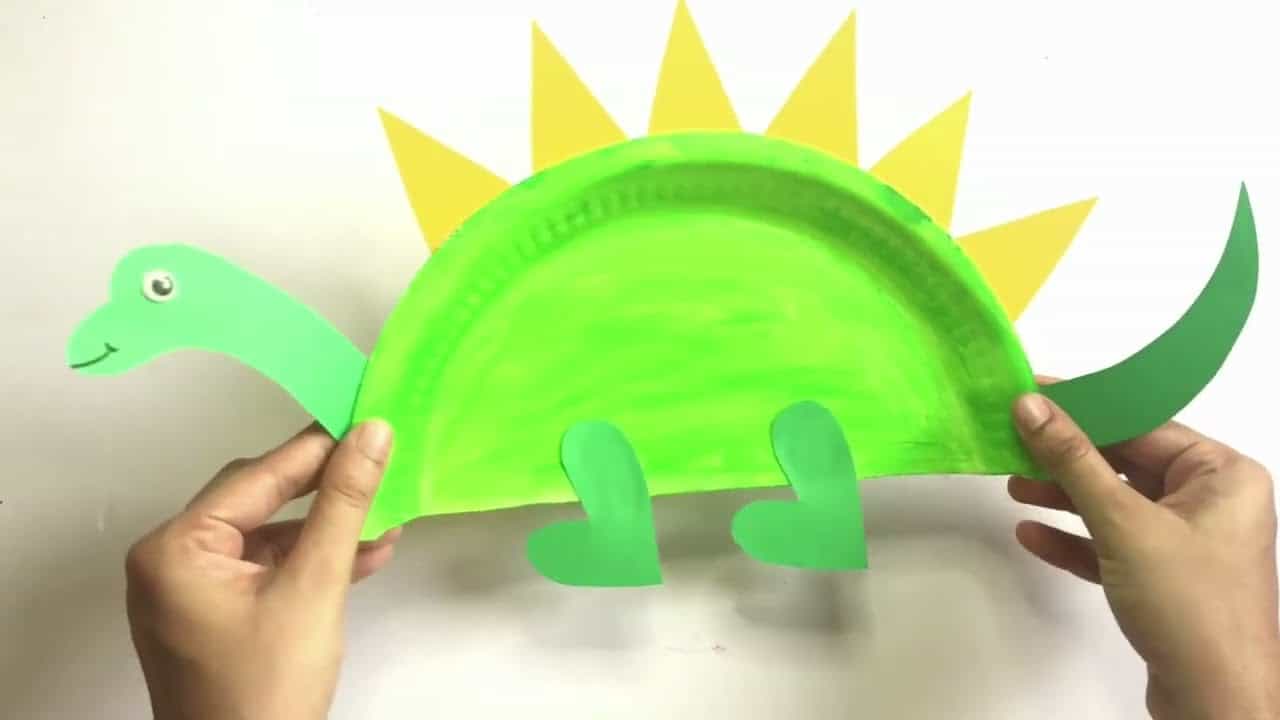
- Start with a Base: Grab a paper plate and paint it in a color of your choice. This will form the body of your dinosaur. Allow it to dry completely while you ponder which species you’re going to bring to life!
- Cut out the Parts: While the base dries, use another paper plate or construction paper to cut out the head, tail, and limbs. Remember, dinosaurs come in all shapes and sizes, so let your imagination roam wild!
- Assemble Your Dino: Once all the parts are cut out and the base is dry, glue them onto the body. Position the head, tail, and limbs where they look best to you. Feeling like a real paleontologist yet?
Hold on tight, folks! We’re not done yet. What’s a dinosaur without its personality, right? Go ahead and use those markers or crayons to draw on a smiling mouth, some fearsome teeth, or maybe even a pattern of scales. Remember, there’s no right or wrong here – it’s your dino, your rules!
Dot some glue on the back of a pair of googly eyes and press them onto your dinosaur’s face. Suddenly, it’s not just a paper plate; it’s a creature with a soul (albeit a rather crafty one).
And voila! You’ve just crafted your very own paper plate dinosaur! But don’t stop there – why not create an entire herd? Try out different colors, different dinosaur species, and even settings! You could create a scene straight out of the Mesozoic era with paper plate volcanoes and tissue paper trees! The possibilities are only limited by your imagination.
As you display your dino creations throughout the house or play with them in an adventurous storytelling session, cherish these moments of creativity and learning. Not only have you crafted a cute prehistoric pal, but you’ve also crafted lasting memories with your children. Talk about a roaring success!
Seriously, isn’t it incredible what you can do with something as simple as a paper plate? Embracing the DIY spirit can transform an ordinary afternoon into an extraordinary one. Stay tuned for more crafting adventures, tips, and dino-fun! Happy crafting, and may your love for DIY and dinosaurs never go extinct!
5 Things Parents Should Know Before Crafting Paper Plate Dinosaurs
1. Set the Scene for a Creative Adventure
Preparing the perfect environment is key to a successful crafting session. Choose a space that’s comfortable and where spills or a bit of mess won’t cause stress. Cover the table with newspaper or a disposable tablecloth and have a small waste bin nearby for easy cleanup. Make sure you have enough room for all the crafting supplies and for each child to work comfortably.
2. Safety Comes First
Always supervise children when they’re handling scissors or any other tools that could pose a risk. Pre-cut shapes or components for younger children can prevent accidents and ensure that the fun isn’t interrupted by boo-boos. For older kids, demonstrate safe use of scissors and other materials before starting the craft.
3. Creativity Over Perfection
Emphasize to your little ones that there’s no such thing as a perfect dinosaur – every creature they create is special. Encourage them to experiment with colors, textures, and shapes. It’s all about the process, not just the finished product. Praise their efforts and imagination regardless of what their paper plate dinosaur looks like in the end.
4. Use the Craft as a Learning Opportunity
Integrate fun facts about dinosaurs as you craft. Talk about the different species, what they might have eaten, and where they lived. This can turn a simple craft into an educational experience. You could even pair the activity with a dinosaur-themed storybook or documentary for added learning!
5. Crafting with a Purpose
Discuss with your children what they’d like to do with their dinosaurs once they’re complete. Maybe they want to use them in a play, hang them in their room, or gift them to a family member or friend. Giving the craft a purpose can be even more exciting for kids and can encourage them to put extra love into the creation.
As a reminder, always have a contingency plan for when things might not go as expected. Keep extra supplies on hand for do-overs and remember to keep the mood light and enjoyable. The goal is to make wonderful memories together!
Ready to embark on this artistic prehistoric adventure with your kids? With these tips and your crafting tools at the ready, you’re all set to create some truly dino-mite art. So, let the paper plate dinosaur crafting begin!


