
DIY Spinner Toys: A Fun & Creative Guide for Parents
Welcome, creative parents and crafty kids! Get ready to spin into action with our joyful guide to making your very own DIY spinner toys right at home. You’re about to embark on a whirlwind of fun, laughter, and creativity – together!
Why DIY Spinner Toys are Awesome
There’s something magical about spinner toys that captivates both children and adults alike. The hypnotic spinning action isn’t just mesmerizing but the process of making them can be just as thrilling. Here’s why you should consider DIY spinner toys:
- Boost Creativity: Designing a spinner from scratch allows for endless creative expression.
- Develop Fine Motor Skills: The cutting, coloring, and assembling are excellent for honing fine motor skills.
- Educational Opportunity: Introduce concepts like physics and symmetry in a fun, tangible way.
- Quality Family Time: Shared projects like these create memories and strengthen bonds.
- Eco-Friendly: Repurpose household items, reducing waste and teaching valuable environmental lessons.
Supplies You’ll Need to Get Started
Before we get spinning, let’s ensure we have all the supplies. The beauty of DIY projects is that they’re incredibly flexible – you can often use materials you’ve got lying around the house. Here’s a basic list to start:
- Cardboard or thick paper
- Markers, crayons, or paint
- Scissors
- A small coin or a washer
- Hot glue gun or strong tape
- Toothpick or a small dowel
- Compass or circular objects to trace
- Ruler
Step-by-Step Spinner Toy Crafting for Beginners
Alright, it’s time to roll up your sleeves and start crafting! We’ll go step-by-step to ensure your DIY spinner toy comes out spectacularly:
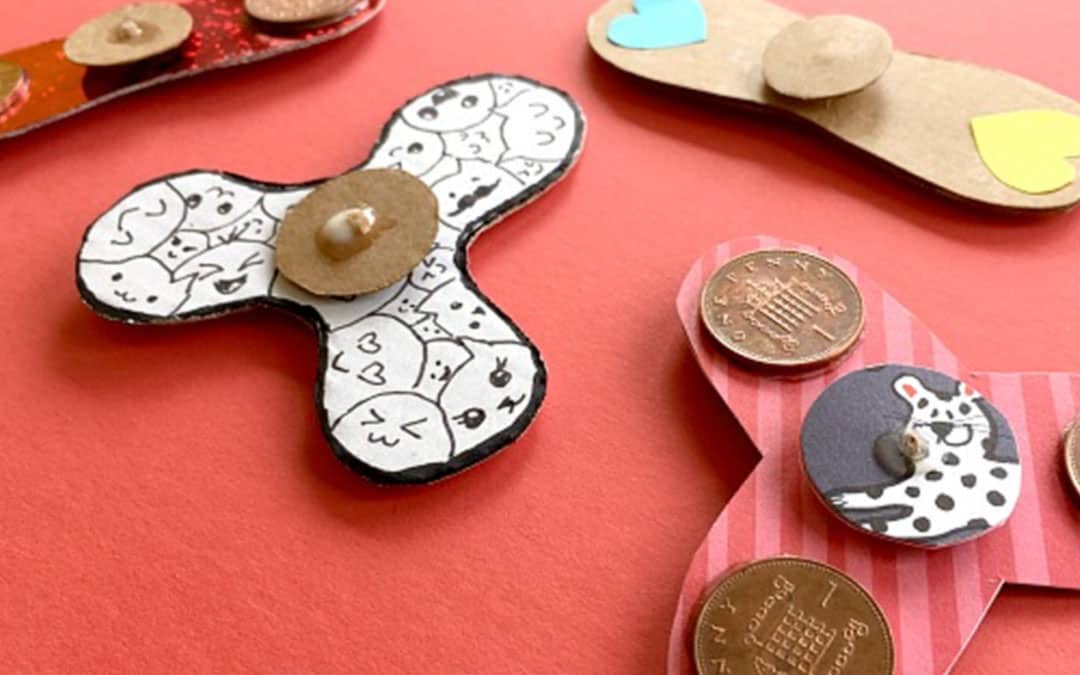
- Design Your Spinner: Decide on the shape of your spinner. Circular spinners are common, but you can go wild with stars, hexagons, or even heart shapes.
- Trace and Cut: Use your compass or found objects to trace the shape on your cardboard. Once satisfied with your design, carefully cut it out with scissors.
- Decorate with Flair: This is where the fun comes in! Grab those markers, crayons, or paints, and let your child’s imagination take the lead. Patterns, colors, and designs will make your spinner uniquely yours.
- Add Weight: To ensure your spinner balances and spins well, attach a small coin or washer to the center of one side using a hot glue gun or strong tape.
- Attach the Spinner Mechanism: Carefully pierce the center of the spinner with a toothpick or dowel. Make sure it’s snug but not too tight, as the spinner needs to rotate freely.
- Test and Tweak: Give your spinner a test spin! If it wobbles or doesn’t spin well, you might need to adjust the weight or the hole in the center. Once perfected, enjoy the spin!
Advanced Spinner DIY Tips
Once you’ve mastered the basic spinner, why not take it to the next level? Experiment with different sizes and weights to see how it affects the spin. You can even create a double-sided spinner with different designs on each side to create a mesmerizing optical illusion.
Remember, each spinner is a reflection of its maker, so encourage your children to share their creations and what they love about their unique design. Not only are you crafting a toy, but you’re also crafting confidence and pride in their creativity. Now that’s something worth spinning about!
Essential Tips for Crafting DIY Spinner Toys with Your Kids
Hey there, super-cool parents! Are you and your mini-makers ready to twirl into some DIY fun? Our ultimate guide to handcrafted spinner toys will turn craft time into prime family time, brimming with creativity and giggles!
Why DIY Spinner Toys Rock
Spinner toys are like magic, hypnotizing anyone who sees them. But guess what? Creating them is half the enchantment! Here’s the scoop on the awesomeness that is DIY spinner toys:
- Creative Genius: Unleash the imagination by crafting original designs.
- Skill Sharpeners: Watch as your kiddos improve their dexterity during craft time.
- Fun with Physics: Sneak in a little learning by exploring the science behind the spin.
- Togetherness Trophy: Building memories is just as important as building toys.
- Planet Protectors: Teach eco-savviness by reusing materials for play.
Gather Your DIY Gear
Let’s get this spinning party started! You’ll need a handful of supplies – most of which you likely already have at home. Here’s a quick checklist for getting your DIY on:
- Sturdy paper or repurposed cardboard
- Coloring materials—think markers or paints
- Scissors (safety first!)
- A wee bit of coinage or washers for balance
- Glue gun or trusty tape
- Pint-sized toothpick or dowel
- Compass or any circular dude to outline your spinner
- Straight-up ruler
Creating Your Spinner Toy: A Beginner’s Walkthrough
Fear not, first-time crafters! We’ve got the deets on turning those supplies into spin-worthy masterpieces. Follow along for smiles and spins:
- Pick a Shape: Dream up the form your spinner will take. Classic round, edgy star, maybe a charming heart—it’s spinner’s choice!
- The Trace Race: Use your compass or household shapes to outline the spinner on your chosen material. Cut it out smoothly with those scissors!
- Color Me Happy: Bust out the art supplies and let artistic instincts lead the way. Your spinner’s fashion is in your hands.
- Weight It Out: Slap on some weight—like a coin or washer—to one side to keep that spinner sailing smoothly.
- Spinny Bit Attachment: Puncture the heart of your spinner with a toothpick or dowel. It’s critical to make it snug, but not too snug—spinning is the goal!
- Test Drives & Twists: Spin test, anyone? If it wobbles or flops, adjust the weight or the pivot point until you’re in the clear. Then, it’s all about enjoying!
Next-Level Spinner Strategies
Got the basic spinner down? Amp up your game by trying different weights or double-decking your spinner with exciting designs on each face. Watching the colors blend as it spins is a treat!
Every spinner is an extension of its creator, so nudge your children to exhibit their art and chat about what makes their spinner special to them. You’re not just making a toy here — you’re nurturing their ingenuity and self-esteem. And that’s the real merry-go-round!
Five Things Parents Should Know in Preparing for Spinner DIY
Ready to lead the way in your home’s spinning sensation? Here are five golden nuggets to have in your back pocket:
- Keep Safety in Sight: Crafting should be all fun and games, but safety can’t take a backseat. Supervise the use of scissors and hot glue guns!
- Embrace Imperfections: Not all spinners are created equal, and that’s the beauty of DIY. Encourage your kids to embrace their unique touch!
- Prep Your Space: Glue guns and paint can be craftily chaotic. Set up in an area that’s ready for splatters and spills – the kitchen table with a cover is perfect!
- Patience is a Virtue: Some spinners may take a few tries to perfect. Use this as an opportunity to teach resilience and problem-solving.
- Spinoff Ideas: Once you’ve nailed down the spinner, think outside the box – maybe a themed spinner competition or a physics-based game. Sky’s the limit!
See more great Things to Do with Kids in New Zealand here. For more information see here
Disclaimer
The articles available via our website provide general information only and we strongly urge readers to exercise caution and conduct their own thorough research and fact-checking. The information presented should not be taken as absolute truth, and, to the maximum extent permitted by law, we will not be held liable for any inaccuracies or errors in the content. It is essential for individuals to independently verify and validate the information before making any decisions or taking any actions based on the articles.


