
Unleash the Power of Learning with a Volcano Paper Mache Project!
Welcome, creative parents and curious kids! Are you ready to embark on an exciting adventure right in the comfort of your home? Let’s dive into a world where science, creativity, and fun erupt together—yes, we’re talking about building your very own volcano paper mache! Whether it’s for a school project or a rainy day activity, this guide is your ticket to a blast of educational entertainment. ??
The Magic of Volcano Paper Mache
Creating a volcano paper mache is an awesome way to combine art and science in one dynamic activity. Not only does it fuel creativity and fine motor skills with the artsy craft of paper mache, but it also brings to life the explosive wonders of geology and chemistry. Get ready to spark curiosity and dazzle the minds of young learners as they witness the thrilling eruption they’ve crafted with their own hands!
What You’ll Need to Get Started
- Materials for the Volcano Base:
- Cardboard or a small plastic bottle (for the volcanic structure)
- Old newspapers or paper towels (for the paper mache)
- Water and flour (for the paper mache paste)
- A paintbrush or your hands (for applying the paste)
- Materials for the Volcano Eruption:
- Baking soda
- Vinegar
- Food coloring (red or orange for a realistic lava effect)
- Dish soap (optional for bubblier lava)
- Painting and Decorating Supplies:
- Paint (browns, greens, reds, and oranges)
- Brushes and sponges
- Decorative items like small plastic trees or dinosaurs (for the surrounding landscape)
Creating Your Volcano Structure
The first step is all about laying the groundwork for your volcanic masterpiece. You’ll need to prepare your paper mache mixture and build a solid base for your volcano. Patience is key here, as your structure will need time to dry before you can move on to the painting and eruption stages. Ready to get messy and have a blast? Let’s get crafting!
Step 1: Prepare Your Paper Mache Paste
Mix one part flour with two parts water in a large mixing bowl. You’re aiming for a consistency similar to pancake batter. If it’s too thick, add a bit more water; too runny, and a bit more flour. This mixture will be the glue that binds your paper strips and forms the structure of your volcano.
Step 2: Build the Base of Your Volcano
Now comes the fun part! Take your cardboard or plastic bottle and place it on a flat surface. This will act as the core of your volcano. Dip strips of old newspapers or paper towels into your paper mache paste, removing the excess, and start layering them around the base. Build up the volcano’s sides to create a mountainous shape—the messier and more textured, the better! This will add a realistic touch to your final product.
Stay tuned for the thrilling continuation of building and erupting your very own volcano paper mache. The next steps will guide you through the drying, painting, and ultimate eruption phases that truly bring your volcano to life. We’re just getting started, so hold on to your artsy hats—the real fun is about to begin!

5 Things Parents Should Know in Preparing for Volcano Paper Mache
Before you jump into creating your molten masterpiece, here are five important tips to keep the process smooth, safe, and enjoyable:
1. Prepare Your Workspace
Choose an area that’s easy to clean and won’t be disturbed during drying times, which can last a few hours to overnight. Cover your table with newspapers or an old tablecloth to catch any drips or spills. Remember, paper mache can be a sticky business, so it’s crucial to protect your surfaces.
2. Wear Appropriate Clothing
Paper mache can be a messy affair, and even though it’s all part of the fun, you don’t want to ruin your favorite outfits. Make sure everyone is wearing old clothes or aprons, and keep a stack of paper towels or rags handy for quick clean-ups.
3. Prepare Materials in Advance
To keep the crafting session flowing smoothly, cut your strips of newspaper and mix your paper mache paste beforehand. You’ll thank yourself when your little ones are eager to get started, and everything is ready to go.
4. Safety First!
While the materials used are generally safe, it’s always a good idea to keep a close eye on younger children, ensuring they don’t ingest any non-edible materials. Also, supervise the eruption process closely, as vinegar and baking soda can react quite vigorously!
5. Be Patient and Flexible
Paper mache is an art, not a science—well, until the eruption! It’s okay if your volcano has bumps or lumps; it adds to the authenticity. Allow your children to be creative, and remember that drying times can vary depending on the thickness of your layers and the humidity in your home.
Drying, Painting, and Decorating Your Volcano
Step 3: Allow Your Volcano to Dry
Once your volcano structure is as massive and textured as you want, you’ll need to let it dry completely. This process can take from a few hours to overnight, depending on the thickness of the paper mache and the humidity in the air.
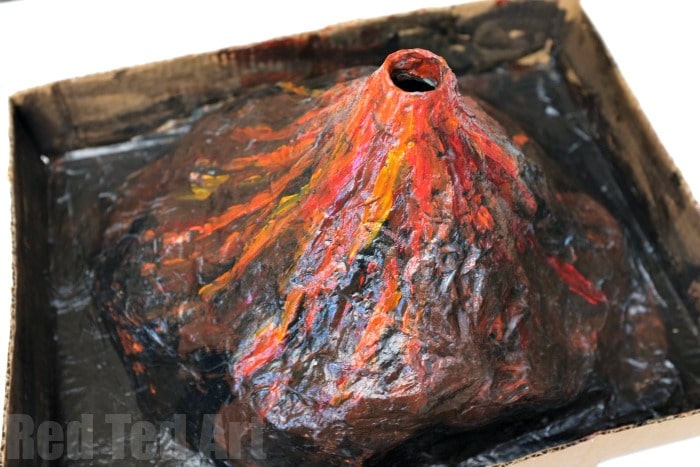
Step 4: Paint and Decorate Your Volcano
When your volcano is dry, it’s time to bring it to life with color! Paint your volcano with earthy tones such as brown for the mountain, green for grass, and reds and oranges for the lava trails. You can get as detailed or as simplistic as you like. For an extra touch of realism, add trees, dinosaurs, or little houses around the base to create a prehistoric scene.
Bringing Your Volcano to Life: The Eruption!
Step 5: Prepare Your Eruption Mixture
This is the moment you’ve all been waiting for—the eruption! In the center of your volcano, mix baking soda and a few drops of dish soap. Add a few squirts of food coloring to your vinegar for that fiery lava look, and when you’re ready, pour the vinegar into the heart of your volcano and stand back to watch the bubbly, fizzing explosion!
Step 6: Enjoy and Learn
Take a moment to enjoy the results of your hard work. Discuss with your children why the reaction happened, and talk about how it relates to real volcanic eruptions. What better way to learn about the power of nature than with a spectacular volcanic display in your own home?
Recap and Next Steps
Building and erupting your volcano paper mache is a fun-filled learning experience that can provide value well beyond the initial excitement. Use this opportunity to delve deeper into subjects like geology and chemistry or incorporate this project into a broader lesson about nature and the environment.
If your kids loved this activity, there are plenty of other experiments and projects that can continue to stimulate their imagination and understanding of the world around them. Consider a paper mache solar system, a homemade weather station, or even a mini-garden project to explore the wonderful realm of botany.
This craft has undoubtedly sparked joy and curiosity in the hearts and minds of everyone involved. Hold onto that momentum and keep the learning going! Remember, the sky—or should we say, the peak of the volcano—is the limit! Ready for your next adventure?


