
Create Cherished Memories with DIY Christmas Clay Ornaments
Hello, crafty parents and festive enthusiasts! Are you looking to sprinkle an extra pinch of joy into your holiday season? Well, you’re in the merriest place possible! In this guide, we’ll explore the whimsical world of Christmas clay ornaments, a perfect blend of creativity and family fun. Whether looking to start a new tradition or simply searching for a delightful activity to share with your little elves, making clay ornaments can be a fabulous source of holiday cheer.
Why Make Your Own Christmas Clay Ornaments?
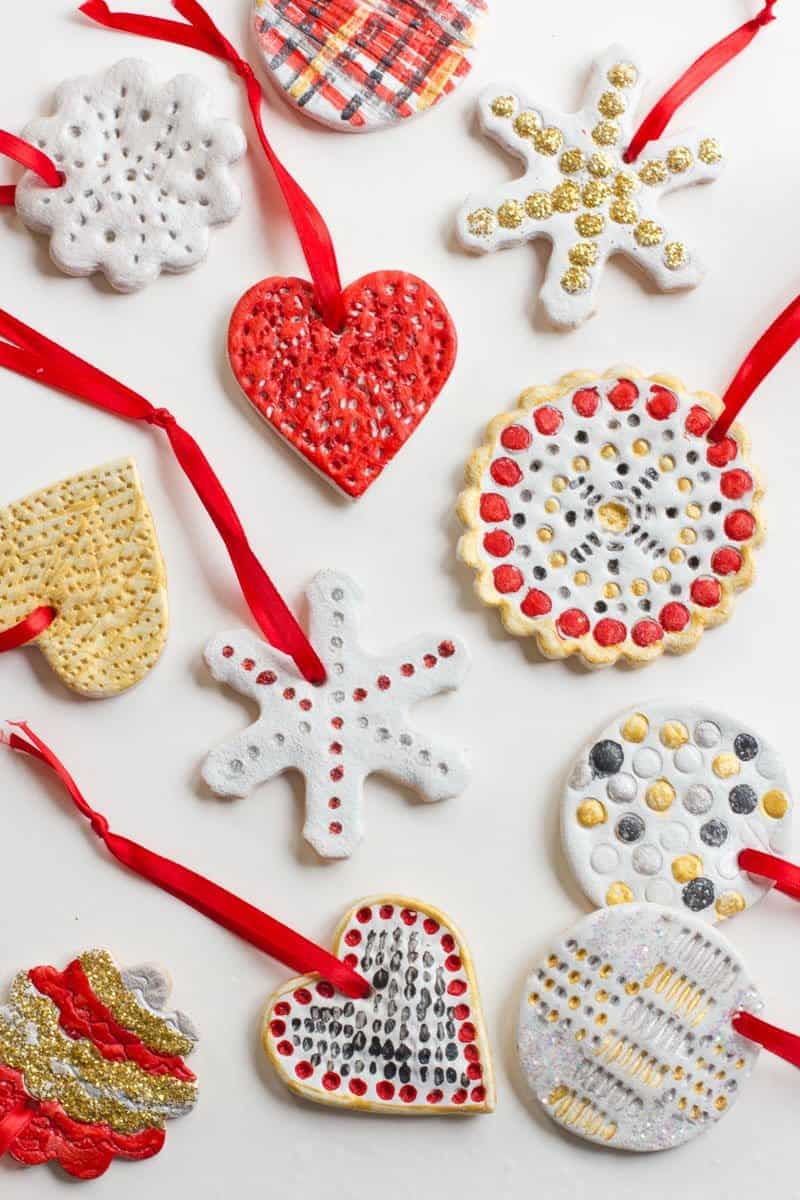
Making your own Christmas clay ornaments isn’t just a fun holiday activity, it’s a chance to bond with your children and create lasting memories. Each ornament can tell a story, represent a special moment, or reflect your family’s unique personality. Plus, what’s better than seeing your very own creations twinkling amongst the fairy lights on your Christmas tree?
Gathering Your Supplies
Before we dive into the nitty-gritty of our festive crafting, let’s start by gathering all the necessary supplies. Here’s what you’ll need:
- Air-Dry Clay: This is the foundation of your ornaments. It’s easy to mold and, best of all, requires no baking!
- Rolling Pin: For rolling out your clay to an even thickness.
- Cookie Cutters: These will help you cut out shapes from the rolled-out clay. Think Christmas trees, stars, snowflakes, or even custom shapes!
- Straw or Toothpick: For making a small hole at the top of each ornament for ribbon or string.
- Acrylic Paints: To bring color to your clay creations after they’ve dried.
- Mod Podge or Clear Varnish: To seal and protect your painted ornaments.
- Ribbons or Hooks: For hanging your ornaments on the Christmas tree.
- Embellishments: Think glitter, beads, or anything else you’d like to add a special touch to your ornaments.
Creating Your Ornaments
With your supplies in hand, it’s time to start crafting! Here’s a simple step-by-step process:
- Knead Your Clay: Begin by softening the air-dry clay in your hands. Kneading it will make it more pliable and easier to work with.
- Roll Out the Clay: Use your rolling pin to roll out the clay on a smooth surface. You’re aiming for a thickness of about 1/4 inch, which will ensure the ornaments are sturdy enough without being too heavy.
- Get Creative with Shapes: Press your cookie cutters into the clay to create your desired shapes. Wiggle them a little to make sure the edges are clean and sharp.
- Make a Hole: Take your straw or toothpick and gently make a hole towards the top of each ornament shape, making sure it’s big enough for string or a ribbon to pass through.
- Let Them Dry: Place your ornaments on a flat surface and allow them to dry as instructed on the clay packaging. Depending on the type and thickness of the clay, this may take up to 24 hours.
While you wait for them to dry, you can start thinking about how you want to paint and decorate them. Maybe each family member can choose their own color scheme, or perhaps you could all work on a theme together?
Painting and Decorating Your Ornaments
Once your ornaments are completely dry, it’s time to get colorful! Set up a painting station with various acrylic paint colors, brushes, and a cup of water for rinsing between colors. Encourage your kids to express their creativity, but make sure to cover your workspace to protect it from any paint spills.
After the paint has dried, you can apply any embellishments using craft glue. Add glitter for a sparkling effect, ribbons for an elegant touch, or beads for a bit of whimsy. Let your family’s imagination run wild! This is where your tree decorations will truly come to life and embody the special charm of a handmade Christmas.
Sealing your ornaments with Mod Podge or clear varnish will ensure they last for many Christmases to come. Apply a thin, even layer and allow it to dry completely before moving on to the final step: adding the ribbons or hooks.
Finally, thread the ribbons or attach hooks through the holes you made earlier, and voilà, you have beautiful, ready-to-hang Christmas clay ornaments!
As the sweet scent of gingerbread lingers in the air and the warmth of the hearth glows, there’s no doubt that crafting these clay ornaments can only enrich the magic of the season. So, gather ’round, roll up your sleeves, and let the festive clay-making merry-go-round spin you into a wonderful whirl of Christmas joy!
Up next, we will take an even deeper dive into designing and personalizing your ornaments, ensuring this Christmas will be adorned with a truly personal touch. Stay tuned, as your ornaments transform from simple clay to a gallery of holiday memories.
Five Things Parents Should Know in Preparing for Christmas Clay Ornaments
1. Choosing the Right Clay
Picking the suitable clay is crucial for your ornament-making success. There are various types like air-dry, oven-bake, and polymer clay. For beginners and families with young children, air-dry clay is often the safest and easiest option, as it doesn’t require any baking. It’s also less messy and generally non-toxic, making it child-friendly!
2. Timing Is Key
Remember that air-dry clay can take from a few hours to a full day to dry completely before you can paint. To avoid any last-minute rushes, it’s best to plan. Set aside ample time for crafting, drying, and decorating so your ornaments can gracefully join the tree on time.
3. Embrace Creativity, Not Perfection
While it might be tempting to aim for Pinterest-perfect ornaments, the true joy lies in the unique and sometimes wonky creations that come straight from the heart. Encourage your kids to enjoy the process and express their creativity without worrying about making mistakes. After all, these creations will carry sentimental value that outweighs any notion of ‘perfection’.
4. Safety First
Before getting started, ensure that your work area is safe and that all materials used are non-toxic and suitable for children. When handling paints, glues, and especially small embellishments, it’s important to supervise young children to prevent any accidents or potential choking hazards.
5. Preserving Your Ornaments
Your handcrafted ornaments could be treasured for years to come if they’re preserved properly. Using a sealant like Mod Podge or clear varnish will protect them from wear and tear. Store them carefully at the end of the season, wrapping them in tissue paper to prevent any breakages while they hibernate till next Christmas.
In the warmth of your cozy crafting corner, as the snowflakes dance outside the window, the spirit of Christmas really comes alive. With every pinch, roll, and brush stroke, you are not just crafting ornaments but also piecing together a mosaic of fond family memories. As each ornament assumes its place on the lush pine boughs, let them be a testament to the love and laughter shared during those crafting sessions.
Before you know it, the Christmas tree will be standing tall, proudly bearing the weight of your family’s joint creativity. Remember to take lots of pictures, not just of the beautiful ornaments but of the sparkling eyes and joyful grins that accompanied their making. After all, it’s these merry moments that make up the most treasured of family traditions.
And there you have it, dear parents and guardians of merriment, your festive guide to creating the most enchanting Christmas clay ornaments. Your tree will not just radiate with beauty but also resonate with the love and care poured into every handcrafted piece. So let’s keep the tradition alive, one joyful crafting session at a time, and continue to fill our homes with the kind of Christmas spirit that truly lasts a lifetime.
See more great Things to Do with Kids in New Zealand here. For more information see here
Disclaimer
The articles available via our website provide general information only and we strongly urge readers to exercise caution and conduct their own thorough research and fact-checking. The information presented should not be taken as absolute truth, and, to the maximum extent permitted by law, we will not be held liable for any inaccuracies or errors in the content. It is essential for individuals to independently verify and validate the information before making any decisions or taking any actions based on the articles.


