
Delightful Jelly Slice Recipe for Kids: A Step-by-Step Guide for Parents
Hey there, awesome parents! Are you on the hunt for a fun and jiggly dessert that will light up your kids’ eyes with glee? Look no further! We’ve got an incredibly yummy Jelly Slice recipe that’s not just tasty, but also super easy to whip up. Whether you’re planning a birthday party, a family gathering, or just looking for a sweet surprise, this Jelly Slice is sure to become a family favorite. So, tie on your apron and get ready for some kitchen fun!
Why You’ll Love This Jelly Slice Recipe
- It’s No-Bake: Oven, what oven? Leave it off! This cool dessert comes together without any baking, making it safe and easy for busy bees.
- Just 5 Ingredients: With only a handful of ingredients, this dessert is a breeze to prepare. Simple and delicious!
- Kid-Friendly: Kids can join in on the layering fun, making it a delightful kitchen activity for the whole family.
- Perfect for Any Occasion: Whether it’s a playdate, school event, or just dessert after dinner, this Jelly Slice is the perfect choice.
What You’ll Need to Get Started
Ingredients:
- Biscuit Base:
- 250g plain digestive biscuits (or graham crackers for those across the pond!)
- 150g unsalted butter, melted
- Creamy Layer:
- 395g can sweetened condensed milk
- 2 tablespoons fresh lemon juice
- 5 tablespoons boiling water
- 1 tablespoon gelatine powder
- Jelly Topping:
- 85g packet of jelly crystals (your favorite flavor!)
- 1 cup boiling water
- ½ cup cold water
Equipment:
- A square baking pan (preferably 20cm x 20cm)
- Parchment paper or baking paper for lining
- A food processor (for crushing biscuits)
- A mixing bowl
- A saucepan
- A whisk or spoon for stirring
- A refrigerator (because it’s all about staying cool!)
Let’s Dive Into Making That Scrumptious Jelly Slice
Before you get started with the mixing, layering, and setting, it’s super important to ensure you’ve got everything laid out on your kitchen counter. This way, you won’t find yourself in a fluster searching for the lemon juice while your butter solidifies. Prepping ahead is the secret ingredient to making kitchen magic happen.
Constructing the Biscuit Base
Begin by crushing the biscuits into fine crumbs. If you’ve got a food processor, fabulous! If not, no worries. You can place the biscuits in a sealable plastic bag, grab a rolling pin or heavy object, and unleash your inner cookie-crushing superhero! Once the biscuits have transformed into tiny crumbs:
- Combine them with the melted butter in a bowl. Mix it around until the butter coats every itty-bitty crumb.
- Press this buttery mixture into the bottom of your lined baking pan. Use the back of a spoon or a flat bottomed cup to get a firm, even layer.
- Pop the pan in the fridge to let the base set and chill out while you prep the creamy layer.
Creaming Up the Middle Layer
Next, it’s time to create that dreamy, creamy layer. Here’s how:
- In a small cup, sprinkle the gelatine powder over the boiling water and stir briskly until completely dissolved. Set aside to cool slightly.
- In a medium bowl, whisk together sweetened condensed milk and lemon juice. The lemon juice not only adds a citrusy twist but also helps thicken the mixture.
- Once the gelatine is no longer hot, but still liquid, pour it into the condensed milk mixture. Whisk until well combined.
- Pour this over the chilled biscuit base and return it to the refrigerator to set. This usually takes about an hour, but timing can vary, so check for a firm consistency before proceeding to the next step.
While you wait for the middle layer to firm up, have a little dance party in your kitchen or sneak in some extra cuddle time with your kiddos. After all, patience is a dessert best served with fun!
Ready for the final touches? Stay tuned for the grand finale as we create the jewel-toned jelly topping that crowns your majestic dessert. But for now, give yourself a pat on the back, because you’re doing fabulous, sweet parent!
We’ll be diving into the final steps to bring that wobbly layer of jelly goodness to your fridge and soon to everyone’s happy tummies. Keep your spirits high because you’re one step away from making those taste buds dance with joy!
5 Things Parents Should Know When Preparing This Jelly Slice Recipe
1. The Importance of Ingredient Temperature
Temperature really matters in this recipe! Make sure your butter is melted but not too hot when combining it with the biscuit crumbs. This will prevent the base from becoming greasy. Similarly, ensure the gelatine mixture is cool but still in liquid form before adding to the condensed milk. Too hot, and it could curdle the mixture; too cold, and it might start setting too soon.
2. The Magic of Setting Times
Patiently wait for each layer to set properly before adding the next. Rushing can lead to layers mixing or not setting correctly, which can affect the final texture and appearance of your slices. The fridge is your friend here, so use it wisely and give each layer the time it needs to achieve perfection.
3. Involving Your Kids in the Process
Get your little ones involved in the kitchen with age-appropriate tasks. Crushing biscuits, pressing down the base, and choosing the jelly flavor can be fun activities that also teach them about following directions and the joys of cooking. Plus, it turns dessert-making into a bonding experience.
4. Choosing the Right Pan
The size of your pan can affect the thickness of each layer, so sticking to the recommended 20cm x 20cm size is a good idea. If you choose a different size, just be prepared for the look and texture of your jelly slices to vary slightly from what you see in pictures or what you might expect.
5. Prep and Cleanup Ease
Line your pan with parchment paper with some overhang on the sides. This will ensure your Jelly Slice lifts out easily once set. You’ll thank yourself during cleanup because it minimizes sticking and leaves your pan almost clean—leaving you more time to enjoy the fruits (or jellies!) of your labor.
Assembling the Rainbow-Hued Jelly Topping
Creating the Glorious Jelly Topping
Now, let’s put the wobble in the equilibrium with a rainbow-hued jelly topping that crowns this royal delight:
- Dissolve the jelly crystals in a cup of boiling water, stirring until completely melted. Then add the cold water to help cool the mixture down faster.
- Once the jelly mixture is cool (but not set), carefully pour it over the creamy condensed milk layer. The aim here is to not disturb the smooth surface beneath, so take it slow.
- Place the pan back in the refrigerator to set completely, which can take a few hours. To be safe, consider leaving it to set overnight—it guarantees you’ll slice into set layers that hold their shape beautifully when served.
Final Set and Serve
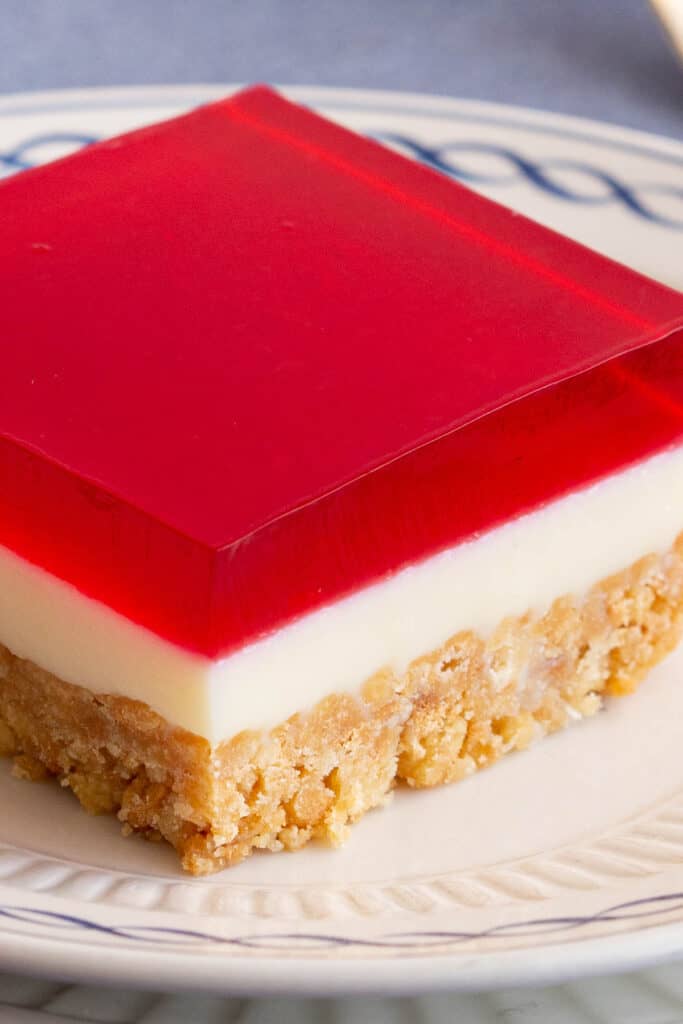
The hardest part of this recipe might just be the wait, but trust us—it’s worth it! Once all layers have set firmly, lift the Jelly Slice from the pan using the overhanging parchment paper as handles. With a sharp knife (dipped in hot water for clean cuts), slice into squares or bars. Serve up these vibrant slices and witness the delight on your family’s faces as they bite into the perfectly set layers of biscuity base, creamy filling, and wobbly jelly topping.
All Set to Enjoy!
Congrats, you’ve reached the pinnacle of parent-cooking-success with this delightful jelly slice! Keep these simple yet effective tips in mind, and you’ll be a jelly-slice-juggernaut in no time. What are you waiting for? Let those smiling faces and happy tummies be your ultimate satisfaction as you all dig into this delightful no-bake masterpiece. Happy slicing!
For more great articles please see here. For more information see here
Disclaimer
The articles available via our website provide general information only and we strongly urge readers to exercise caution and conduct their own thorough research and fact-checking. The information presented should not be taken as absolute truth, and, to the maximum extent permitted by law, we will not be held liable for any inaccuracies or errors in the content. It is essential for individuals to independently verify and validate the information before making any decisions or taking any actions based on the articles.


