
Ultimate Guide to Making Homemade Muesli Bars
Hey there, super parents! Are you on the hunt for a wholesome snack that can keep up with your family’s bustling energy levels? Look no further! ? These homemade muesli bars are not only a cinch to whip up but are also jam-packed with nutritious goodies that are bound to bring smiles to your little ones’ faces (and let’s be honest, yours too!).
The Joy of Homemade Muesli Bars
There’s something quite magical about creating your very own snacks from scratch. Not only do you get to pick the best ingredients, but you also get to avoid all those pesky preservatives often found in store-bought options. Making muesli bars at home allows you to tailor everything to your family’s tastes and dietary needs. Plus, you can involve the kids and turn it into a fun family activity! ?
Before you start, let’s gather what you’ll need for your homemade muesli bar adventure:
- A big bowl for mixing
- A baking tray
- Baking paper
- A wooden spoon or spatula
- Measuring cups and spoons
- Ingredients for your bars—don’t worry, we’ll guide you through this!
Choosing Your Ingredients
One of the best things about muesli bars is the endless variety of ingredients you can mix and match. To get started, we’ve divided the ingredients into different categories:
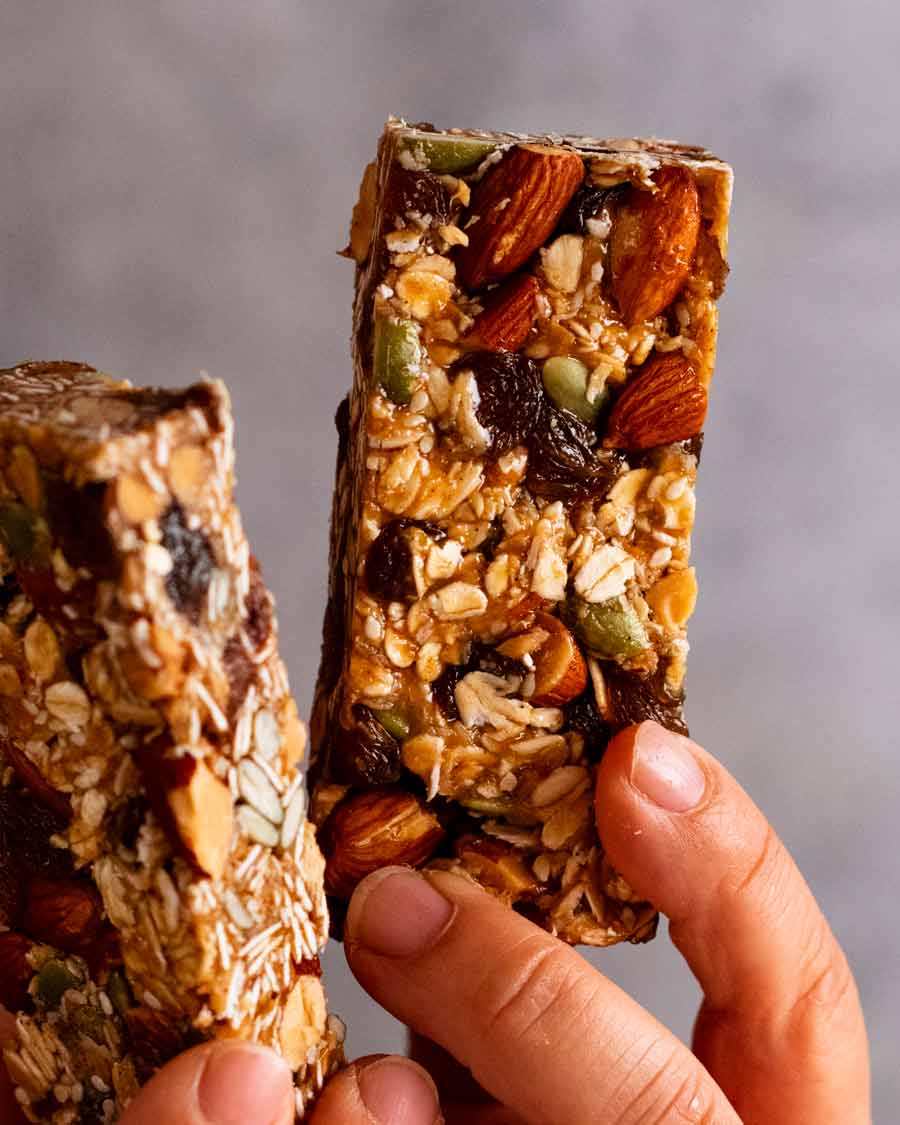
- Oats – These are the heart of the muesli bar, providing a fantastic source of fiber and keeping you full for longer.
- Nuts and Seeds – Almonds, cashews, walnuts, or seeds like pumpkin and sunflower add crunch, nutrients, and healthy fats.
- Dried Fruit – For natural sweetness and chewiness, consider dried apricots, raisins, cranberries, or dates.
- Binders – Honey, maple syrup, or even a ripe banana will help to stick all the ingredients together.
- Extras – Spice things up with cinnamon, nutmeg, or vanilla extract for an extra flavor kick.
Step-by-Step: Crafting Your Muesli Masterpiece
Now for the fun part—let’s get into the nitty-gritty of making those delightful bars:
- Preheat your oven to the perfect toasty temperature- typically around 350°F (175°C) – so your bars can crisp up nicely.
- Line your baking tray with baking paper, ensuring none of those tasty morsels stick. This step means a no-fuss cleanup afterward!
- In your trusty big bowl, mix the oats, your chosen nuts and seeds, and that scrumptious dried fruit. Stir these dry ingredients like you’re crafting a potion of deliciousness!
- Time to bring in the sweet, sticky binders—warm your honey or maple syrup slightly to make it easier to mix in. If you’re using a ripe banana, mash it until it’s smooth and blend it in.
- Pour your wet ingredients over the dry mix and stir, stir, stir with enthusiasm until everything is wonderfully coated and starting to stick together like best friends at recess.
Stick with us, because we’ve only just begun exploring the heights of homemade muesli bar joy! Keep reading for the tactical baking tips, cool customizations, and creative twists that will elevate your snack game to a whole new level of awesome. And who knows, you might just become the neighborhood’s go-to muesli bar wizard. Ready for the next part? Let’s keep the fun rolling! ??

5 Things Parents Should Know When Preparing Homemade Muesli Bars
1. Balance is Key
It’s critical to balance the dry and wet ingredients to ensure your bars stick together without being overly dry or too sticky. Aim for a ratio that allows the mix to clump together when pressed but isn’t dripping in syrup. Too much liquid and your bars will be too tough to chew; too little, and they’ll crumble like a sandcastle at high tide!
2. Nutritional Considerations
Keep an eye on the sugar content, even from natural sources like honey or dried fruit. While delicious, too much sugar can lead to energy crashes. Opt for a lower glycemic index sweetener like coconut sugar or include a boost of protein with nut butter to keep those energy levels stable.
3. Dietary Restrictions
Be mindful of any dietary restrictions or allergies within your family. Substitute nuts for seeds if allergies are a concern, and use gluten-free oats if gluten is an issue. Similarly, for a vegan option, replace honey with agave syrup or another plant-based binder.
4. The Pressing Matter
The secret to bars that hold their shape is in the pressing. Once you have spread the mix in the tray, press down firmly with the back of a spoon or with dampened hands. The tighter the mix is packed, the less likely your bars will crumble. No one enjoys chasing oats around their snack box!
5. Storage Smarts
Once baked and cooled, store your muesli bars in an airtight container to keep them fresh and crunchy. They can last up to a week at room temperature or be frozen for longer-term storage. To avoid a solid block of muesli, layer parchment paper between bars before freezing.
Customization: Making Muesli Bars Your Own
The true joy of homemade muesli bars is in the countless ways you can personalize them. Stir in some chocolate chips for a treat, swap out the dried fruit based on seasonal availability, or add a swirl of peanut butter to woo your nut-loving kiddos. The kitchen is your playground!
Tips for Successful Baking
Check those bars around the 15-minute mark; ovens can be a bit cheeky with their temperature swings. You want your muesli bars golden brown not just on the edges but also on top. A gentle touch should come with a firm bounce-back. If it sinks like a trampoline, give it a bit more time to firm up.
Getting Kids Involved
Little hands love helping out, and making muesli bars offers a perfect opportunity. Have your kids help with pouring, mixing, and pressing down the mix. Not only does this foster a love for cooking, but it also gives them a sense of accomplishment when munching on the fruits of their labor.
The Final Touch
Once your bars are baked and cooled, cut them into evenly sized pieces with a sharp knife for a professional look. If the bars are a bit too crumbly, pop them in the fridge for a while to firm up before attempting to cut them again. These morsels of goodness are now ready to be devoured. Enjoy the taste of togetherness with every bite!
And there you have it, folks! With this guide, you’re well on your way to snack-time mastery with homemade muesli bars that will delight your family and make snack time a breeze. What a tasty way to bring joy and nutrition into your home. Jump in, give them a try, and watch those little faces light up with each bite. Happy baking!
See more great Things to Do with Kids in New Zealand here. For more information see here
Disclaimer
The articles available via our website provide general information only and we strongly urge readers to exercise caution and conduct their own thorough research and fact-checking. The information presented should not be taken as absolute truth, and, to the maximum extent permitted by law, we will not be held liable for any inaccuracies or errors in the content. It is essential for individuals to independently verify and validate the information before making any decisions or taking any actions based on the articles.


