
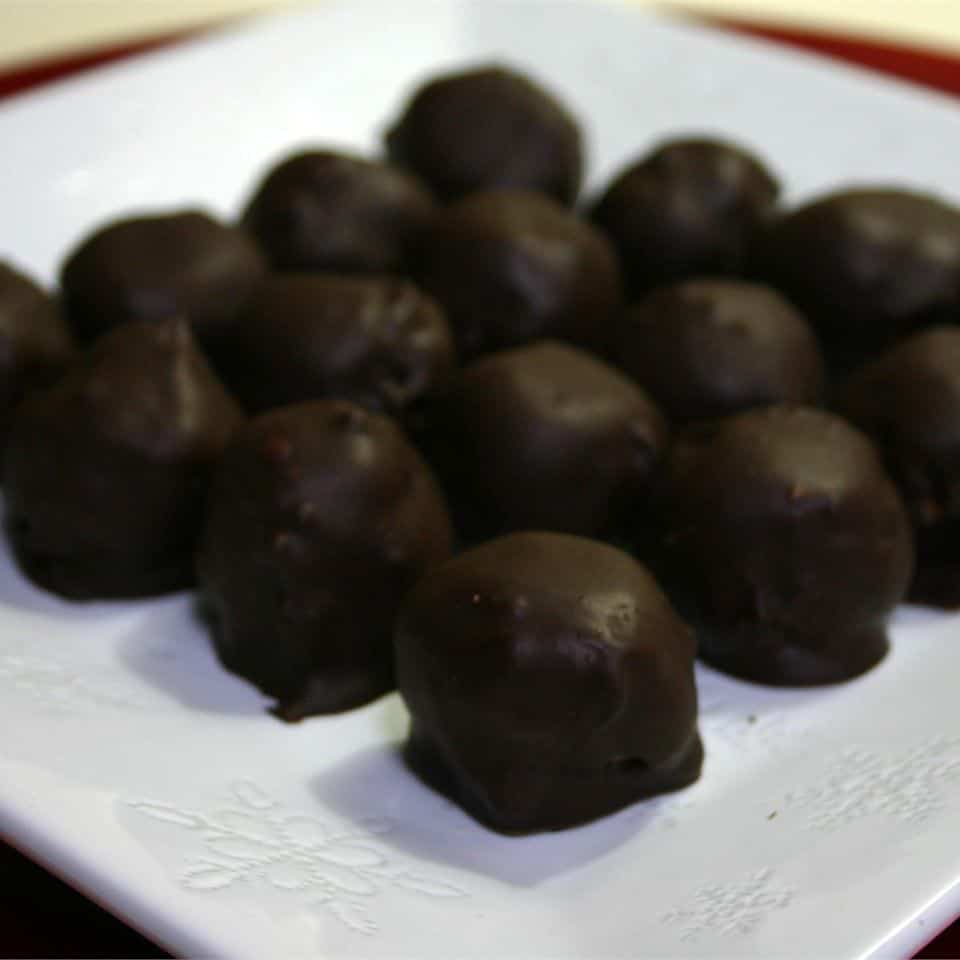
Delicious Chocolate Ball Recipe That Your Kids Will Love!
Hey there, dear parents and chocolate enthusiasts! Are you looking for a delightful treat to make with your kids that’s not just fun to prepare but also irresistibly scrumptious? Look no further because we’ve got the perfect chocolate ball recipe that will bring smiles to your family’s faces and fill your home with the sweet aroma of chocolate. Plus, this recipe is as easy as pie—or, should we say, as easy as rolling a ball of chocolate! ??
Why Chocolate Balls are the Ultimate Family-Friendly Treat
Before we dive into the recipe, let’s chat about why chocolate balls are such a hit in any household. They are versatile treats that can be customized with your favorite ingredients, they don’t require any baking, and they’re perfect for tiny hands to help shape and roll. That means you get to spend quality time with your kiddos while creating something yummy that everyone can enjoy. It’s a win-win!
Ingredients You’ll Need
- 1 cup of your preferred chocolate (dark, milk, or white), finely chopped
- 1/2 cup heavy cream
- 2 tablespoons unsalted butter, softened
- 1 teaspoon pure vanilla extract
- Pinch of salt
- Various coatings (cocoa powder, sprinkles, crushed nuts, powdered sugar, etc.)
Easy-Peasy Steps to Chocolate Ball Bliss
Step 1: Melting Chocolate Goodness
Start by creating a simple ganache, which will be the base of your chocolate balls. Heat the heavy cream in a saucepan over medium heat until it begins to simmer. Then, pour it over the chopped chocolate and let it sit for about 5 minutes—no peeking! This allows the chocolate to melt gently. After 5 minutes, whisk the mixture until it’s smooth and shiny. Go ahead, take a moment to bask in the glory of that chocolate nirvana!
Step 2: Adding Flair with Butter and Vanilla
Now, add the softened butter, vanilla extract, and that sneaky pinch of salt to the ganache. The butter makes the chocolate balls extra creamy, while the vanilla and salt elevate the flavors to make them even more delectable. Stir everything together until beautifully combined.
Step 3: Chill Time!
Spread the ganache onto a baking dish lined with parchment paper and chill in the fridge for about 2 hours, or until firm to the touch. The anticipation might be tough, but this is a great time to start planning which coatings you and your kiddos will use to dress up your chocolate creations!
As you wait for the ganache to firm up, take this moment to engage with your children in other fun activities. Discuss their favorite part of making the chocolate balls or what other desserts they’d love to learn how to make. These are the precious moments where bonding happens, and memories—I promise—are just as sweet as the treats you’re about to enjoy.
Get excited because, in the next section, we’ll dive into rolling and coating your chocolate balls, plus some creative twists to make each batch uniquely yours. Let’s get ready to roll, sprinkle, and savor!
Stay tuned for more chocolatey fun, and remember, the best ingredient in any recipe is a sprinkle of joy and a heap of love. ?
5 Things Parents Should Know Before Preparing Chocolate Balls
1. Prepare Your Kitchen Space
Make sure you have a clean and spacious area to work on. Chocolate can be messy, especially when little hands are involved, and you’ll want to have enough room to spread out your ingredients and utensils. Lay out your coatings and have a lined tray ready for the finished chocolate balls to set on.
2. Choose the Right Chocolate
Select high-quality chocolate for the best-tasting chocolate balls. If you’re making these with youngsters, you might prefer milk chocolate for a sweeter, milder flavor. For a more intense flavor, dark chocolate is a perfect choice. It’s not just taste; good quality chocolate will melt and temper better, resulting in smoother ganache.
3. Get Creative with Ingredients
This recipe is incredibly adaptable! Discuss with your children what flavors they love and incorporate them into the recipe. From stirring in peanut butter to mixing in dried fruits or crushed cookies, you can make each batch a new adventure. Plus, this is a great opportunity to teach your kids about pairing and contrasting flavors.
4. Safety First
Always prioritize safety, especially when working with hot ingredients like the simmering cream. Ensure kids are at a safe distance during this step, and they can take over once the chocolate has cooled sufficiently. Use this moment to educate them on kitchen safety and responsible behavior.
5. Patience is Key
Ganache needs time to set, and this might test the patience of eager little chefs. Involve them in the waiting process by setting a kitchen timer, and plan a small activity while you wait. Not only does this teach them the virtue of patience, but it also builds anticipation for the yummy outcome.
Rolling and Coating: A Hands-On Chocolate Adventure
Step 4: Roll those Chocolate Balls!
Once your ganache is firm, use a spoon or a melon baller to scoop out portions of the chocolate mixture. Roll them between your palms to form balls. This is where the hands-on fun begins—kids love this part! If the ganache begins to melt as you work, pop it back into the fridge for a few minutes.
Step 5: Coating in Glory
Time to dress up those chocolate balls! Roll them in coatings of your choice. Encourage your kids to make patterns, mix colors, or create themes with the coatings. Every chocolate ball can be unique, reflecting each child’s creativity and taste. This is a fantastic fine motor activity for kids and makes for a delightful presentation.
Extra Tips and Twists to Share with Your Little Chefs
- For a festive twist, use seasonal sprinkles or edible glitter.
- If you’re making these for a party, consider placing the chocolate balls in mini cupcake liners for an attractive display.
- Experiment with adding a little espresso powder to the ganache to enhance the chocolate flavor.
- Teach your kids about textures by comparing the crunch of nuts to the silkiness of the ganache.
- Inspire a little science talk by discussing how the chocolate changes from solid to liquid and back again!
Storage and Serving Suggestions
Once rolled and decorated, chocolate balls should be stored in an airtight container in the refrigerator. They’re best enjoyed cool, so take them out just a few minutes before serving. These make perfect after-school treats, party favors, or simply a joyous end to a family cooking session.
Engage in conversations about what other recipes could spin from this one, like chocolate truffles with different flavors or even chocolate ball pops. The goal is to cultivate creativity, understanding of cooking processes, and, most importantly, instil joy in both cooking and quality time spent together.
Ready for more chocolatey fun, and remember, the best ingredient in any recipe is a sprinkle of joy and a heap of love. ?
For more great articles please see here. For more information see here
Disclaimer
The articles available via our website provide general information only and we strongly urge readers to exercise caution and conduct their own thorough research and fact-checking. The information presented should not be taken as absolute truth, and, to the maximum extent permitted by law, we will not be held liable for any inaccuracies or errors in the content. It is essential for individuals to independently verify and validate the information before making any decisions or taking any actions based on the articles.


:max_bytes(150000):strip_icc()/538436-8bb9212e47a14ac0abeb3043be94a1fc.jpg)