
Easy and Nutritious Coconut Yogurt Recipe Just for Your Family!
Welcome, wonderful parents! Are you on the lookout for a healthy, delicious, and allergy-friendly snack to please both the little tummies and the grown-up palates in your family? Look no further, because we’re about to dive into the world of homemade coconut yogurt! This delightful treat is not only delectable but also packed with beneficial probiotics that can aid your family’s digestive health.
Why coconut yogurt, you ask? Well, it’s a fantastic dairy-free alternative, making it perfect for those with lactose intolerance or dairy allergies. Plus, the velvety texture and tropical taste of coconut bring a unique twist to any snack or breakfast table. And the best part? It’s incredibly easy to prepare!
Who Is This Coconut Yogurt Recipe For?
- Health-Conscious Parents: Looking for a snack free from additives and preservatives found in store-bought options.
- Vegan Families: Searching for plant-based yogurt alternatives that are tasty and nutritious.
- Allergy-Aware Households: Needing a dairy-free, gluten-free, and nut-free option to accommodate everyone.
- DIY Enthusiasts: Eager to experiment with fermentation and enjoy homemade probiotic-rich foods.
This guide will walk you through all the steps necessary to make this splendid coconut yogurt that even the pickiest of eaters will adore. Just follow this simple, fool-proof recipe and witness the joy it brings to your kitchen and your family’s health!
Gathering the Essentials: What You’ll Need
Embarking on your coconut yogurt journey begins with a few essential ingredients and tools. Here’s what you’ll need to get started:
Ingredients:
- 4 cups of unsweetened coconut milk (preferably full-fat for the creamiest texture)
- 1-2 probiotic capsules (or probiotic powder equivalent)
- 2 tablespoons of organic tapioca starch or any other thickener if you prefer thicker yogurt (optional)
- 1 tablespoon of maple syrup or any sweetener of your choice (optional, for those who like a mildly sweet yogurt)
Equipment:
- 1 medium-sized clean glass bowl
- 1 whisk or a spoon for stirring
- 1 thermometer to monitor the temperature
- 1 cheesecloth or a clean kitchen towel
- 1 elastic band or a string to secure the cheesecloth
- 1 warm spot in your kitchen or a yogurt maker (this could be your oven with the light on or a particularly cozy corner)
Now that we’ve gathered what’s needed, let’s move on to the fun part – mixing these simple ingredients into something truly magical!
Creating the Creamy Magic: The Coconut Yogurt Process
Good news! The hands-on time for making coconut yogurt is minimal, but the fermentation will take a bit of patience. So, here’s your step-by-step guide:
- Sanitize Your Equipment: Make sure your bowls, whisk, and any other equipment are well cleaned to avoid introducing any unwanted bacteria into your yogurt. Simple dish soap or boiling water are effective ways to sanitize.
- Mix Your Coconut Milk and Thickeners: If you’re using a thickening agent, whisk it into the coconut milk in a saucepan and gently warm the mixture on the stove, watching the temperature closely. If not, skip the warming and go directly to adding the probiotics.
- Add Sweetener: If you’re adding sweetener, now is the time to do it. Stir gently to mix it well.
- Cool and Cultivate: Let your coconut milk mixture cool to below 110°F (43°C), ensuring it’s warm enough to activate the probiotics but not so hot as to kill them.
- Add Probiotics: Once at the right temperature, open up your probiotic capsules and pour the powder into the mixture. If using probiotic powder, follow the package instructions for the amount. Stir gently with a non-metal utensil to avoid deactivating the probiotics.
- Ferment Your Mixture: Pour the mixture into the glass bowl, cover with a cheesecloth or kitchen towel, and secure it with a band or string. Place the bowl in your chosen warm spot for 24-48 hours. The longer it sits, the tangier it will become.
- Chill and Enjoy: Once the fermentation period is over, give it a taste and when it’s to your liking, refrigerate your yogurt to stop the fermentation process. The yogurt thickens further and becomes more.
Hope you are keeping up so far, because here’s where the magic happens! The friendly bacteria from the probiotics start feasting on the natural sugars in the mixture, producing lactic acid which gives the yogurt its signature tangy taste and contributes to gut health.
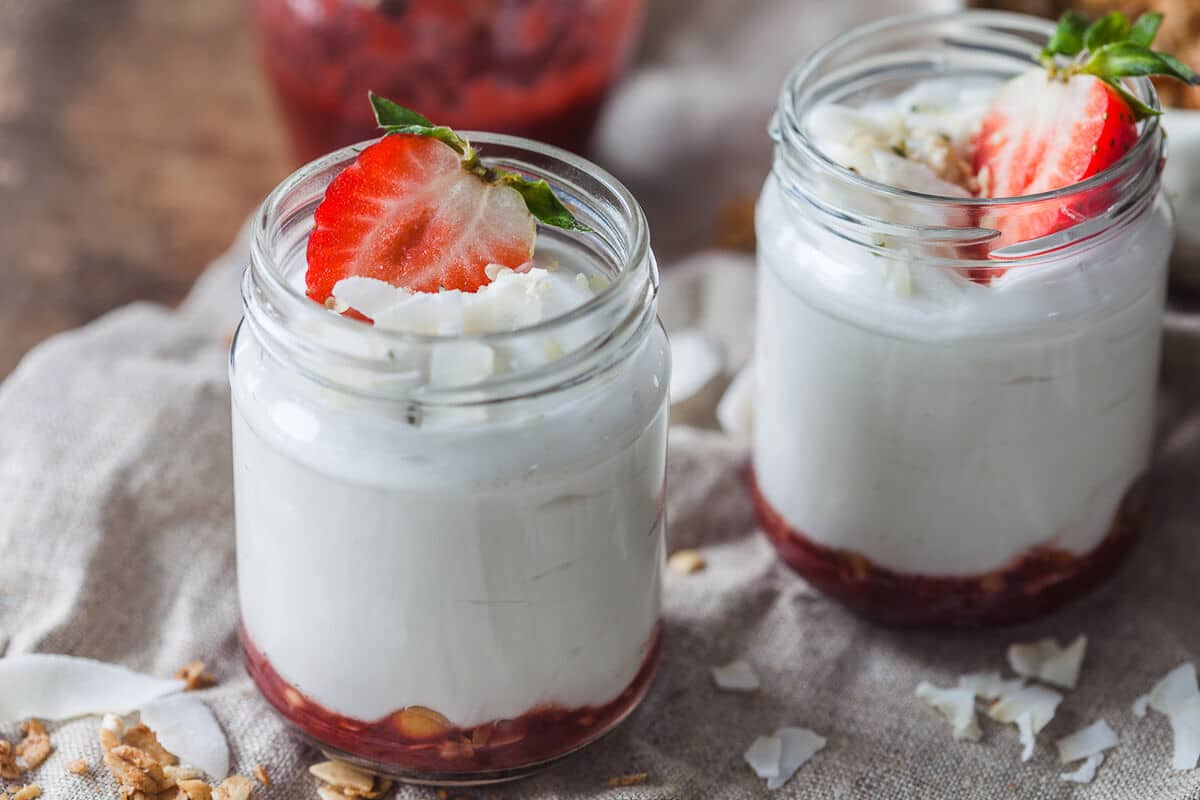
At this point, the excitement builds as you await to uncover the tangy, creamy goodness you’ve created. Once chilled, gather your family around, dive in with your favorite toppings, and enjoy the fruits—or should we say the yogurt—of your labor.
Making coconut yogurt at home is a delightful experience that results in a product you can trust, bursting with live cultures and free from additives. Keep reading as we delve into more personalized tips, topping ideas, and frequently asked questions that will make your coconut yogurt experience even more fabulous!
Delightfully Creamy Coconut Yogurt Recipe for Health-Conscious Families Easy and Nutritious Coconut Yogurt Recipe Just for Your Family!
Welcome, wonderful parents! Are you on the lookout for a healthy, delicious, and allergy-friendly snack to please both the little tummies and the grown-up palates in your family? Look no further, because we’re about to dive into the world of homemade coconut yogurt! This delightful treat is not only delectable but also packed with beneficial probiotics that can aid your family’s digestive health.
Why coconut yogurt, you ask? Well, it’s a fantastic dairy-free alternative, making it perfect for those with lactose intolerance or dairy allergies. Plus, the velvety texture and tropical taste of coconut bring a unique twist to any snack or breakfast table. And the best part? It’s incredibly easy to prepare!
Who Is This Coconut Yogurt Recipe For?
- Health-Conscious Parents: Looking for a snack free from additives and preservatives found in store-bought options.
- Vegan Families: Searching for plant-based yogurt alternatives that are tasty and nutritious.
- Allergy-Aware Households: Needing a dairy-free, gluten-free, and nut-free option to accommodate everyone.
- DIY Enthusiasts: Eager to experiment with fermentation and enjoy homemade probiotic-rich foods.
This guide will walk you through all the steps necessary to make this splendid coconut yogurt that even the pickiest of eaters will adore. Just follow this simple, fool-proof recipe and witness the joy it brings to your kitchen and your family’s health!
5 Things Parents Should Know Before Making Coconut Yogurt
- Probiotics Choice Matters: Opt for high-quality, dairy-free probiotics to ensure the cultures can thrive in the coconut milk environment.
- The Right Temperature Is Key: Keeping the mixture at a consistent warm temperature during fermentation is essential for proper culture activation.
- Sterilize Everything: To prevent bad bacteria from spoiling your batch, make sure everything that comes into contact with your coconut yogurt is sterilized.
- Patience Pays Off: The fermentation process cannot be rushed, as it takes time for the beneficial bacteria to create the perfect tang and texture.
- Customization Is King: Once you master the basic recipe, feel free to get creative with flavors and toppings to tailor the yogurt to your family’s tastes.
Gathering the Essentials: What You’ll Need
Embarking on your coconut yogurt journey begins with a few essential ingredients and tools. Here’s what you’ll need to get started:
Ingredients:
- 4 cups of unsweetened coconut milk (preferably full-fat for the creamiest texture)
- 1-2 probiotic capsules (or probiotic powder equivalent)
- 2 tablespoons of organic tapioca starch or any other thickener if you prefer thicker yogurt (optional)
- 1 tablespoon of maple syrup or any sweetener of your choice (optional, for those who like a mildly sweet yogurt)
Equipment:
- 1 medium-sized clean glass bowl
- 1 whisk or a spoon for stirring
- 1 thermometer to monitor the temperature
- 1 cheesecloth or a clean kitchen towel
- 1 elastic band or a string to secure the cheesecloth
- 1 warm spot in your kitchen or a yogurt maker (this could be your oven with the light on or a particularly cozy corner)
Now that we’ve gathered what’s needed, let’s move on to the fun part – mixing these simple ingredients into something truly magical!
Creating the Creamy Magic: The Coconut Yogurt Process
Good news! The hands-on time for making coconut yogurt is minimal, but the fermentation will take a bit of patience. So, here’s your step-by-step guide:
- Sanitize Your Equipment: Make sure your bowls, whisk, and any other equipment are well cleaned to avoid introducing any unwanted bacteria into your yogurt. Simple dish soap or boiling water are effective ways to sanitize.
- Mix Your Coconut Milk and Thickeners: If you’re using a thickening agent, whisk it into the coconut milk in a saucepan and gently warm the mixture on the stove, watching the temperature closely. If not, skip the warming and go directly to adding the probiotics.
- Add Sweetener: If you’re adding sweetener, now is the time to do it. Stir gently to mix it well.
- Cool and Cultivate: Let your coconut milk mixture cool to below 110°F (43°C), ensuring it’s warm enough to activate the probiotics but not so hot as to kill them.
- Add Probiotics: Once at the right temperature, open up your probiotic capsules and pour the powder into the mixture. If using probiotic powder, follow the package instructions for the amount. Stir gently with a non-metal utensil to avoid deactivating the probiotics.
- Ferment Your Mixture: Pour the mixture into the glass bowl, cover with a cheesecloth or kitchen towel, and secure it with a band or string. Place the bowl in your chosen warm spot for 24-48 hours. The longer it sits, the tangier it will become.
- Chill and Enjoy: Once the fermentation period is over, give it a taste and when it’s to your liking, refrigerate your yogurt to stop the fermentation process. The yogurt thickens further and becomes more.
Peek in on the process occasionally to witness the transformation firsthand. The friendly bacteria from the probiotics start feasting on the natural sugars in the mixture, producing lactic acid which gives the yogurt its signature tangy taste and contributes to gut health. This is a wonderful learning opportunity for the kids to see science in action!
At this point, the excitement builds as you await to uncover the tangy, creamy goodness you’ve created. Once chilled, gather your family around, dive in with your favorite toppings, and enjoy the fruits—or should we say the yogurt—of your labor. Whether it’s with fresh fruits, honey, granola, or a swirl of jam, making coconut yogurt at home is a delightful experience that results in a product you can trust, bursting with live cultures and free from additives.
Keep scrolling as we delve into more personalized tips, topping ideas, and frequently asked questions that will make your coconut yogurt experience even more fabulous!
See more great Things to Do with Kids in New Zealand here. For more information see here
Disclaimer
The articles available via our website provide general information only and we strongly urge readers to exercise caution and conduct their own thorough research and fact-checking. The information presented should not be taken as absolute truth, and, to the maximum extent permitted by law, we will not be held liable for any inaccuracies or errors in the content. It is essential for individuals to independently verify and validate the information before making any decisions or taking any actions based on the articles.


