
Ultimate Guide to Making Pompoms: Fun Crafting with Kids
Hello crafty parents and pompom enthusiasts! Get ready to dive into the wonderful world of pompom making, a fun and creative activity that’s perfect for bonding with your kids and sparking their imagination. Pompoms are not just versatile decorative items that can add a pop of color to any project; they are also incredibly simple and enjoyable to make.
In this ultimate guide, we’ll walk you through the fluffy journey of making your very own pompoms from scratch. Whether you’re looking to create festive decorations, jazz up a knitted hat, or just have a blast with your little ones, this is the perfect place to start!
What You’ll Need
Before we jump into the pompom party, let’s make sure we have all the necessary supplies at hand. Making pompoms doesn’t require many materials, and the chances are you already have most of them at home!
- Yarn of your favorite colors
- Scissors
- A piece of cardboard, a pompom maker, or even just your fingers!
- A template (if using cardboard)
- Optional: variegated or textured yarns for unique pompom effects
- Optional: decorations like googly eyes or glitter
Step-by-Step Instructions
Now to the exciting part! Follow these instructions, and soon you’ll be surrounded by a pile of cheerful pompoms.
Making a Pompom with Cardboard
Making pompoms with cardboard is an excellent way to recycle and is incredibly budget-friendly. Plus, it’s a method that kids of all ages can enjoy. Let’s start by making a simple template.
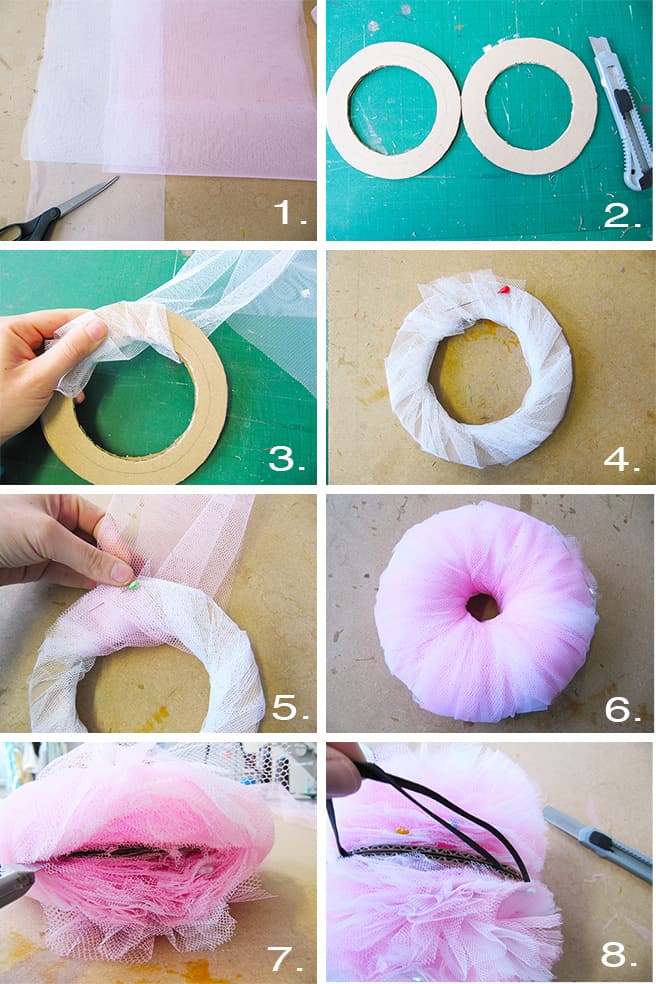
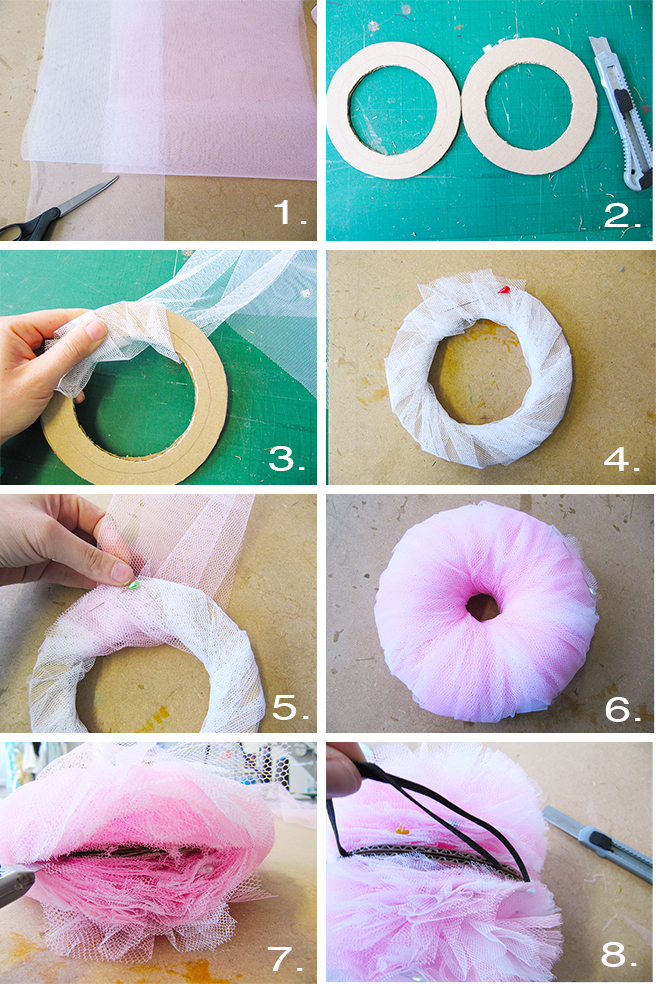
- First, cut out two identical donut-shaped pieces from your cardboard. The size of the donut will determine the size of your pompom.
- Place the two pieces together and start wrapping your yarn around the cardboard donut. The more yarn you wrap, the fluffier your pompom will be!
- When you have a substantial amount of yarn wrapped, carefully cut the yarn along the edge between the two pieces of cardboard.
- Next, cut a separate piece of yarn and slide it between the two cardboard pieces, tying it tightly around the center of the wrapped yarn.
- Once tied securely, you can remove the cardboard and fluff up your pompom. Give it a good trim if necessary to create a perfectly round shape.
And viola! You’ve made a pompom. But wait, there’s more to explore! Stay tuned as we delve into another method that’s great for little helpers – making pompoms with your fingers.
5 Things Every Parent Should Know Before Making Pompoms with Kids
Welcome to the colorful and playful activity of pompom crafting! Here are five essential tips to ensure a smooth and fun pompom-making session with your little ones.
Preparation Tips for Pompom Crafting
- Choose the Right Yarn: Opt for yarn that isn’t too slippery or too fuzzy. Acrylic and wool blends are great options as they are easy to handle and create full, fluffy pompoms.
- Pompom Size Matters: Ensure you have cardboard circles in various sizes or adjustable pompom makers, so kids can experiment with making pompoms of different sizes for assorted projects.
- Prepare Your Workspace: Pompom making can get messy with all the yarn fibers and cuttings. Set up a designated craft area where spills and messes won’t be a concern, and clean-up will be easier.
- Patience is Key: First attempts might not be perfect. Encourage your children to have fun with the process and let them know that practice makes perfect pompoms!
- Safety First: Use child-friendly scissors, especially for younger children, to avoid any accidents during the cutting process of the pompom making.
With these preparation tips in mind, let’s jump into the pompom crafting adventure!
Step-by-Step Instructions
Now to the detailed crafting guide! Here are the steps to create your homemade pompoms.
- Gather Your Materials: You’ll need yarn, scissors, and your tool of choice – a pompom maker, cardboard, or even forks for tiny pompoms!
- Start Wrapping: Wrap the yarn around your tool evenly and snugly. The more yarn, the denser the pompom. But don’t wrap too tightly, or it’ll be difficult to cut and tie off later.
- Cut: Once you’ve wrapped enough yarn, carefully cut the yarn around the edge, ensuring you don’t miss any loops.
- Tie It Up: Slide a piece of yarn between the tool and the wrapped yarn, and tie it tightly in the middle. Secure with a double knot to hold everything in place.
- Fluff and Trim: Remove the pompom from the tool and fluff it up. Now it’s time for a haircut! Trim the pompom, so it is nice and round.
You’ve made a pompom, hurrah! Don’t worry if it’s not perfect – with each one, you and your kids will improve. Keep the fun going, and create a whole bunch in different colors and sizes!
Pompom Project Ideas
Now that you have a stack of pompoms, what to do with them? Here are some crafty ideas:
- String them together to make vibrant garlands.
- Glue them onto picture frames or mirrors for a whimsical touch.
- Attach them to the top of hats or the ends of scarves for a fun flair.
Remember, pompom making is all about creativity and enjoyment, so encourage your kids to come up with their own unique uses for their pompoms!
Advanced Pompom Techniques
If you and your children are ready to take pompom crafts to the next level, try these advanced techniques:
- Mix and match different colors and textures of yarn to create multi-colored pompoms.
- Use a comb to brush out the pompom for a fluffy, more professional look.
- Experiment with shaping your pompoms into animals or flowers with some strategic trimming.
Clean-Up Tips
After the pompom party, here’s how to tackle the clean-up:
- Gather Loose Ends: Collect all stray yarn pieces and dispose of them properly, or save for smaller projects.
- Storing Materials: Keep your yarn and other materials organized in containers or bags, so they are ready for next time.
- Involve the Kids: Make clean-up part of the activity. It can be a game: Who can collect the most yarn scraps?
See more great Things to Do with Kids in New Zealand here. For more information see here
Disclaimer
The articles available via our website provide general information only and we strongly urge readers to exercise caution and conduct their own thorough research and fact-checking. The information presented should not be taken as absolute truth, and, to the maximum extent permitted by law, we will not be held liable for any inaccuracies or errors in the content. It is essential for individuals to independently verify and validate the information before making any decisions or taking any actions based on the articles.


