
Delightful DIY Slime Making for Parents & Kids Alike!
Welcome, creative parents and curious kiddos, to the enchanting universe of homemade slime! There’s nothing quite like the feeling of squishy, stretchy slime oozing between your fingers. Not only is making slime an absolutely enjoyable activity, but it’s also a fantastic way to teach your little ones about science and creativity. Whether it’s for a rainy day, a birthday party, or just for the sheer joy of it, making homemade slime is bound to be a hit!
Why You’ll Love Making Slime at Home
Slime isn’t just a captivating plaything; it’s also chock-full of educational opportunities. When you and your kids whip up a batch of homemade goo, you’re diving into a practical chemistry lesson! Plus, it’s a wonderful sensory experience that can help develop fine motor skills. And let’s not forget the sheer joy of customization. From colors to textures to add-ins, your homemade slime can be a unique masterpiece!
The Basic Ingredients for Perfect Slime Every Time
Before you start, it’s essential to gather your supplies. Making slime requires just a few household ingredients:
- Glue: The base of most slime recipes is good ol’ PVA glue (that’s white school glue to you and me).
- Borax Solution: A mix of borax powder and water that acts as an activator to turn the glue into slime. Don’t worry; we’ll discuss safe handling and non-borax alternatives!
- Coloring: Food coloring or washable paint can add that pop of color for extra fun.
- Add-ins: Time to get creative! Glitter, beads, foam balls, and more can spice up your slime.
Now, are you ready to get your hands slimy? Let’s go through the steps for making your very own batch of homemade slime!
Step-by-Step Guide to Slime-tastic Fun!
Here’s a simple recipe for classic slime to get you started:
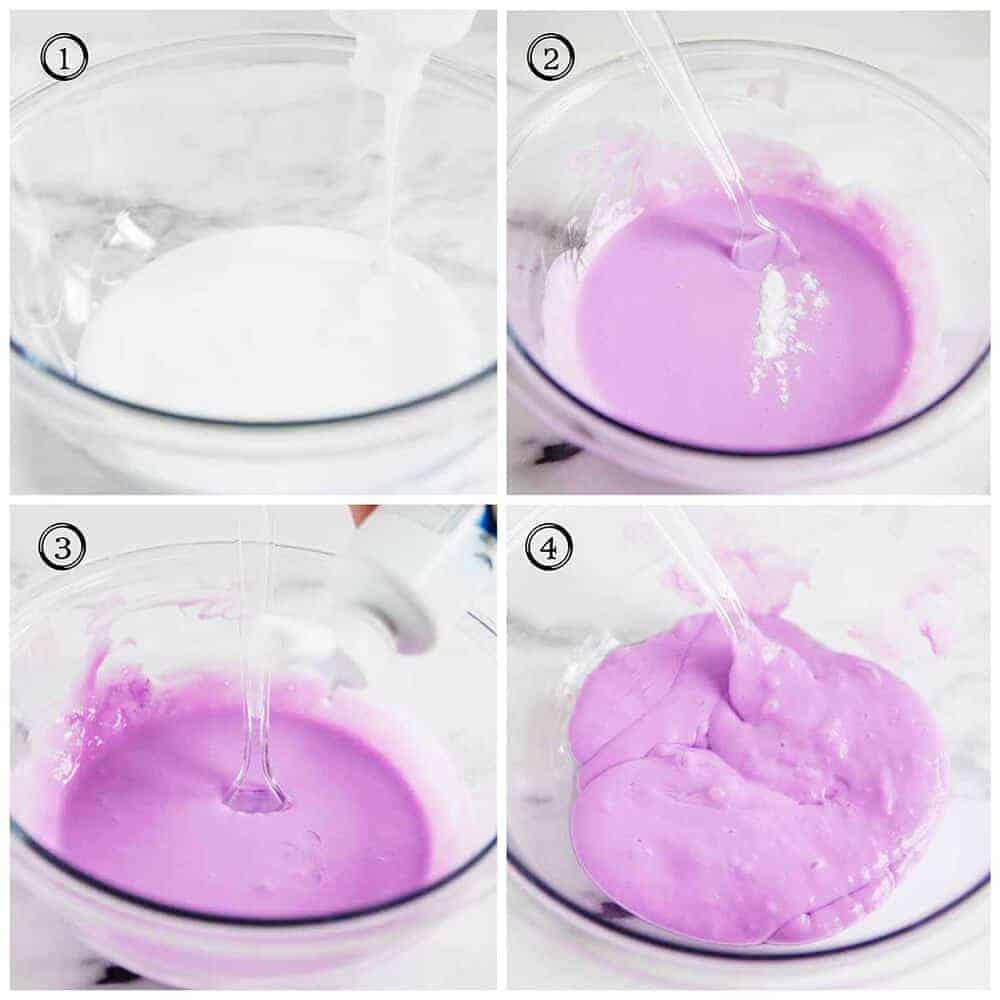
- Prepare the Borax Solution: Dissolve 1 teaspoon of borax powder in 1 cup of warm water. Stir until fully dissolved and set aside.
- Color the Glue: In a separate bowl, pour out 1 cup of PVA glue. If you’re using food coloring or paint, now’s the time to add a few drops and mix thoroughly.
- Combine: Slowly add the borax solution to the colored glue, stirring constantly. You’ll notice the mixture begin to thicken and pull away from the sides of the bowl.
- Knead It: Once the slime has formed, take it out of the bowl and knead it with your hands. If it’s too sticky, add a little more of the borax solution.
- Time for Fun: Now it’s time to play with your slime! Stretch it, pull it, roll it, or squeeze it. The slime-abilities are endless!
Remember, making slime is not just about following a recipe—it’s about experimenting and experiencing science first-hand. Encourage your children to make observations about the texture, stickiness, and stretchiness of the slime, and ask questions about why they think certain ingredients act the way they do.
As you become more comfortable with the basic recipe, feel free to venture out into the wild world of slime variations. From fluffy to crunchy to glow-in-the-dark, there’s no end to the fun you can unlock with just a few simple tweaks to your recipe.
And with safety as a top priority, I’ll be guiding you through some all-natural and borax-free slime recipes that are perfect for little ones with sensitive skin or for parents who prefer to steer clear of borax altogether.
Keep turning the page of this Ultimate Guide to Homemade Slime, as we’ll be diving into the best tips, tricks, and troubleshooting techniques to ensure your slime-making adventure is a resounding success. So roll up your sleeves, and let’s get ready for some gloriously gooey fun!
Stay tuned as we explore more exciting slime recipes, additional safety tips, and imaginative ideas for customization in the next section of our guide!
5 Essential Tips for Parents Preparing for Homemade Slime
Before you embark on your slime creation journey, here are five vital things every parent should consider for a smooth and enjoyable experience:
1. Choose the Right Workspace
Slime making can get a bit messy, and that’s part of the fun! Be sure to choose an area that’s easy to clean, like a tiled floor or a plastic tablecloth-covered surface. Do your slime crafting near a sink for quick wash-ups, and keep paper towels handy for spills.
2. Wear Appropriate Clothing
Encourage your kids to wear old clothes or aprons during slime time. Some ingredients may stain clothing, so it’s better to be safe than sorry. You might also want to protect your own outfit – slime knows no age limit!
3. Supervise and Participate
Stay involved in the slime-making process. Not only does this allow you to ensure safety, but it’s also a golden opportunity to bond with your children and share their sense of wonder as the slime comes to life.
4. Be Mindful of Allergies and Sensitivities
If your child has sensitive skin or allergies, be cautious with the ingredients. Opt for hypoallergenic and non-toxic glue, and look for natural coloring options. Always do a patch test before your child plunges their hands into the slime.
5. Prep All Ingredients and Tools in Advance
Gather all necessary supplies before getting started to keep the process moving smoothly. This means measuring cups, mixing bowls, spoons or craft sticks for stirring, and of course, all the ingredients for your chosen slime recipe.
With these tips in your parenting toolbox, you’re all set to make slime that’s not just a playful toy, but a memorable experience for your family. Let the good times roll, or rather, let the good slime stretch and squish!
Next Level Slime: Customizations and Creative Twists
Now that you’re set up and ready to go, why not take a moment to think outside the slime box? Here are some neat ideas to personalize your gooey creation:
- Use glow-in-the-dark paint for a slime that lights up the night.
- Try adding scents with food extracts for a multi-sensory play.
- Mix in thermochromic pigment for color-changing slime that reacts to temperature.
- Create a sparkling universe by adding different sizes and colors of glitter.
- Make your slime educational by incorporating counting beads or alphabet pasta.
Combining creativity with science fosters an environment where kids are free to explore and learn. And remember – sometimes the ‘failed’ experiments lead to the most discovery and fun!
Embrace the potential for a little chaos, and you’ll find yourself not only crafting the perfect slime but also crafting lasting memories with your little ones. Now that’s a sticky situation everyone can enjoy!
Don’t miss out on the upcoming sections where we’ll share even more fantastic slime recipes, including eco-friendly options and all the tricks to get the perfect consistency every time. Keep your spirits high and your slime stretchy as we dive further into this ultimate slime-making guide!
See more great Things to Do with Kids in New Zealand here. For more information see here
Disclaimer
The articles available via our website provide general information only and we strongly urge readers to exercise caution and conduct their own thorough research and fact-checking. The information presented should not be taken as absolute truth, and, to the maximum extent permitted by law, we will not be held liable for any inaccuracies or errors in the content. It is essential for individuals to independently verify and validate the information before making any decisions or taking any actions based on the articles.


