The Ultimate Guide to Making Slime with Glue for Endless Fun and Learning
Hey there, awesome parents! Are you looking for a way to add a splash of excitement to playtime with your kids? Well, you’re in for a treat! Slime making is not just a super fun activity; it’s also a delightful educational experience. And the best part? It’s incredibly easy to make with common household items, particularly glue! Let’s dive into the squishy, stretchy world of slime and turn an ordinary day into an extraordinary adventure!
The Magic of Slime: Benefits and Learning Opportunities
Before rolling up our sleeves to get into the nitty-gritty of slime making, let’s talk about why slime is more than just a plaything. It’s a fantastic way to encourage creativity, enhance fine motor skills, and introduce basic chemistry concepts to your curious kiddos. Plus, making slime with your children is a phenomenal bonding activity that can help build communication and teamwork.
What You’ll Need for Homemade Slime
Gather around, it’s time to whip up some gooey goodness! Here’s a simple checklist for your slime-making extravaganza:
- White Glue: This will be the base of your slime. You can use either regular white PVA glue or clear glue for a transparent slime base.
- Baking Soda: This common kitchen ingredient helps thicken the slime.
- Contact Lens Solution: Make sure it contains boric acid, as this acts as an activator.
- Food Coloring: Choose any color(s) you like to jazz up your slime creation.
- Glitter or Beads (optional): For that extra sparkly touch or texture.
- Measuring Cups and Spoons: For accurate portions and a teachable moment in measurements.
- Mixing Bowl and Spoon: Where the magic happens!
Note: Always supervise your little ones during slime play to prevent any accidental ingestion or irritation from the materials used.
Step-by-Step: Crafting the Perfect Slime
Okay, team! Let’s get to the step-by-step process of creating that perfect batch of slime:
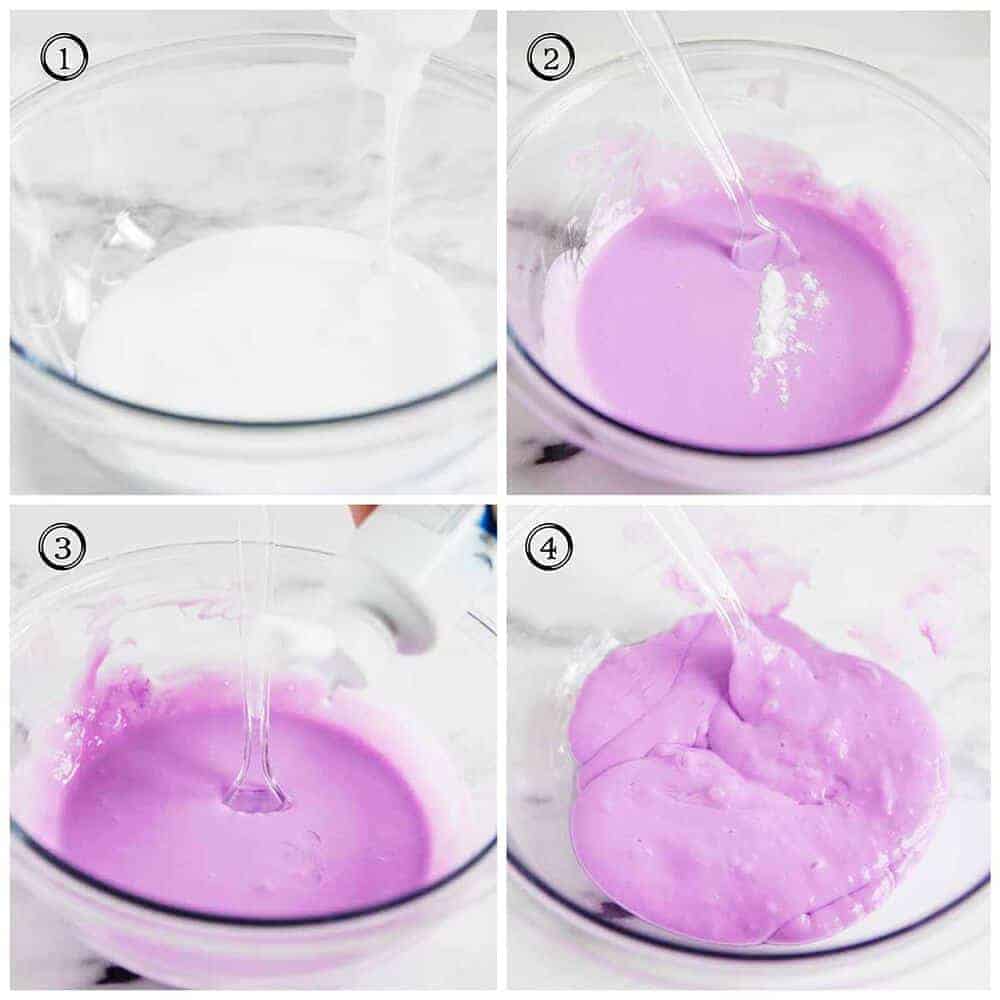
Step 1: The Glue Goes In
Start by pouring your white glue into the mixing bowl. Remember, the amount of glue you use will determine the quantity of slime you end up with, so feel free to adjust according to how much you want to make.
Step 2: A Dash of Color
Add a few drops of your chosen food coloring to the glue. Stir it up until the color evenly spreads out, creating a beautiful, uniform shade. This is the moment where you can let your child’s imagination take the lead!
Step 3: Baking Soda Boost
Sprinkle some baking soda into the mix—just about half a teaspoon should do the trick. Gently stir the concoction until the baking soda has completely dissolved. This is the perfect time to discuss states of matter!
Step 4: Slime Activator, Activate!
Now for the magical moment—adding the contact lens solution! Begin with just a few drops, and as you mix, the slime will start to form and pull away from the sides of the bowl. Continue adding the activator little by little until the slime reaches your desired consistency.
Isn’t it thrilling to see the transformation from liquid to slime right before your eyes? This moment never fails to amaze and provides a fantastic opportunity to talk about scientific reactions.
Step 5: Embellish Your Creation
If you’re feeling fancy, throw in some glitter, beads, or foam balls for an extra texture or sparkle. This part is all about personalizing your slime and making it special.
Continue to knead and mix by hand until your slime is stretchy, smooth, and holds together well. If it’s too sticky, add a tiny bit more of the activator.
Voilà! You now have a custom-made, oh-so-satisfying batch of slime ready for action. It’s squishing time!
Fun with Slime: Exploring and Playing
Now that the making is done, the fun truly begins. Encourage your kids to squish, stretch, and roll their slime. This tactile play is not only enjoyable but also calming for many children. Not to mention, it’s a perfect sensory activity that can help develop fine motor skills and hand-eye coordination.
Remember to store the slime in an airtight container to keep it fresh for as long as possible. And hey, why not label it with the date and name of the slime? It’s a mini time capsule of a joyful day spent together.
Slime making is a delightful journey that goes beyond just playing—it’s a bonding experience, it’s educational, and most importantly, it’s a lot of fun. Stay tuned for more tips and tricks to make your slime adventure even more fascinating!
And there you have it, dear parents: the beginning steps to creating gobs of giggles with homemade slime. Keep an eye out for our next installment where we’ll dive into advanced slime tricks, troubleshooting common slime woes, and ensuring safe slime play. Let the slimy escapades begin!

5 Things Parents Should Know Before Making Slime with Glue
Ready to embark on the slime-making journey? Great! But before we get our hands sticky, here are five vital things every parent should know:
1. Safety First: Choose Safe Ingredients
Slime is fun, but it’s important to make sure the ingredients used are safe for your children. Always opt for non-toxic, washable PVA glue. When it comes to the activator, look for a contact lens solution with boric acid or opt for a kid-friendly slime activator available in craft stores. Remember to store all your ingredients safely away from little hands when not in use.
2. The Mess Factor: Prepare Your Workspace
Slime making can get a bit messy, and that’s part of the fun! However, to save your sanity, prep your space with newspaper, plastic tablecloths, or parchment paper. It’ll make clean-up a breeze, and you won’t stress over spills or stains.
3. Allergies and Sensitivities: Know Your Child’s Reactions
Some kids may have sensitivities to the ingredients used in slime, such as skin irritation from prolonged contact. Conduct a patch test before you begin, and ensure hands are washed thoroughly after play. If your child has a known allergy, look for alternative recipes that suit their needs.
4. The Learning Element: Incorporate Educational Fun
Making slime isn’t just about getting gooey; it’s a wonderful way to integrate learning. Discuss the chemical reactions taking place, measure ingredients together, and talk about color mixing. You’re likely to spark a love for science and math without them even realizing they’re learning!
5. Quantity Control: Start Small
If it’s your first time making slime, begin with a small batch to perfect your technique. Once you and your kids feel comfortable, you can scale up the quantities for more slimy enjoyment. Plus, starting small means less waste if things don’t go as planned.
Final Tips for the Ultimate Slime Adventure
Wrapping up our slime guide, always listen to your children’s ideas and encourage their imagination during the slime-making process. Whether they want unicorn colors or ocean-themed textures, each slime creation is a masterpiece of their making. And don’t forget, the experience is not just about the end product; it’s about the giggles, the ‘oops’ moments, and the teamwork.
Embrace the chaos and remember that every splash of slime is a memory made. Roll up your sleeves, get stuck in, and enjoy the delightful squishiness of your home-crafted slime! Stay playful, keep experimenting, and may your family’s slime creations be as unique and boundless as your children’s imaginations.
See more great Things to Do with Kids in New Zealand here. For more information see here
Disclaimer
The articles available via our website provide general information only and we strongly urge readers to exercise caution and conduct their own thorough research and fact-checking. The information presented should not be taken as absolute truth, and, to the maximum extent permitted by law, we will not be held liable for any inaccuracies or errors in the content. It is essential for individuals to independently verify and validate the information before making any decisions or taking any actions based on the articles.


