
DIY Bench Seat with Storage: A Creative and Practical Project for Parents
Welcome to this delightful and handy guide designed for all the fantastic parent-crafters out there who are itching to create something unique and truly useful for their homes. As we embark on this DIY journey together, we will be focusing on creating a beautiful and versatile bench seat with storage, perfect for keeping your family’s knick-knacks neatly tucked away while providing a comfy spot to sit and relax.
Why a DIY Bench Seat with Storage is a Perfect Family Project
As parents, we are always looking for ways to maximize space and minimize clutter. A DIY bench seat with storage serves as a perfect solution, offering a multi-functional furniture piece that not only adds value to your home but also involves the entire family in a creative and practical weekend project. It’s also a fabulous way to introduce your kids to the basics of woodworking and organization!
What You’ll Need to Get Started
Before diving into the construction, let’s gather our tools and materials. You’ll be thrilled to know that this project can be as simple or as elaborate as you prefer, meaning you can often work with tools and materials you might already have at home!
- Wood panels (size and quantity will depend on the desired dimensions)
- Wood screws and nails
- Drill and drill bits
- Screwdriver
- Wood glue
- Saw (hand saw, circular saw, or a power saw depending on your comfort level)
- Sanding paper or a power sander
- Paint or wood stain (optional)
- Protective varnish (optional)
- Hinges (for a lift-up seat/storage lid)
- Piano hinge (optional, provides a cleaner look)
Remember, the beauty of DIY is in the flexibility, so feel free to adapt the materials based on your design preferences and what’s easily available to you.
Designing Your DIY Bench Seat with Storage
Now the fun begins! Are you aiming for a cozy reading nook, a rustic entryway piece, or perhaps a charming window seat? The design phase is crucial because it gives you a clear direction and helps prevent unnecessary hiccups along the way.
First, consider the size of the bench. This will largely depend on the intended location and the available space. Next, think about the style that will compliment your interior. Whether it’s sleek and modern or country cottage chic, your bench should reflect your family’s personality.
Once you have the design drafted, you can move on to the actual dimensions. Measure twice, cut once! This age-old adage holds especially true for DIY projects. Detailed measurements ensure that all pieces fit together perfectly.
Lastly, take a moment to think about safety, especially if you have little ones. Rounded edges, secure hinges, and a sturdy build are all important factors to keep in mind to maintain a safe environment for your family.
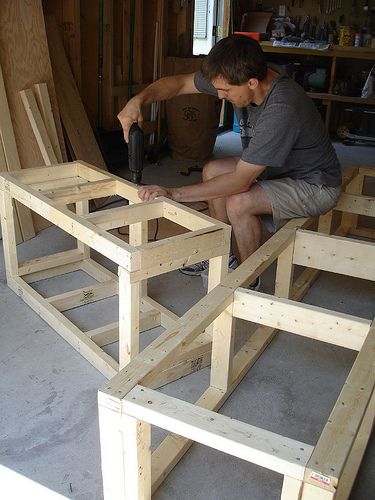
Step-by-Step Construction of Your DIY Bench Seat with Storage
With the design details ironed out and the materials at the ready, let’s dive into the construction itself. Here’s a simplified step-by-step guide to give you an overview – we’ll go into more detail in each step later on.
- The Frame: Start by building a strong frame that will hold the weight and also serve as the skeleton for your bench.
- Adding the Panels: Once the frame is done, it’s time to add the side, front, and back panels that form the outer walls of your bench.
- Sanding and Finishing: Sand all edges and surfaces to ensure a smooth finish. Apply the paint or stain if desired and let it dry.
- Installing the Seat/Lid: Attach the seat to the bench with hinges so it can lift open, revealing the storage space below.
As you embark on this project, remember that DIY is not just about the end product but also about the joy of creating something special with your own hands. Stay tuned for the detailed steps, tips, and tricks that will make this DIY bench seat with storage a proud addition to your home, and a memorable project for the whole family.
And guess what? The sense of accomplishment you’ll feel when you see your family using and enjoying something crafted by you is unrivaled. So, roll up your sleeves – it’s time to start building some fantastic memories (and a fabulous bench)!
5 Things Parents Should Know in Preparing for a DIY Bench Seat with Storage
When venturing into the world of do-it-yourself projects, it’s essential to come prepared. This not only makes the building process smoother, but it also ensures that your bench is both functional and long-lasting. Here are five key things you should know as you prepare to build your DIY bench seat with storage:
1. Understand the Purpose of Your Bench
Are you looking for additional seating, a play area for the kids, or simply some extra storage? The purpose of your bench will influence its size, design, and even the materials you choose. For instance, if it’s for the kids’ play area, you might opt for a durable, easy-to-clean surface. On the other hand, if it’s for your entryway, the focus might be on aesthetics and sturdy construction to handle heavy usage.
2. Choose the Right Materials
The materials you select for your bench will impact not only the look and feel but also its longevity. Hardwoods like oak or maple are great for durability, while softer woods like pine can be more cost-effective. Also, consider whether you want the natural beauty of wood or if you’d prefer to paint or stain it to match your home decor.
3. Plan for Child Safety
With little explorers around, safety should be your top priority. If the bench seat will lift for storage access, be sure to choose hinges that are child-friendly, such as those with soft-close mechanisms to protect little fingers. Additionally, ensure all corners and edges are rounded or cushioned to prevent bumps and scrapes.
4. Think About the Cushioning and Upholstery
If your bench seat will also serve as a comfortable nook, consider the type of cushioning and upholstery fabric. Choose materials that are durable and easy to clean, especially if you have young children or pets. An outdoor fabric might be a good choice for its durability, even if the bench will be indoors.
5. Measure Your Space Accurately
It can’t be stressed enough how important it is to measure your space accurately before cutting any materials. Not only does this help in creating a bench that fits perfectly in its intended spot, but it also saves you time and resources by avoiding errors. Additionally, consider walking paths and room for doors to open without obstruction.
Preparing to undertake a DIY bench seat with storage project is an exciting endeavor that combines practicality with creativity. Not only will you end up with a functional and charming piece of furniture, but you will also have the satisfaction of building it yourself. By keeping the above points in mind, you can ensure that your DIY project is a roaring success that your whole family will appreciate and enjoy.
Keep an eye out for our upcoming segments, where we’ll dig deeper into each construction phase, providing you with detailed instructions, helpful diagrams, and practical tips to guide you from start to finish. Let’s turn this DIY dream into a reality!
See more great Things to Do with Kids in New Zealand here. For more information see here
Disclaimer
The articles available via our website provide general information only and we strongly urge readers to exercise caution and conduct their own thorough research and fact-checking. The information presented should not be taken as absolute truth, and, to the maximum extent permitted by law, we will not be held liable for any inaccuracies or errors in the content. It is essential for individuals to independently verify and validate the information before making any decisions or taking any actions based on the articles.


