
DIY Bird Feeder: A Delightful Weekend Project for Families
Welcome all you brilliant parents and craft enthusiasts! ? Are you ready to dive into a splendid activity that will not only bring joy to your feathered friends but also provide a fantastic bonding experience for your family? I’m here to guide you through creating a DIY bird feeder that’s as easy as pie and twice as fun!
Building a bird feeder with your kids can be a phenomenal way to nurture their creativity, teach them about nature, and give them the satisfaction of watching birds enjoy their handiwork. So, let’s spread our wings and start crafting!
Gather Your Supplies:
- Recycled materials: Think milk cartons, plastic bottles, or tin cans. It’s a great opportunity to repurpose and teach the kiddos about recycling. ?
- Wood pieces: If you’re feeling a bit more ambitious, scraps of wood can be used to build a more traditional feeder. ?
- Nontoxic paint or markers: To add a splash of color and make your bird feeder stand out. Remember, safety first for our feathered buddies!
- String or wire: You’ll need something to hang your feeder from a branch or a hook.
- Tools: Scissors, glue (outdoor-rated, if possible), and maybe a few tools if you’re working with wood.
TIP: Before you begin, take a moment with your little ones to watch the birds in your garden. Observe the types of birds that visit and consider their sizes; this can influence your bird feeder design. ?
Step by Step: Making Your Bird Feeder
1. Choose Your Base
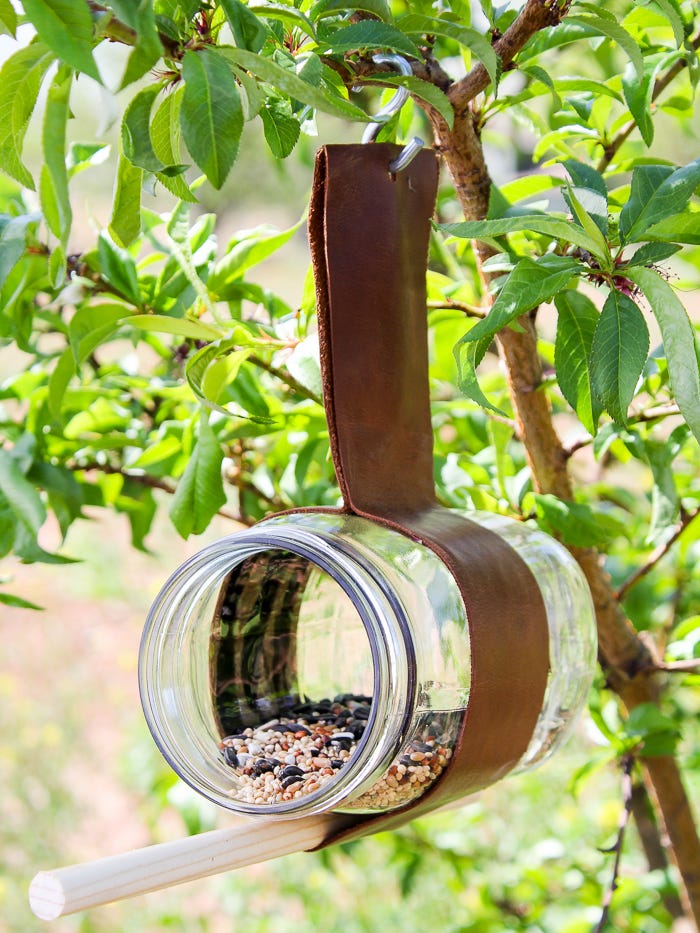
First up, pick your base! A simple and popular choice is a plastic bottle or a milk carton. Clean it thoroughly and ensure it’s dry before you begin.
2. Cut and Design
With your children’s help, carefully cut holes in your base for the birds to access the food. The holes should be large enough for the birds to get in but not so big that it makes the feeder less sturdy. Then, let your kids decorate with paints or markers, creating a unique piece of art!
3. Add Perches
If you’re using a material like a plastic bottle, you can insert twigs or popsicle sticks for perches. Simply make small slits under the feeding holes and slide your sticks in.
4. Fill with Birdseed
Once your feeder is all set and looking fabulous, it’s time to add the birdseed. Opt for a mix that’s suited to a variety of birds so that everyone can join the feast!
5. Hang Your Masterpiece
Find the perfect spot in your garden where the birds can safely enjoy their meal. Use the string or wire to securely hang the feeder from a branch or a hook, making sure it’s stable.
And there you have it, superstars! ? You’ve just created a lovely spot for our bird friends to dine, and you did it together as a family! The joy you’ll get watching the birds flock to your feeder will be a testament to the fun and love put into this project. Keep your eyes peeled for Part 2 of our guide, where we’ll cover how to maintain your feeder and further involve your family in bird-watching activities!
Remember, the beauty of a DIY project lies in the memories created in the process. So, take lots of pictures, share laughs, and enjoy this feathery adventure to the fullest. Happy crafting!
5 Things Parents Should Know Before Starting the DIY Bird Feeder Project
Consider the Local Environment
Every region has its own set of indigenous birds. Before starting on your project, do a little research to understand which birds are native to your area and what types of food they prefer. This will not only make your DIY bird feeder more effective but also more educational for your kids.
Safety Comes First
While crafting, safety is paramount. Ensure sharp tools are handled by adults and supervise your kids closely during the project. If paint or decoration is part of the plan, confirm that all materials are nontoxic and safe for wildlife.
Keep It Stable and Durable
Make sure your feeder can withstand the local weather. Stability is important, as a feeder that easily tips over will scatter birdseed and may not be safe for birds. Use sturdy materials and ensure that the feeder is securely hung or mounted.
Select the Right Food
All birds are not alike, and their dietary needs can be quite varied. Some may prefer seeds, others might like nuts or fruits. Purchase a high-quality birdseed mix to cater to a wide array of birds or research specific seed types if you intend to attract certain bird species.
Location is Key
Placing the bird feeder in the right location will define how frequently it is visited. Choose a quiet and safe spot in your garden where birds feel secure. Avoid placing the feeder too close to windows to prevent birds from flying into the glass. It’s also good to place it near some natural cover so birds can quickly flee to safety if they sense danger.
Creating a DIY bird feeder is more than just a weekend activity; it’s about instilling a love for nature in your children and helping them learn about wildlife conservation. With your feeder, you’re not just giving birds a place to eat; you’re providing a sanctuary where your family can watch and enjoy the wonders of nature together.
So, there you have it! Five essential tips to elevate your bird feeder project from good to great. Armed with this knowledge, you and your kids are ready to embark on an exciting adventure that culminates in a beautiful haven for your avian friends. Roll up your sleeves, it’s time to create something extraordinary with love, laughter, and a little bit of birdseed!
Remember to check back for our next instalment on how to maintain your bird feeder and enhance your family’s bird-watching experience. Until then, enjoy the chirps and tweets of gratitude from your new feathered visitors. Happy crafting and happy birdwatching!
. For more information see here
Disclaimer
The articles available via our website provide general information only and we strongly urge readers to exercise caution and conduct their own thorough research and fact-checking. The information presented should not be taken as absolute truth, and, to the maximum extent permitted by law, we will not be held liable for any inaccuracies or errors in the content. It is essential for individuals to independently verify and validate the information before making any decisions or taking any actions based on the articles.

