
Ultimate Guide to Homemade Slime: Safe, Easy & Fun!
Hey there, super parents! ? Are you on the hunt for a fun, creative activity that will keep your little scientists engaged for hours? Look no further! Our ultimate guide to homemade slime is here to transform your kitchen into a mini science lab where fun and learning go hand in slime-covered hand!
Why Homemade Slime Is a Parent’s Best Friend
Slime isn’t just a squishy and oozy delight; it’s a wonderful way to merge play with educational experiences. When you make slime at home, you help your kids:
- Enhance fine motor skills through stretching and squishing.
- Learn basic chemistry by mixing ingredients and observing reactions.
- Express creativity by customizing colors, add-ins, and textures.
- Enjoy sensory play which is great for cognitive development.
Choosing the Right Slime Recipe for Your Family
Concerned about the safety of homemade slime? Worry not! Our recipes are kid-friendly and use non-toxic ingredients that you can find in your home. From classic glue-based slimes to edible, taste-safe options, we’ve got you covered.
Prepping for Slime Time
Before we dive into the ooey-gooey world of slime, let’s get ready:
- Pick a space that’s easy to clean. A wipeable table or a plastic tray works wonders.
- Gather all your ingredients and tools. Measuring cups, spoons, and mixing bowls will come in handy.
- Keep paper towels or a cloth nearby for spills. Slime-making can be messy (that’s part of the fun!).
- Wear old clothes or aprons, and pull back long hair. Slime is notorious for getting everywhere!
Classic Glue-Based Slime
The basic slime recipe is simple, and once you perfect it, the sky’s the limit for customization! Here’s what you’ll need for a batch of classic slime:
- 4 oz of white or clear PVA school glue
- 1/2 tbsp of baking soda
- 1 tbsp of contact lens solution (make sure it contains boric acid!)
- Choice of food coloring or glitter (optional)
Let’s Get Slimey!
Got everything ready? Let’s create some slime magic!
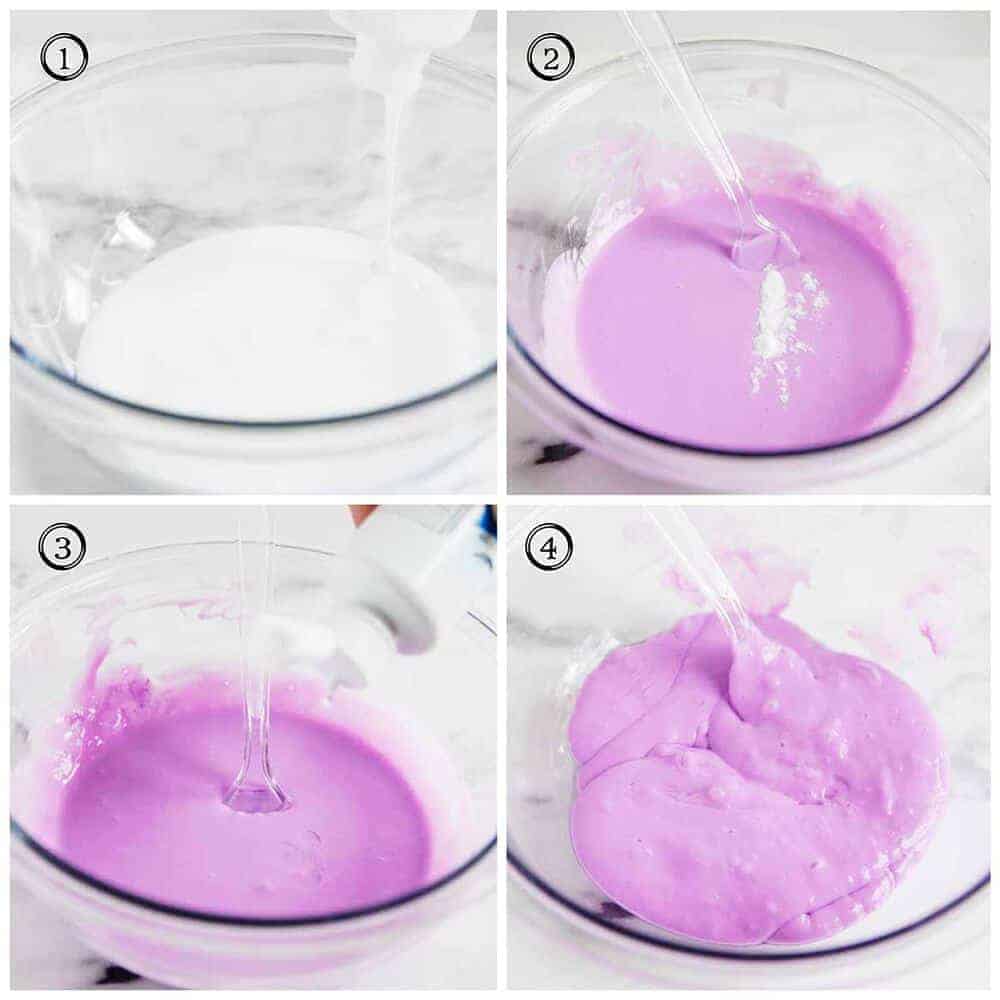
- Pour the entire bottle of glue into a bowl.
- Add the baking soda and mix well.
- If you’re using food coloring or glitter, now’s the time to add it. Stir until you get your desired color or sparkle.
- Gradually mix in the contact lens solution. This is the slime activator that transforms your glue mixture into slime!
- Keep stirring until the slime begins to form and pull away from the bowl edges.
- When it gets tough to mix, take it out and knead with your hands. If it’s too sticky, add a drop of contact lens solution at a time until you reach the perfect slimy consistency.
Your DIY slime is now ready for play! Isn’t it amazing how a few simple ingredients can come together to create hours of fun?
Remember, the best part about homemade slime is that you can tweak the recipe to your liking. You can add more glue for a stretchier slime, mix in shaving cream for fluffy slime, or even incorporate scented oils for an aromatherapy experience. The possibilities are pretty much endless!
And hey, don’t forget the most important ingredient of all: a big scoop of imagination!
Slime-making is not just a fun activity; it’s an opportunity to bond with your kids and watch them discover the wonders of science and creativity. So, roll up your sleeves, prep your ingredients, and get ready for some sensational slimy adventures! Stay tuned for more tips, tricks, and recipes to make your slime experience even better.
Ready to explore more slime varieties and learn how to store your slimy creations properly? Keep reading, because the fun is just getting started!
5 Things Every Parent Should Know When Preparing Homemade Slime
Creating homemade slime is an exciting and educational activity, but there are a few things every parent should know before they start. Here are five essential tips to ensure that your slime-making experience is as safe and enjoyable as possible:
1. Understanding the Ingredients
It’s crucial to use safe, non-toxic ingredients when making slime, especially if younger children are involved. Familiarize yourself with the function of each ingredient:
- Glue: The main component of slime, providing the polymers necessary for the slime’s unique texture.
- Baking Soda: Helps to firm up the slime and acts as a stabilizer.
- Contact Lens Solution: Contains boric acid, which acts as the activator to turn the glue mixture into slime. Make sure it’s safe for children’s use and that there are no allergies.
2. Allergy Checks Are a Must
Before starting, make sure that none of the materials used will cause reactions with your kids. Conduct patch tests if introducing new ingredients or if your child has sensitive skin.
3. The Importance of Supervision
Adult supervision is not just beneficial for safety, but also enhances the learning experience. Guide your kids through the process and seize the opportunity to explain the science behind the slime.
4. Preparing Your Workspace
Choose an area that can get messy. Cover your workspace with newspaper, plastic sheets, or a tablecloth for easy cleanup. Keep wet wipes and a bowl of water nearby to clean sticky fingers.
5. Creative Customization
Encourage your children to express their creativity by choosing colors, adding glitter, or even mixing in small beads or foam balls. Customizing their slime promotes creativity and gives them a sense of ownership over their creation.
Advanced Slime Recipes for the Adventurous Family
After mastering the classic glue-based slime, you may want to venture into new textures and types of slime. Here are a couple of advanced recipes to try out:
Edible Chocolate Slime
A delicious and safe option for the little ones who might taste their creations:
- 1 can of sweetened condensed milk
- 1 tablespoon of cornstarch
- 2 tablespoons of chocolate powder
- Heat the ingredients in a pot over medium heat until it thickens. Let it cool, and voilà—edible slime!
Fluffy Slime
For a lighter, fluffier texture that’s as fun to squish as it is to make:
- 4 oz of white glue
- 3 cups of shaving cream
- 1 tablespoon of baking soda
- 1 tablespoon of contact lens solution
- Mix all the ingredients in a bowl and knead until you reach the desired fluffy consistency.
Exploring these recipes can not only be a blast, but it also increases the scope of learning and play. Mixing different textures and types of slime can teach your kids about the properties of materials and how they interact with one another, adding an extra layer of education to the fun!
Store your homemade slime in an airtight container to keep it from drying out. If you’ve made edible slime, store it in the refrigerator to maintain freshness. Label your containers with the date they were made to keep track of their longevity.
Slime-making provides an excellent way for kids to learn and play, but it’s also about the precious memories you create together. With a little bit of preparation, the right ingredients, and a dash of creativity, you can ensure a successful and enjoyable slime-making experience.
By understanding these key aspects and integrating fun, advanced options into your slime repertoire, you can keep the fun fresh and potentially messy moments to a minimum. So grab your mixing bowls, and get ready for some slippery, slimy smiles!
See more great Things to Do with Kids in New Zealand here. For more information see here
Disclaimer
The articles available via our website provide general information only and we strongly urge readers to exercise caution and conduct their own thorough research and fact-checking. The information presented should not be taken as absolute truth, and, to the maximum extent permitted by law, we will not be held liable for any inaccuracies or errors in the content. It is essential for individuals to independently verify and validate the information before making any decisions or taking any actions based on the articles.


