
How to Make Delightful DIY Rabbit Ears with Your Little Bunnies
Hello, creative parents and little crafters! Are you looking for a fun and simple project that you can enjoy with your kids? Well, hop right in as we dive into the world of DIY rabbit ears! This adorable accessory is perfect for playtime, Easter celebrations, or just for a day when your little ones want to dress up as their favorite furry friends. So, let’s get our crafting supplies ready and start this bunny-tastic journey!
Why DIY Rabbit Ears?
Before we get into the nitty-gritty of crafting, let’s explore why making your own rabbit ears is an egg-cellent idea. It’s not just about having a cute costume piece; it’s about the experience and the benefits that come with it:
- Stimulates Creativity: Crafting helps children explore their imaginative side, encouraging creative thinking and problem-solving.
- Enhances Fine Motor Skills: Assembling the rabbit ears involves cutting, gluing, and possibly sewing, which are all great for honing fine motor skills.
- Bonding Time: Shared activities like this foster a stronger bond between parent and child, building cherished memories in the process.
- Customization: DIY allows you and your kiddos to personalize the ears, making them unique and special.
Materials You’ll Need
Gather these simple materials and let’s get hoppy—I mean happy—with our homemade rabbit ears!
- Sturdy headband
- Construction paper or felt (white and pink)
- Scissors
- Glue or hot glue gun (supervision required)
- Pencil or marker
- Optional: embellishments like glitter, stickers, or ribbons
Create Your Rabbit Ear Template
Getting the shape of your rabbit ears just right is key to a successful craft. Here’s how to create a simple template:
- Lay a piece of white paper or felt on a flat surface.
- Using a pencil, draw two elongated oval shapes for the outer ear. You can make them as long or as short as you prefer.
- Inside each oval, draw a smaller oval to represent the inner ear – this is where you’ll add the pink color later.
- Cut out the shapes – these will serve as your templates for the outer and inner parts of the rabbit ears.
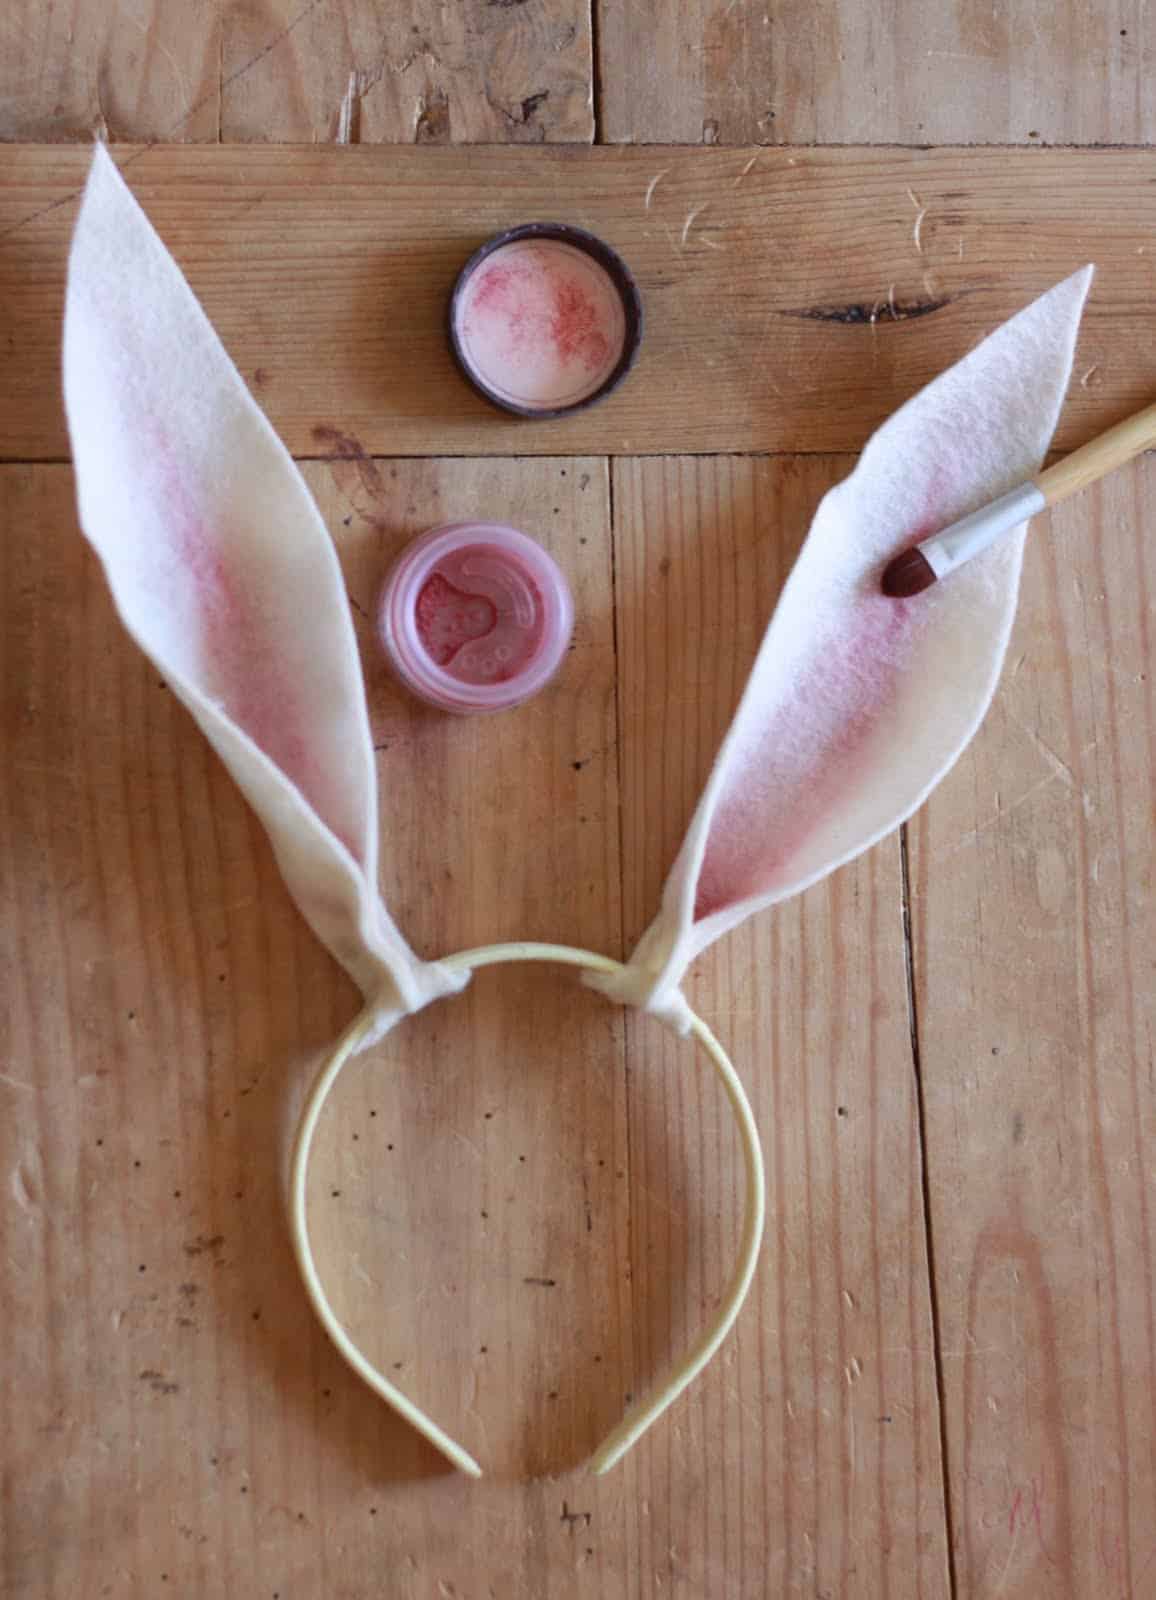
Sculpting Your Rabbit Ears
Now that you have your templates, it’s time to bring these rabbit ears to life!
- Trace the outer ear template onto your chosen material – white felt or construction paper – and cut out two identical pieces.
- Repeat this process with the pink paper or felt for the inner ears, using the smaller template.
- Glue the pink inner ear cutouts to the center of the white outer ear pieces.
- Bend the bottom of the ears slightly so they can be attached to the headband. You might want to create a tab by folding the bottom section, which will help secure the ears more firmly to the headband.
Attaching the Ears to the Headband
With your rabbit ears shaped and ready, let’s attach them to the headband for the final transformation.
- Place a small amount of glue on the bottom tab of your ear.
- Press the tab onto the headband firmly, holding it in place until the glue dries. If using hot glue, please be careful of the temperature and supervise children closely.
- Repeat the process for the second ear, making sure both are symmetrical and securely attached.
- Allow your new bunny ears to dry completely before trying them on. This will ensure they’re strong enough to withstand the fun adventures ahead!
And there you have it, folks! A set of adorable, handcrafted bunny ears that are sure to bring joy to your little one’s heart. But wait, there’s more! Want to give your rabbit ears an extra touch of magic? Keep reading to learn how you can enhance these hoppy headpieces with some additional flair and creativity.
Remember, the fun doesn’t stop here. Engage with your kiddos and ask them how they’d like to personalize their bunny ears. Maybe they want to add some sparkly stickers or tie a charming bow around the headband. The possibilities are endless, and the outcome is sure to be ear-resistible!
So, grab your crafting supplies and let’s create some unforgettable memories and the cutest little rabbit ears you’ve ever seen. Your kids will love hopping around in their new handmade accessory, and you’ll adore watching them play and grow through this wholesome, creative activity.
5 Things Parents Should Know in Preparing for DIY Rabbit Ears
Before you get started with this exciting DIY project, here are five important tips to ensure everything goes smoothly:
- Plan Beforehand: Take a few minutes to read through the instructions with your little ones. This will help them understand what they’re going to do and get excited about the project. Pre-planning also ensures you have all the necessary materials on hand before you begin.
- Safety First: If you’re using a hot glue gun or scissors, it’s essential to prioritize safety. Always supervise your children closely and handle any potentially dangerous tools yourself. For younger children, consider using safety scissors and a less hot adhesive option like white glue or double-sided tape.
- Mess Management: Crafting can get a little messy, especially when glue and embellishments are involved. Prepare your workspace by covering it with newspaper or a craft mat, and keep some wet wipes or a cloth nearby for quick clean-ups.
- Patience is Key: Resist the urge to take over if your child is struggling. Instead, offer guidance and encourage them to keep trying. This craft is not just about the final product, but about learning and developing new skills.
- It’s All About Fun: Don’t stress about perfection. The ears might be a bit wonky or the decorations uneven, but it’s the joyful process and the pride in creating something themselves that children will remember the most.
Enhancing Your DIY Rabbit Ears
Let’s add a pop of personality to those rabbit ears with some extra embellishments:
- Wrap the headband in ribbon or fabric for a comfy fit and an added splash of color.
- Attach small flowers, pompoms, or sequins to the ears for some textural flair.
- Personalize each ear with the initials of your child using fabric paint or markers.
- Make the ears sparkle by adding a dusting of glitter. A thin layer of glue and a sprinkle of glitter will do the trick!
- Create thematic ears by using patterned paper or fabric, such as polka dots for a playful look or floral for spring vibes.
Now that you’re armed with knowledge and inspiration, the world of DIY rabbit ears won’t know what hopped into it! By creating these wonderfully whimsical ears with your children, you’re sowing the seeds of creativity and crafting a memory that will last a lifetime. So, let’s get those creative juices flowing, prep those supplies, and embark on this bunny ear venture with enthusiasm and joy!
See more great Things to Do with Kids in New Zealand here. For more information see here
Disclaimer
The articles available via our website provide general information only and we strongly urge readers to exercise caution and conduct their own thorough research and fact-checking. The information presented should not be taken as absolute truth, and, to the maximum extent permitted by law, we will not be held liable for any inaccuracies or errors in the content. It is essential for individuals to independently verify and validate the information before making any decisions or taking any actions based on the articles.

