
Welcome to the Spectacular World of DIY Slime!
Hey there, fun-loving parents and guardians! Are you ready to dive into the squishy and satisfying world of DIY slime? We’ve got the perfect activity that promises to deliver giggles, awe, and maybe just a tiny bit of mess (it’s all part of the fun, right?). Whether it’s a rainy day, birthday party, or just a regular afternoon, making homemade slime is an incredible way to bond with your kids and spark their creativity!
Why DIY Slime?
Slime isn’t just a gloopy, stretchy substance that kids adore; it’s a versatile plaything that comes with a basketful of benefits. It’s sensory play at its finest, which means it can help in your child’s development by enhancing fine motor skills, and it also encourages the exploration of science concepts like polymers and viscosity. Plus, it’s a great stress buster—not just for the kids, but for you too!
Getting Started: What You’ll Need for Your DIY Slime Adventure
Before we jump into our slime-creating escapade, let’s make sure we have everything we need. You’ll find that most of these items can already be found in your home, making this DIY project a breeze.
- Glue: The foundation of your slime, clear or white PVA glue works best.
- Borax Solution: A bit of Borax mixed with water acts as an activator to bind the slime together. However, we’ll cover some Borax-free options too, for those looking for safer alternatives!
- Coloring: Food coloring, paint, or even glitter—whatever adds that burst of fun to your slime!
- Mixing Bowls and Spoons: For blending up your goopy masterpiece.
- Measuring Tools: Accuracy is key, so be sure to have your measuring cups and spoons at the ready.
- Storage Containers: To keep your slime fresh and play-ready for days to come!
Step-by-Step Slime: Your Path to Slime Glory
Now that you’ve gathered your supplies, let’s get to the best part—making the slime! We’ll start with a basic recipe that’s easy, quick, and serves as a perfect base for all your slime experiments.
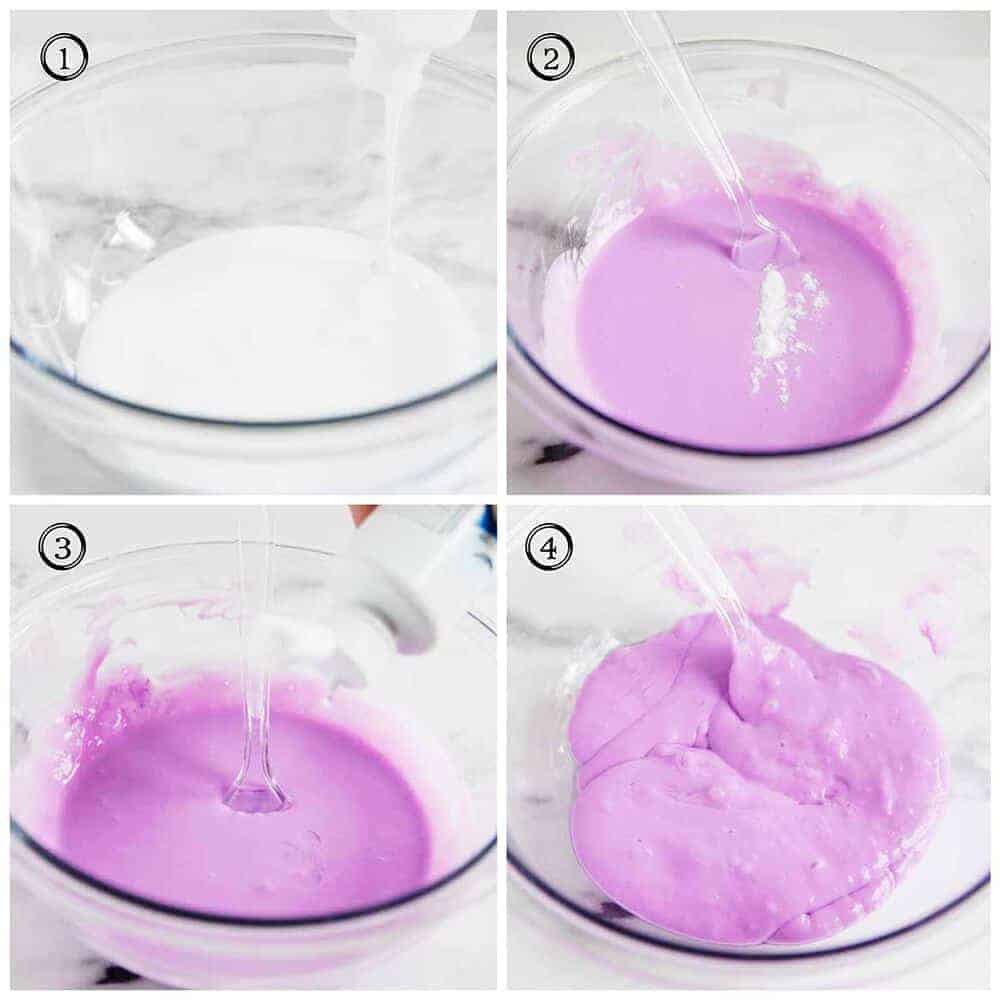
Simple Slime Recipe
- Grab your mixing bowl and pour in 1/2 cup of PVA glue.
- Add a few drops of food coloring or a sprinkle of glitter. Stir it up to distribute the color evenly.
- In a separate container, mix 1/2 cup of warm water with 1/4 teaspoon of Borax until it’s fully dissolved.
- Slowly add the Borax solution to the glue, stirring constantly. You’ll begin to see the magic happen as the mixture turns into slime!
- Once the slime begins to pull away from the sides of the bowl and clump together, it’s time to get hands-on! Knead the slime until it reaches your desired consistency.
Voilà! You now have your very own homemade slime! Feel free to play with the colors, add more glitter, or even include little beads for texture. The sky’s the limit when it comes to customizing your squishy creation.
Troubleshooting Tips for Perfect Slime
Not all slime sessions go as planned, but don’t worry—that’s just an opportunity for more learning and fun. If your slime is too sticky, add a little more of the Borax solution. If it’s too runny, then a bit extra glue can help thicken it up. Remember to add these adjustments gradually—you can always add more, but you can’t take it out!
Now you’re well on your way to becoming a slime expert! But the fun doesn’t stop here. We have a whole world of slime varieties to explore next, including fluffy slime, glitter slime, and even edible slime (a super hit for those curious little tasters). So, stay tuned, because we’re just getting started on this gooey journey of imagination and discovery. Keep those smiles wide and that slime squishy!
Five Essential Tips for Parents Preparing for DIY Slime
As you gear up for some messy, hands-on fun, here are five key tips to prepare for your DIY slime adventure:
- Create a Slime-Making Space: Choose an area that’s easy to clean and won’t get damaged by spills. A plastic tablecloth or old newspapers on a table work great as a protective layer.
- Safety First: Ensure that the ingredients you’re using are non-toxic and safe for your children’s age group. Always supervise younger children to prevent ingestion of slime components.
- Premeasure Ingredients: To keep the process smooth and enjoyable, measure out all your ingredients beforehand. This not only minimizes the mess but also turns the activity into a mini science experiment.
- Embrace the Mess: Understand that making slime can be messy, and that’s okay! It’s part of the experience and teaches kids that it’s fine to get a little dirty when creating and learning.
- Post-Slime Clean Up: Have soapy water and towels ready for cleaning hands and surfaces. Knowing how to tackle the clean-up will make the whole experience more relaxing for everyone involved.
Advanced Slime Recipes for the Curious and Creative
Once you’ve mastered the simple slime recipe, why not venture into more advanced territory? Introducing different textures and effects can make each slime-making session a unique exploratory adventure!
Fluffy Slime for Cloud-Like Squish
- Start with your basic slime recipe and mix 1/2 cup of glue with a few pumps of foaming shaving cream and stir.
- Incorporate food coloring or your favorite glitter into the fluffy mixture.
- Add your activator slowly until the slime begins to form. The shaving cream will give this slime a delightful, fluffy texture that’s light as air.
- Knead the slime until you reach a consistency that holds together, yet is still stretchy and fluffy. Too much activation may lead to stiff slime, so be conservative with the Borax solution.
Glitter Slime for Sparkling Fun
- Make the base slime using clear glue instead of white to allow the glitter to really shine through.
- Add an abundance of glitter—fine or chunky, one color or a rainbow mix—into the glue before mixing in the activator.
- Follow the rest of the base slime instructions, and soon you’ll have a mesmerizing slime that sparkles and shines with every stretch.
Edible Slime for Safe Tasting
- Heat up 1/3 cup of candy such as gummy bears in the microwave until melted. Be cautious, as it can be hot!
- Add a bit of cornstarch and icing sugar to the melted candy to achieve a dough-like consistency.
- Knead the mixture, adding cornstarch as needed until it’s not sticky anymore. Make sure it’s cool enough for hands!
- Enjoy this tasty treat, but keep in mind, it’s still sugary candy, so moderate consumption is key.
Want more wonders of DIY slime? Check out recipes for magnetic slime, glow-in-the-dark slime, and thermal color-changing slime. Just make sure your ingredients are always safe for play, and feel free to share your splendid slime creations on social media—we’d love to see what you come up with!
Remember, the aim is to have a blast while mixing, making, and playing with slime. It’s a wonderful world worth exploring, filled with science, art, and sensory experiences. So roll up those sleeves, gather around the table, and prepare to be slimed—together!
See more great Things to Do with Kids in New Zealand here. For more information see here
Disclaimer
The articles available via our website provide general information only and we strongly urge readers to exercise caution and conduct their own thorough research and fact-checking. The information presented should not be taken as absolute truth, and, to the maximum extent permitted by law, we will not be held liable for any inaccuracies or errors in the content. It is essential for individuals to independently verify and validate the information before making any decisions or taking any actions based on the articles.


