
DIY Slime Recipe: Fun and Easy Guide for Parents
Are you ready to get your hands goo-ey and faces smiling? Well, fellow fun-loving parents, you’ve landed in the perfect spot! Welcome to the whimsical world of DIY Slime—the place where creativity knows no bounds, laughter is a must, and sticky fingers are a sign of success!
In this ultimate guide, I’ll walk you through the perfect DIY slime recipe that’s not only kid-approved but also parent-friendly. So roll up your sleeves, because we’re about to dive into the delightful details of creating the most spectacular slime at home!
Why DIY Slime? It’s More Than Just Goo!
Before we jump right into the slime-making process, let’s pause for a sec and appreciate the wonders of this stretchy sensation. Slime is so much more than a trendy plaything—it’s a tactile treasure that engages the senses, sparks imaginative play, and even doubles as a stress reliever for both kiddos and adults. And hey, it sneaks in some science lessons too!
Getting Ready: Your Slime Station Setup
As with any great adventure, preparation is key! Here’s a quick checklist to ensure your slime session goes as smooth as the slime itself:
- A clean, flat surface
- Plenty of space to mix and mash
- Bowls or containers for mixing
- A measuring cup
- Stir sticks or spoons
- Ziploc bags or airtight containers for storage
- And of course, the ingredients for your chosen slime recipe (which we’ll get to in just a jiffy!)
The Basic Slime Recipe: Ingredients and Instructions
Now, for the moment we’ve all been waiting for: the slime recipe! Here’s a simple, fuss-free formula guaranteed to yield hours of squishy fun.
What You’ll Need:
- 1/2 cup (120 ml) of white school glue
- 1/2 cup (120 ml) of water (room temperature)
- Food coloring of your choice (optional for a splash of color)
- 1/2 teaspoon of baking soda
- 1-2 tablespoons of contact lens solution (look for one containing boric acid)
Let’s Get Mixing!
Alright, super-parents, here’s how you conjure up some slime magic:
- Grab your mixing bowl and pour in 1/2 cup of white school glue.
- Add the 1/2 cup of water to the glue and mix until well combined.
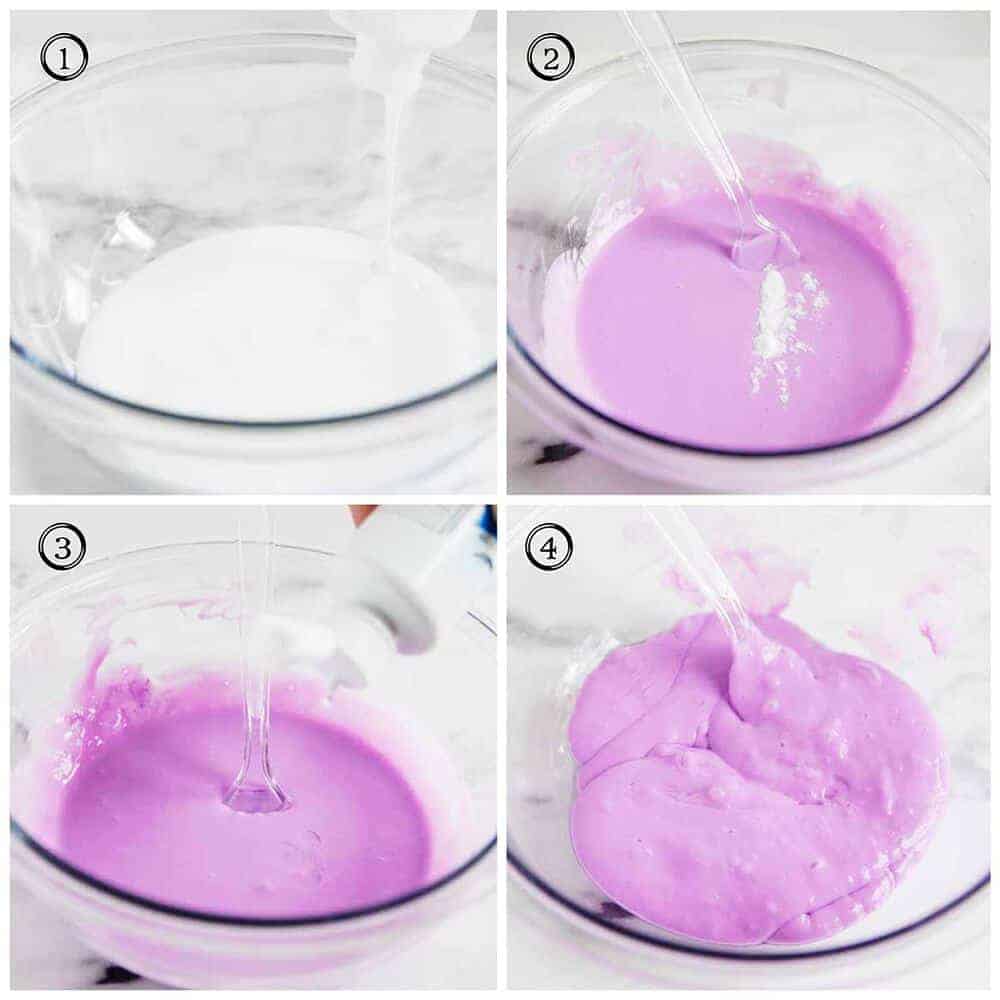
- If you’re going all in with color, now’s the time to add a few drops of food coloring. Stir it up until you’ve got a gorgeous uniform hue.
- Sprinkle that 1/2 teaspoon of baking soda into the mixture and mix it thoroughly.
- Now, get ready for the transformation! Slowly add in the contact lens solution, stirring as you go. You’ll see the mixture begin to clump and pull away from the sides of the bowl—that’s slime magic in action!
- Keep stirring until your mixture turns into a gooey, stretchy blob. If it’s too sticky, you can add a little more contact lens solution, but just a dab at a time.
- Once everything’s mixed, take the slime out and knead it with clean, dry hands. In no time, you’ll feel it turning into the perfect slime texture!
Voila! You’ve just created your very own DIY slime! Get ready to stretch, pull, roll, and maybe even make some slime bubbles. This is where the real fun begins, and memories are made.
Now, wasn’t that easy? Not only do you have a fun activity to share with your little ones, but you’ve also made something that they can continue to play with time and time again. Just make sure to store the slime properly in those Ziploc bags or airtight containers to keep it fresh and ready for another day of play!
And guess what? This is just the start! There are countless variations of slime waiting for you to explore. You can add glitter, beads, foam balls, or even make your slime glow in the dark. The possibilities are infinite, and I’m here to guide you through them all. Stick around as we dive deeper into the world of slime and unlock new levels of messy, gooey, delightful playtime!
Ready for more slimy adventures? Keep reading, because we’re just getting started! Let’s pave the way for more imaginative play with DIY slime variations that will keep the creativity flowing and your little ones engaged. Keep the fun rolling and the slime stretching!

5 Things Parents Should Know in Preparing for DIY Slime Recipe
Before we hop into more slime variations, it’s essential for parents to note these five golden nuggets of wisdom when embarking on your DIY slime journey:
1. Safe Ingredients are Key
Ensure you’re using non-toxic, kid-friendly ingredients, especially if younger children are joining in on the fun. Check for any allergies, and always opt for child-safe alternatives where possible.
2. Mess is Part of the Process
Slime creation is a messy art. Cover your workspace with newspaper or a plastic sheet, dress for a mess, and don’t sweat the small spills. Embrace this as part of the hands-on experience!
3. Supervision is a Must
Always supervise little ones during slime play. While we use safe ingredients, it’s still important to ensure children don’t ingest any slime or put it near their eyes.
4. Creativity Comes in Every Color
Don’t shy away from customizing. Slime can be an expression of your child’s personality, so encourage them to choose colors, add-ins, and explore their creative side.
5. Storage Solutions Extend the Fun
Storing your slime right is crucial for longevity. Airtight containers keep it from drying out, so you can return to the fun day after day.
Let the Slime-tastic Adventure Continue!
With the basics under our belts, it’s time to add a dash of sparkle and pizzazz to our slimy creations!
Glitter and Glam: Sparkly Slime Time
Adding That Shimmer:
- Follow the basic slime recipe we covered earlier.
- Before adding the contact lens solution, pour in a generous amount of glitter. Silver, gold, rainbow – let your child pick their favorite!
- Mix it all up and watch the glitter spread throughout, making your slime sparkle and shine.
Texture Wonderland: Beads and Foam Balls
Creating Textured Slime:
- Prepare your basic slime mix.
- Instead of glitter, add in beads, foam balls, or even small plastic trinkets to create unique textures.
- Mix and knead until you’ve got a slime that feels as interesting as it looks.
Ready for something even more out of this world?
Glow-in-the-Dark: Luminous Fun
Making Slime Glow:
- Create your slime base, and then stir in some glow-in-the-dark paint or powder.
- Charge your slime under a light source and then hit the lights for an epic, glowing experience that will thrill any child.
There you go, wonderful slime architects! With these variations and tips, your family is all set to become prime slime aficionados. Whether it’s a rainy day indoors or you’re looking for a magical activity to bond over, slime delivers a world of enjoyment. Embrace the squish, the squelch, and the smiles. Let’s make memories—one sticky strand at a time!


