
DIY Spinner Toys: A Creative Craft for Parents and Kids Alike
Hey there, crafty families! Are you ready to spin into action with a delightful DIY project that’s guaranteed to whirl up some fun? That’s right, we’re talking about DIY spinner toys! Whether it’s a rainy day, a playdate, or just a quiet afternoon at home, making your own spinner toys can be an exciting activity for the whole family. So grab your crafting gear, and let’s put a new spin on creativity!
Why DIY Spinner Toys?
Before we jump into the whirlwind of construction, let’s talk about why DIY spinner toys are such an awesome craft project. First off, they are terrific for developing fine motor skills in children, enhancing hand-eye coordination, and encouraging design thinking. Plus, the pride and joy that come from playing with a toy that they’ve created themselves is utterly priceless. And let’s not forget the bonding time! Working together on a homemade project can create special memories that last far beyond the life span of the toy itself.
Materials You’ll Need
Getting started with your DIY spinner toy is easy, and you might already have most of these items at home:
- Cardboard or thick stock paper
- A round object to trace (like a CD or a large coin)
- Markers, crayons, or paint
- A pair of scissors
- A toothpick or a small nail
- A rubber band or string
- Glue or a hot glue gun (to be used by adults!)
Now, with these items at the ready, we’re all set to create a spinner toy that will provide hours of twirling joy.
Step-by-Step Instructions
Let’s break down the process into simple, easy-to-follow steps:
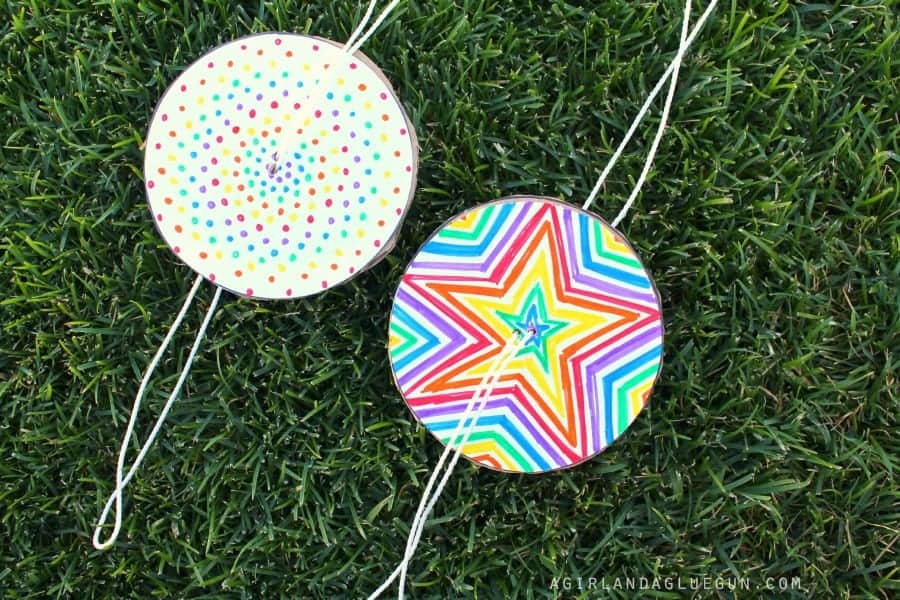
- Trace and Cut: Use your round object to trace a perfect circle onto your cardboard or thick paper. This will be the body of your spinner. Next, carefully cut out the circle with your scissors.
- Decorate Your Spinner: Unleash your inner artist and decorate one or both sides of the circle. Use bright colors and fun patterns to make your spinner visually exciting.
- Create Spinner Handles: Poke two small holes in the center of your circle, making sure they are directly across from one another. Be sure to smooth out any bumpy edges.
- Attach the String: Thread your rubber band or string through the two holes. Tie a knot large enough that it won’t slip back through the holes but not so large that it prevents spinning.
- Final Touches: Check the balance of your spinner. You might need to trim the edges to make it spin evenly. If you’re using string, wind it up by twisting the spinner, then pull the ends to watch it whirl. If you’re using a rubber band, just pull and release!
Voila! You’ve crafted your very own spinner toy! But wait, there’s more to explore. Let’s dive into some customization ideas that will make your spinner truly unique.

5 Things Parents Should Know in Preparing for DIY Spinner Toys
Embarking on the DIY spinner toy project? Here are five important tips to ensure a smooth and joyous crafting experience:
- Safety First: Always prioritize safety when crafting with children. Keep sharp tools like scissors out of reach and supervise their use. If you’re using a hot glue gun, ensure that only adults handle it to prevent any accidental burns.
- Workspace Setup: Select a spacious and clean area to work on. A large table covered with newspaper or a plastic sheet will do excellently, making clean-up a breeze. Good lighting and comfortable seating will make the crafting process even more enjoyable.
- Prepare Materials Ahead: To keep the project flowing smoothly, gather all necessary materials before starting. This prevents any mid-crafting hiccups and keeps the little ones engaged without unnecessary breaks in the fun.
- Customization is Key: Encourage your kids to get creative with the design of their spinner toys. Provide a variety of decorating materials—stickers, glitter, and even small gems can add a personal touch. Remember, each spinner doesn’t have to look the same; the uniqueness adds to the charm!
- Patience and Encouragement: Not all children will have the same skill level, so be patient and offer lots of encouragement. Applaud their attempts, no matter the outcome, and be ready to lend a helping hand when needed. The goal is to build confidence and have a good time!
With these tips in mind, you’re now ready to enjoy a fantastic crafting session with your kids. Keep the atmosphere light and fun, and remember that the primary aim is to create lasting memories—and of course, a fabulous spinner toy!
Spinner Toy Customizations
Making your spinner toy is the first step, but customizing it is where the real fun begins! Here are some ideas to enhance your creation:
- Themed Spinners: Have a theme in mind? Whether it’s superheroes, animals, space, or princesses, decorate your spinners to reflect your child’s interests and watch them come alive with every spin.
- Texture Experiments: Mix in textures for a sensory experience. Felt, foam, and textured papers can add an interesting touch to your spinner’s surface.
- Glow in the Dark: Use glow-in-the-dark paint or stickers to create a spinner toy that doubles as a cool nighttime display.
- Interactive Elements: Attach beads or small bells to the string for an additional element of play. These can add sound or visual appeal to the spinning motion.
- Education Spinners: Make it a learning tool by adding numbers, letters, or words. This way, spinning can become an interactive educational game!
Endless possibilities await as you embark on your DIY spinner toy adventure. Let your and your child’s imagination run wild, and enjoy the beautiful spinners that result from your crafting session!
See more great Things to Do with Kids in New Zealand here. For more information see here
Disclaimer
The articles available via our website provide general information only and we strongly urge readers to exercise caution and conduct their own thorough research and fact-checking. The information presented should not be taken as absolute truth, and, to the maximum extent permitted by law, we will not be held liable for any inaccuracies or errors in the content. It is essential for individuals to independently verify and validate the information before making any decisions or taking any actions based on the articles.


