
DIY Toy Box Ideas: Create a Fun Storage Solution for Your Little Ones
Hello, crafty parents and guardians! Are you on the hunt for a creative and budget-friendly way to tidy up those piles of toys? Look no further! In this comprehensive guide, we’re diving into the playful world of DIY toy boxes. Whether you’re a seasoned DIYer or a newbie to the world of crafting, you’ll find simple, step-by-step instructions to make a toy storage solution that’s as unique as your little one. Let’s turn clutter into clean and crafty fun!
Why DIY a Toy Box?
Before we get our hands dirty, let’s talk about the ‘why’. A DIY toy box isn’t just a place to toss in toys. It’s an opportunity to encourage organization skills in your young ones and to add a personal touch to their space. Best of all, you can upcycle materials and create something truly unique that fits your child’s personality and your home’s decor. Plus, it’s a fun project that the whole family can get involved with!
Choosing Your Materials
First things first, we need to select the right materials. Depending on your preference and what you have on hand, you can go as simple or as elaborate as you like. Here are some popular choices:
- Wooden Crates or Pallets: Perfect for a rustic look and super sturdy! They can often be found for free or at a low cost from local stores or shipping yards.
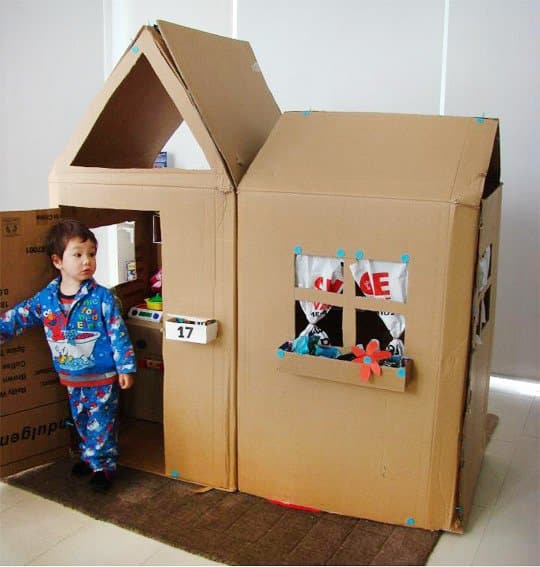
- Cardboard Boxes: An economical option that’s great for those who aren’t ready to commit to woodworking. These can be decorated with paints, fabric, or wrapping paper.
- Plastic Bins: Durable and easy to clean. With a little bit of customization, a simple plastic bin can transform into a charming toy box.
Gathering Tools and Supplies
Once you’ve chosen your main material, gather some basic tools and supplies to help you bring your toy box to life:
- A saw (if working with wood)
- Safety gear (gloves, goggles)
- Paints and brushes
- Sanding paper (for wooden options)
- Decorative elements (stickers, stencils, decals)
- Adhesives (if you’re planning on attaching fabric or decorations)
- A measuring tape
- A screwdriver and screws (if assembling)
Designing Your Toy Box
Now comes the fun part – designing! Whether you’re painting, decorating with decals, or creating cushions for the top, the sky’s the limit. Kids can even contribute to the design, making the DIY toy box project a wonderful family activity. Here are some design tips to get you started:
- Choose a theme that your child loves, like dinosaurs, space, princesses, or cars.
- Include your child in the color selection process. You can even practice with color mixing for an educational spin.
- Utilize stencils or templates for designs if you’re not confident in your free-hand painting skills.
- Think about longevity. A classic, simple design might last through several stages of your child’s interests.
- Consider safety features, like soft-close hinges or cut-out handles to protect little fingers.
- If space is tight, consider making a stackable design, or add wheels for easy movement.
Preparing Your Workspace
Before you start building, it’s important to prep your workspace. Make sure it’s well-ventilated if you’re painting or sanding, and that you have a clean, flat surface to work on. Layout all your materials and tools, so everything is within easy reach.
With the preliminary steps out of the way, we’re ready to jump into the nitty-gritty of building our DIY toy box. Stay tuned as we guide you through the process of transforming everyday materials into a magical toy storage solution that will bring joy and order to your home.
Ready to tackle this exciting project? In the next part of our DIY journey, we’ll go step by step through the construction phase, offer trouble-shooting tips, and discuss how to maintain your creation for years to come. Let’s create something wonderful together!
5 Things Parents Should Know in Preparing for a DIY Toy Box
1. Safety First
When it comes to DIY projects, nothing is more important than safety. If you choose to work with wood or other materials that require cutting, drilling, or sanding, always wear the right safety gear. Keep tools and hazardous materials out of reach of children, and never leave power tools unattended. Ensure that the final design has no sharp edges and consider installing safety hinges to prevent the lid from slamming shut.
2. Plan for the Future
As you brainstorm your DIY toy box project, think in terms of adaptability and growth. Your child’s interests will evolve as they grow, so create a toy box that can either change with them or has a timeless appeal. Additionally, consider building a toy box that could potentially be repurposed later—perhaps as a storage bench or a keepsake chest.
3. Involve Your Kids
Turning this project into a family affair gives children a sense of ownership and pride in the toy box. They’re more likely to use and appreciate something that they’ve helped create! Depending on their age, they could assist with painting, choosing colors, or selecting decorations. Make sure you supervise them closely to ensure they are safe and engaged in age-appropriate tasks.
4. Time and Budget Considerations
Before diving into the project, assess how much time and money you are willing to invest. Simple designs with readily available materials like upcycled crates or cardboard will cost less and take less time. More intricate designs or those requiring purchased materials and additional tools will increase your investment on both fronts. Remember, the most efficient way to save time and money is to plan thoroughly before you start building.
5. Maximize Storage and Functionality
A good toy box is more than just a place to store toys. It can double as a bench, have a chalkboard side for drawing, or even feature removable dividers for better organization. Consider how you can maximize the functionality of the toy box for your child’s uses. It’s crucial to strike a balance between practical storage and an aesthetic appeal that excites your child.
Now that we’ve covered key considerations for your DIY toy box project, you’re well on your way to creating a fun and functional piece for your child’s playroom. Keep in mind these tips as you advance to the crafting stage, and most importantly, enjoy the process. You’re not only building a toy box, but also building memories with your children. Happy crafting!
See more great Things to Do with Kids in New Zealand here. For more information see here
Disclaimer
The articles available via our website provide general information only and we strongly urge readers to exercise caution and conduct their own thorough research and fact-checking. The information presented should not be taken as absolute truth, and, to the maximum extent permitted by law, we will not be held liable for any inaccuracies or errors in the content. It is essential for individuals to independently verify and validate the information before making any decisions or taking any actions based on the articles.

