Easy Easter Bunny Drawing Guide for Parents and Kids
Hey there, creative families! Easter is hopping around the corner, and it’s the perfect time for a sweet drawing activity with your little bunnies. So grab your pencils, because we’re about to hop into an easy guide to drawing the cutest Easter Bunny! Whether you’re an artsy parent or a beginner looking for a fun Easter project, this drawing tutorial is made just for you!
What You’ll Need
- Paper – Any kind of white paper is perfect for this craft; construction paper or drawing pads work great!
- Pencils – A regular HB pencil will do the trick for sketching out your bunny.
- Eraser – For those little oops moments. A kneaded eraser is a gentle option!
- Coloring Supplies – Feel free to use colored pencils, crayons, or markers to bring your bunny to life.
Before we start, remember that drawing is all about having fun and expressing creativity, so encourage your kiddos to add their personal touch to their Easter bunny drawings!
Step-by-Step Instructions:
1. Draw the Head and Face
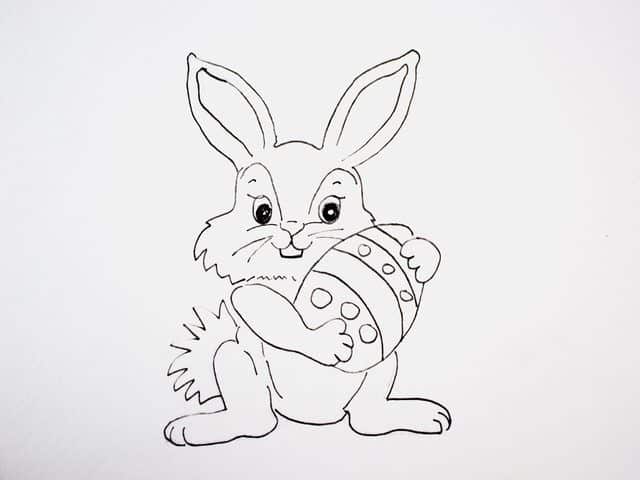
Let’s begin by drawing our Easter Bunny’s head. Draw a circle in the center of your paper – this will be the face of your bunny. To ensure your bunny has plenty of character, let’s add some facial features. Draw two circles for the eyes, making sure they’re big and expressive. A small triangle works perfectly for the nose, and don’t forget the curved line for a smiley mouth!
2. Add the Ears
No bunny is complete without long, floppy ears. Start with two long ovals attached to the top of the head. Remember, it’s okay if they’re a bit wonky – it adds charm! If you’re feeling festive, you can even add a tuft of fur or some inner ear details.
3. Sketch the Bunny’s Body
Underneath the head, draw a larger oval for the bunny’s body. This doesn’t have to be perfect; a slightly chubby, fluffy body adds to the cuteness! We’re going for jolly and cuddly, not precision engineering.
4. Draw the Arms and Legs
Time for the limbs! Draw two smaller ovals on either side of the body for the arms, and two more ovals at the bottom for the feet. To make your bunny look like it’s seated and chill, have the feet stretch out in front. And how about some paws? Just a couple of lines on each foot and arm will do!
5. Give Your Bunny Some Personality
Let’s get imaginative! Maybe add a little bow tie or a cute vest. And don’t forget the fluff – some extra lines on the cheeks and ears really bring out the bunny’s soft texture.
We’re just getting started with our delightful Easter Bunny drawing. In the next steps, we’ll dive into fine-tuning our masterpiece, adding color, and extra tips for various ages. So, keep your pencils ready, and let’s spread that Easter cheer with our own hand-drawn creations!
Together, we’re making memories that will last way beyond the Easter egg hunts and chocolate bunnies. So, snuggle in with your little ones and let’s turn this Easter into a family art fest!
Stay tuned, as more bunny magic is coming right up to complete your Easter celebration with a personal touch of creativity and joy.

5 Essential Tips for Parents Preparing for the Easy Easter Bunny Drawing
1. Create the Right Environment
Set up a comfortable and inviting drawing space where you and your child can sit down together. Make sure the area is well-lit and free of clutter. A quiet spot can help keep your little ones focused and excited about the drawing task at hand.
2. Gather Materials Ahead of Time
Having all your materials ready before you start will ensure a smooth drawing experience. Ensure that pencils are sharp, erasers are at hand, and coloring supplies are within reach. This way, the fun isn’t interrupted by having to search for supplies!
3. Show Examples for Inspiration
Looking at pictures of bunnies or other Easter drawings can spark creativity. Consider showing your child some examples for inspiration, but remind them it’s their unique creation that matters most. This can set the creative wheels in motion for imaginative personal touches.
4. Patience is Key
Be patient and offer gentle guidance when needed. Remember that the outcome is not as important as the process and the time spent together. Celebrate their efforts and creativity instead of focusing on perfection.
5. Encourage Decision Making
Whether they want to add a hat, a patch of flowers, or even a background, let your kids make decisions about their drawing. This practice not only fosters creativity but also builds confidence in their artistic choices.
With those tips in mind, you and your children are all set to embark on a delightful adventure of drawing the Easter Bunny. Keep the atmosphere light, happy, and supportive to make the most of this wonderful Easter activity!
Adding Color and Details
Once your Easter Bunny drawing is complete, it’s time to add some colors and perhaps a background. Encourage your kids to choose their favorite colors or try to mimic real bunny colors for a more natural look. They can even add a scenic garden background, with Easter eggs hidden all around. This is where their imagination can really shine! And while they’re coloring, you can talk about the Easter Bunny’s story and the traditions surrounding this fun holiday.
Adapting the Activity for Different Ages
If you have children of different ages, you can easily adjust the complexity of the drawing to suit their skill levels. For the younger ones, focus on large shapes and fewer details. For older children, encourage more intricate designs and the use of shading techniques. Each child can work at their own pace and level, ensuring they remain engaged and proud of their unique creation.
The end result will be a series of adorable Easter Bunny drawings that reflect the personalities of each young artist in your family. And what’s more precious than displaying these artworks on your refrigerator or framing them for Easter decoration? They might just become treasured keepsakes that you’ll look back on with fondness for years to come.
So let the countdown to Easter begin, and get ready to enjoy this egg-citing drawing adventure with your kids. Happy drawing, happy coloring, and a very happy Easter!
See more great Things to Do with Kids in New Zealand here. For more information see here
Disclaimer
The articles available via our website provide general information only and we strongly urge readers to exercise caution and conduct their own thorough research and fact-checking. The information presented should not be taken as absolute truth, and, to the maximum extent permitted by law, we will not be held liable for any inaccuracies or errors in the content. It is essential for individuals to independently verify and validate the information before making any decisions or taking any actions based on the articles.


