
Easy Easter Bunny Drawings for Kids: A Step-by-Step Guide
Welcome, creative parents and enthusiastic little artists! ? Easter is just around the corner, and what better way to hop into the holiday spirit than by drawing your very own adorable Easter bunny? We’ve put together a delightful step-by-step guide to help you and your kids create the cutest bunny drawings that are absolutely perfect for Easter cards, decorations, or just a bit of festive fun.
Drawing together is not only a wonderful way to bond with your children but also helps them to develop their fine motor skills, boost their creativity, and enjoy the colorful traditions of Easter. So, get your pencils, crayons, and Easter enthusiasm ready – let’s start our art adventure! ??
What You’ll Need for Your Bunny Masterpiece
- Paper or sketchpad
- Pencils
- Erasers
- Coloring materials (crayons, markers, colored pencils, etc.)
Understanding the Basic Shapes of a Bunny
Before we dive into our drawing, it’s important to note that every drawing begins with simple shapes. Bunnies typically consist of circles and ovals – easy peasy lemon squeezy! ? We’ll use these shapes to build the structure of our bunny and then add details to bring it to life.
Step-by-Step Instructions to Draw an Easter Bunny
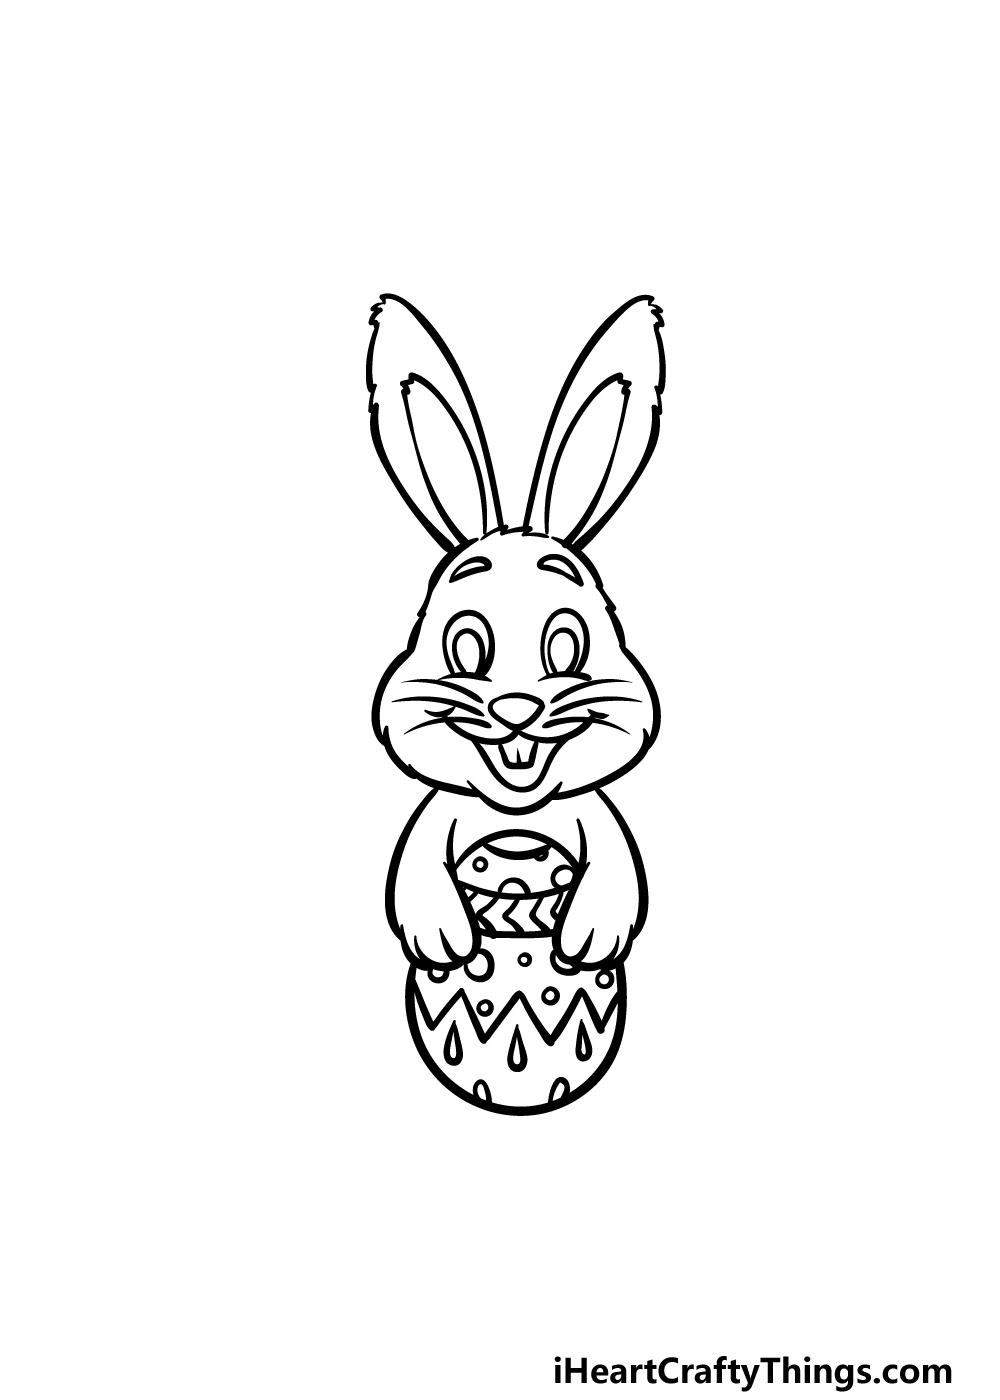
1. Drawing the Bunny’s Head
- Start with a large oval in the middle of your paper; this will be your bunny’s head.
- Add a horizontal and a vertical line inside the oval to split it into quarters. These lines will help you place the bunny’s facial features later on.
2. Adding the Ears and Body
- On top of the head, draw two long ovals for the ears – bunnies are known for their oversized ears, so don’t be afraid to exaggerate!
- For the bunny’s body, draw a larger oval beneath the head, ensuring it’s slightly overlapping – this creates a natural neck.
3. Creating the Face
- In the head’s quarters, draw two circles for the eyes, a small triangle for the nose, and then add a curved line for the mouth.
- Don’t forget the bunny’s whiskers! Draw a few slender lines on each side of the nose.
4. The Bunny’s Paws and Feet
- Add two smaller ovals on the sides of the body for the paws. Bunnies use their paws to hop and hold their Easter eggs, so make them cute and fluffy!
- Draw two larger ovals at the bottom of the body for the feet. Just like the paws, give them some character by making them plump and soft-looking.
5. Accessorizing Your Bunny
- Time to dress up your bunny! Add a little bowtie under the head or a ribbon on one of the ears to make your drawing extra special.
- You could even draw a little Easter basket filled with colored eggs beside your bunny for an additional festive touch.
Remember, art is not about perfection; it’s about expression and fun! Encourage your kids to explore their own ideas and maybe even create a whole family of Easter bunnies. ??
Now that your drawing is complete, you can use your coloring materials to fill your bunny with vibrant Easter colors. Experiment with patterns – polka dots, stripes, or floral designs – to add some texture to your creation.
Stay tuned for more tips on how to make your Easter bunny drawing truly unforgettable. We’ve got so many creative ideas up our sleeve that will ensure your little ones’ masterpieces stand out, and we can’t wait to share them with you! Look forward to exploring backgrounds, adding Easter-themed scenery, and incorporating other elements to your sketches.
Until then, let those bunny drawings multiply and fill your home with Easter cheer. Keep drawing, and most importantly, have tons of fun! ???

5 Essential Tips for Parents Preparing for Easter Bunny Drawings with Kids
1. Create a Drawing-friendly Environment
To make the drawing experience enjoyable and stress-free, set up a comfortable workspace with good lighting. Clear a table and provide chairs that are the right height for little arms to draw without getting tired. Cover the surface with newspapers or a tablecloth to make cleaning up easy peasy – because we know creativity can get a bit messy!
2. Choose the Right Materials
Pick tools that are child-friendly, like thick pencils for small hands to grip easily, and erasers that don’t smudge. Non-toxic crayons, washable markers, and colored pencils are great for adding splashes of color to the drawings. Having a variety of materials can inspire different textures and effects for their hop-tastic artworks!
3. Embrace the Learning Curve
Remember that your little ones are still learning, and their drawings don’t need to be perfect. Praise their effort and encourage their attempts. If they make a “mistake,” show them how it can become a part of the artwork. Perhaps a smudge turns into a cloud, or an odd line becomes a trail for an Easter egg hunt!
4. Get Inspired Together
Before starting, why not look at pictures of bunnies and Easter eggs? Talk about their shapes, colors, and textures. This can spark imagination and help your child translate what they see onto paper. Even better, you could watch some bunny-themed cartoons or read Easter stories to really get into the spirit!
5. Keep it Fun and Encourage Creativity
The whole point of drawing is to have fun, so keep the atmosphere light and enjoyable. Play some Easter tunes, make bunny hop jokes, or have your own drawing alongside to inspire them. Encourage your kids to personalize their bunnies – does their bunny wear glasses? Does it have a superhero cape? Let their imagination lead the way!
With your workspace ready and the perfect materials at hand, you have the perfect recipe for a whole lot of fun and some adorable bunny drawings. Remember, the true magic lies in the time spent with your children, creating memories that last much longer than the holiday itself. So hop to it and let your family’s creativity run wild! ??
Art is about capturing the joy of the moment, and drawing provides a splendid snapshot of childhood. It’s not only about hopping into the festive mood but also nurturing a sense of creativity and expression in your little ones. When they hold up their finished masterpieces with beaming smiles, you’ll know you’ve helped create more than just a bunny drawing – you’ve crafted a moment of love, learning, and laughter.
And now, equipped with these smart tips and an eagerness to draw, your family is all set to create the most enchanting Easter bunny masterpieces. Can you feel the excitement buzzing? Your home is about to be adorned with the cutest bunny art, so let’s make this Easter one that’s filled with creative joy and endless imagination! ??
See more great Things to Do with Kids in New Zealand here. For more information see here
Disclaimer
The articles available via our website provide general information only and we strongly urge readers to exercise caution and conduct their own thorough research and fact-checking. The information presented should not be taken as absolute truth, and, to the maximum extent permitted by law, we will not be held liable for any inaccuracies or errors in the content. It is essential for individuals to independently verify and validate the information before making any decisions or taking any actions based on the articles.


