
Hop into Creativity: Simple Easter Bunny Drawings for Parents and Kids
Welcome to our delightful step-by-step guide on drawing the cutest Easter Bunny! Whether you’re a creative parent seeking a special bonding activity or you’re nurturing a budding young artist, this guide is tailored to help you both draw an adorable Easter bunny with ease and joy. No previous drawing experience is needed – just your enthusiasm and a sprinkle of Easter excitement. So grab your pencils, and let’s hop into the festive spirit together!
What You’ll Need
- Pencil
- Erasers
- Drawing paper or sketchbook
- Colored pencils, markers, or crayons (optional)
Warm-Up: Basic Shapes and Lines
Before we draw our furry friend, let’s do a quick warm-up to loosen up your drawing muscles. Practice sketching simple shapes such as circles, ovals, and triangles. These will be the building blocks of your Easter Bunny drawing. Also, try some gentle curved lines as bunny ears and bodies often involve smooth, rounded edges.
Step-By-Step Guide to Drawing an Easter Bunny
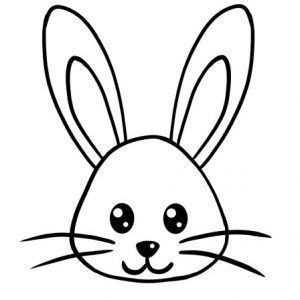
Step 1: The Bunny Head
Begin with a medium-sized oval to form the bunny’s head. This doesn’t have to be perfect; after all, most bunnies’ heads are a cute combination of shapes and fluff!
Step 2: Add the Ears
On top of the oval, draw two long and slender ovals for the ears. Bunnies’ ears can be expressive, so feel free to give them a slight bend or a flop to add character.
Step 3: Bunny Body Basics
Below the head, draw a larger oval or pear shape for the bunny’s body. Make sure it’s somewhat proportionate to the head, but also leave room for a fluffy tail!
Step 4: Facial Features
For the face, start with two circles for the eyes. Inside those circles, draw smaller circles and leave them white to create a gleam. Add a small triangle nose and some whiskers. Don’t forget the mouth and teeth for that classic bunny smile.
Step 5: Legs and Paws
Draw the front legs with two simple lines coming down from the body with small ovals for paws. For the hind legs, sketch more rounded and robust shapes to show the bunny’s strength and ability to hop.
Step 6: The Fluffy Tail
No bunny is complete without a fluffy tail, so add a small circle or puff of fur at the back of the bunny’s body. Make it look soft by using your pencil in a dabbing motion for texture.
Step 7: Coloring Your Creation
Now comes the fun part—coloring! Use your colored pencils, markers, or crayons to bring your bunny to life. Will your bunny be traditional white, or are you going to add a splash of pastels for the festive season?
Finishing Touches
Review your drawing, and add any final details you think it needs. Perhaps some Easter eggs hidden in the scene, or a bow tie to give your bunny character. With these personal touches, your Easter Bunny will undoubtedly be unique and special.
Conclusion
Drawing with your little ones can create lasting memories and traditions, especially around the holidays. This simple guide to drawing an Easter bunny is just the beginning. Encourage your child’s creativity, and don’t forget to praise their efforts. Remember, every artist starts with a blank page, and every Easter Bunny drawing is fabulous in its way. Now, you’re ready to display your artwork as a festive decoration or share it with loved ones. Happy drawing, and have a wonderful Easter filled with creativity and joy!
Hop into Creativity: Simple Easter Bunny Drawings for Parents and Kids
Welcome to our delightful step-by-step guide on drawing the cutest Easter Bunny! Whether you’re a creative parent seeking a special bonding activity or you’re nurturing a budding young artist, this guide is tailored to help you both draw an adorable Easter bunny with ease and joy. No previous drawing experience is needed – just your enthusiasm and a sprinkle of Easter excitement. So grab your pencils, and let’s hop into the festive spirit together!
Five Things Parents Should Know Before Starting
1. Embrace the Mess
Remember, art can be a messy business, especially with kiddos! Cover your work area with newspaper or a disposable tablecloth and have some clean cloths or wet wipes at hand for quick clean-ups.
2. Preparation is Key
Ensure all your drawing tools are sharpened and that you have plenty of paper. This prevents interruptions that might disrupt the creative flow of your little artists.
3. Simplify the Experience
Keep it simple for the kids. Basic shapes are the foundation of drawing, so remind them that every line and circle is a step towards their bunny masterpiece.
4. Focus on Fun, Not Perfection
The goal is to have fun and bond, not to create a perfect piece of art. Praise effort over outcome and make sure your child is enjoying the process.
5. Patience is a Virtue
Understand that kids will work at their own pace, and some may get frustrated. Encourage patience and take breaks if needed to keep the drawing experience positive.
What You’ll Need
- Pencil
- Erasers
- Drawing paper or sketchbook
- Colored pencils, markers, or crayons (optional)
Warm-Up: Basic Shapes and Lines
Before we draw our furry friend, let’s do a quick warm-up to loosen up your drawing muscles. Practice sketching simple shapes such as circles, ovals, and triangles. These will be the building blocks of your Easter Bunny drawing. Also, try some gentle curved lines as bunny ears and bodies often involve smooth, rounded edges.
Step-By-Step Guide to Drawing an Easter Bunny
Step 1: The Bunny Head
Begin with a medium-sized oval to form the bunny’s head. This doesn’t have to be perfect; after all, most bunnies’ heads are a cute combination of shapes and fluff!
Step 2: Add the Ears
On top of the oval, draw two long and slender ovals for the ears. Bunnies’ ears can be expressive, so feel free to give them a slight bend or a flop to add character.
Step 3: Bunny Body Basics
Below the head, draw a larger oval or pear shape for the bunny’s body. Make sure it’s somewhat proportionate to the head, but also leave room for a fluffy tail!
Step 4: Facial Features
For the face, start with two circles for the eyes. Inside those circles, draw smaller circles and leave them white to create a gleam. Add a small triangle nose and some whiskers. Don’t forget the mouth and teeth for that classic bunny smile.
Step 5: Legs and Paws
Draw the front legs with two simple lines coming down from the body with small ovals for paws. For the hind legs, sketch more rounded and robust shapes to show the bunny’s strength and ability to hop.
Step 6: The Fluffy Tail
No bunny is complete without a fluffy tail, so add a small circle or puff of fur at the back of the bunny’s body. Make it look soft by using your pencil in a dabbing motion for texture.
Step 7: Coloring Your Creation
Now comes the fun part—coloring! Use your colored pencils, markers, or crayons to bring your bunny to life. Will your bunny be traditional white, or are you going to add a splash of pastels for the festive season?
Finishing Touches
Review your drawing, and add any final details you think it needs. Perhaps some Easter eggs hidden in the scene, or a bow tie to give your bunny character. With these personal touches, your Easter Bunny will undoubtedly be unique and special.
Some Extra Tips
For those tricky steps, consider using a lightbox or tracing paper to help your child gain confidence in their drawing capabilities. And why not turn on some cheerful spring music in the background to get into the Easter mood? Lastly, taking photos of your child’s bunny drawing process can be a great way to document their artistic journey and celebrate their development.
Conclusion
Drawing with your little ones can create lasting memories and traditions, especially around the holidays. This simple guide to drawing an Easter bunny is just the beginning. Encourage your child’s creativity, and don’t forget to praise their efforts. Remember, every artist starts with a blank page, and every Easter Bunny drawing is fabulous in its way. Now, you’re ready to display your artwork as a festive decoration or share it with loved ones. Happy drawing, and have a wonderful Easter filled with creativity and joy!
See more great Things to Do with Kids in New Zealand here. For more information see here
Disclaimer
The articles available via our website provide general information only and we strongly urge readers to exercise caution and conduct their own thorough research and fact-checking. The information presented should not be taken as absolute truth, and, to the maximum extent permitted by law, we will not be held liable for any inaccuracies or errors in the content. It is essential for individuals to independently verify and validate the information before making any decisions or taking any actions based on the articles.


