
Easy Slime Recipe: A Safe and Fun Activity for Kids!
Welcome, parents, to your ultimate guide to crafting the perfect easy slime recipe for a fun and safe playtime experience for your children! With just a few household ingredients and this step-by-step walkthrough, you’re about to become the coolest parent on the block! Not only is making slime an incredibly entertaining activity, but it also offers educational value, as your kids can learn about basic chemistry principles while they play. Are you ready to get your hands a little gooey? Let’s dive in!
Why Slime is Such a Hit with Kids
Slime is more than just a squishy and sticky substance; it’s a sensation that captivates children’s imaginations and sensory experiences. The process of creating slime allows children to experience a magical transformation right before their eyes—a liquid turning into a fascinating non-Newtonian fluid. It’s a hands-on activity that encourages creativity, as they can add colors, glitter, and even small toys to personalize their slime masterpiece!
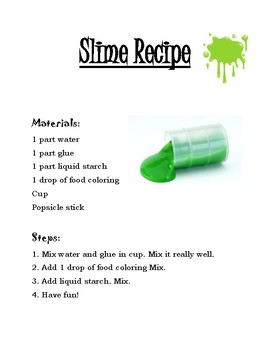
What You’ll Need for Your Easy Slime Recipe
- 1 cup of washable school glue (white or clear)
- 1/2 teaspoon of baking soda
- 2-3 tablespoons of contact lens solution (containing boric acid and sodium borate)
- Food coloring (optional)
- Glitter or confetti (optional)
- A bowl for mixing
- A spatula or spoon
Note: The contact lens solution acts as an activator to bind the ingredients together, so make sure it contains the necessary ingredients. If you’re worried about sensitivity, wearing disposable gloves during the process can help prevent direct contact with the skin.
Step-by-Step Guide to Making Easy Slime
Step 1: Mixing the Base
Start by pouring the cup of glue into your mixing bowl. If you’d like to add color to your slime, now’s the time to mix in a few drops of food coloring. Stir it up until the color is consistent throughout your glue. To make the slime extra special, sprinkle in some glitter or confetti for a delightful sparkle!
Step 2: Adding Structure with Baking Soda
Next, mix in the baking soda, which helps to thicken the slime. Gently stir the baking soda into the glue mixture until it’s completely incorporated.
Step 3: Activating Your Slime
The magical moment has arrived—it’s time to add the contact lens solution! Slowly add in the solution, one tablespoon at a time, stirring continuously. You’ll begin to see the mixture turning into slime as it starts to clump together and pull away from the sides of the bowl.
Continue to mix until you achieve a gooey consistency. If the slime is still too sticky, gradually mix in a bit more contact lens solution until it firms up to the desired texture. Remember, the slime will continue to solidify as you knead it.
Step 4: Kneading Your Slime
Once the slime starts to come together, it’s time to take it out of the bowl and begin kneading with your hands. Work the slime for a few minutes until it becomes less sticky and more stretchy. If you find it’s sticking to your hands, add a little bit more contact lens solution, but be careful not to add too much as it can make the slime too hard.
Kneading is not only an essential step in achieving the perfect slime consistency but also a great way for kids to build hand strength and coordination. Plus, they’ll love the squishy sensation!
Tips for Slime Success
Here are a few tips to ensure your slime-making adventure is a success:
- Always supervise children during the slime-making process, especially youngsters who might be tempted to taste the slime.
- If the slime gets on clothing, furniture, or hair, vinegar can help remove it.
- Store your slime in an airtight container to keep it fresh for playtime use.
- Dispose of the slime responsibly after use; it is not biodegradable and should not be flushed down the drain.
Crafting your very own slime doesn’t have to be a daunting task. With this simple slime recipe, you’re set for a safe and engaging activity that will provide endless hours of enjoyment for your children. Go ahead, embrace the joy of slime with your little ones, and watch their creativity flourish!
Five Things Parents Should Know Before Starting the Easy Slime Recipe
- Choosing the Right Glue: Make sure you use washable school glue for easy cleanup. PVA glue (polyvinyl alcohol) is the best type for making slime as it reacts well with the activator.
- Safety First: Although the ingredients are common household items, they should not be ingested. Always supervise younger kids to ensure they don’t put slime in their mouths.
- Prep Your Space: Slime can be messy, so cover your work area with newspaper or a plastic sheet. Keep wipes or a damp cloth handy for quick clean-ups of sticky fingers.
- Customization Is Key: Have various mix-ins ready. Let your child’s imagination run wild with food coloring, glitter, and beads. It’s a great way for them to express themselves and feel involved in the creative process.
- Slime Care: Always store your slime in an airtight container to prevent it from drying out. If the slime gets too sticky over time, a little more contact lens solution can revive it. If it’s too rigid, a bit of warm water can soften it.
Slime Variations to Keep Things Exciting
Once you’ve mastered the basic slime recipe, you might want to explore new textures and effects. Here are a few ideas to shake things up:
- Fluffy Slime: For a lighter, fluffier texture, add shaving cream to the glue before the activator.
- Butter Slime: To achieve a spreadable butter-like consistency, incorporate some soft clay into the finished slime.
- Crunchy Slime: Mix in small plastic beads or foam balls to create a textured slime that makes satisfying sounds when played with.
- Edible Slime: If you’re concerned about smaller children tasting their creations, there are edible slime recipes that use ingredients like marshmallows or gummy bears. However, these might not last as long and can be stickier.
Maintaining a Positive Slime Experience
Want to make sure that slime time remains a highlight? Here are additional pointers to keep in mind:
- Set boundaries beforehand, such as where slime can be played with and the importance of cleaning up afterward.
- If you’re doing this with multiple children, consider giving each child their own bowl and materials to avoid disputes and foster a sense of ownership over their creations.
- Slime can be a group activity. Invite your child’s friends over for a slime-making party. It’s a terrific way to encourage social skills and teamwork.
- Introduce a little learning by explaining the science behind slime — it’s a practical example of a chemical reaction that kids can see and touch.
- Be flexible and patient. Not every batch of slime turns out perfect, and that’s okay! It’s all about exploration and fun.
Remember, the goal of this activity is not just to make slime, but to create memories and learning experiences. Embrace the mess, enjoy the smiles, and treasure these moments of creative play with your children!
See more great Things to Do with Kids in New Zealand here. For more information see here
Disclaimer
The articles available via our website provide general information only and we strongly urge readers to exercise caution and conduct their own thorough research and fact-checking. The information presented should not be taken as absolute truth, and, to the maximum extent permitted by law, we will not be held liable for any inaccuracies or errors in the content. It is essential for individuals to independently verify and validate the information before making any decisions or taking any actions based on the articles.


