
Ultimate Guide to Easy Slime Recipes for Endless Fun with Your Kids

Welcome, wonderful parents, to a squishy, squashy world of endless joy – yes, we’re talking slime time! Whether it’s a rainy day, a birthday party, or just an after-school activity, making slime with your little ones is not only terrifically entertaining but also marvelously educational. And the best part? You don’t need to be a wizard in the kitchen to whip up these gooey concoctions. I’ll walk you through super simple, fantastically fun, and 100% kid-approved easy slime recipes that’ll have you and the kiddos giggling in no time!
Why Is Slime So Awesome?
Before we leap into the recipes, let’s take a bubbly moment to chat about why slime is such a hit. First off, it’s a sensational sensory experience for children – it stretches, squishes, and sometimes even snaps! This tactile wonder helps in developing fine motor skills and can be a soothing, stress-relieving texture for both kids and yes, let’s admit it, us adults!
Getting Started: Slime-Making Essentials
To begin our slime adventure, be sure you’ve got all the basics on hand. Here’s a quick checklist for our upcoming slimy escapades:
- Glue – Clear or white school glue works best.
- Baking soda – Just a pinch to help our slime form.
- Contact lens solution – This must contain boric acid and sodium borate.
- Food coloring – For that pop of color that makes it all the more fun.
- Measuring cups and spoons – To get the quantities just right.
- Mixing bowl – Where all the magic happens.
- Spoons or craft sticks – For stirring it all up.
- Storage containers – To keep your slime fresh for future play.
Now, let’s make sure you have a clear, easy-to-follow recipe to create the perfect batch of homemade slime.
The Classic Simple Slime Recipe
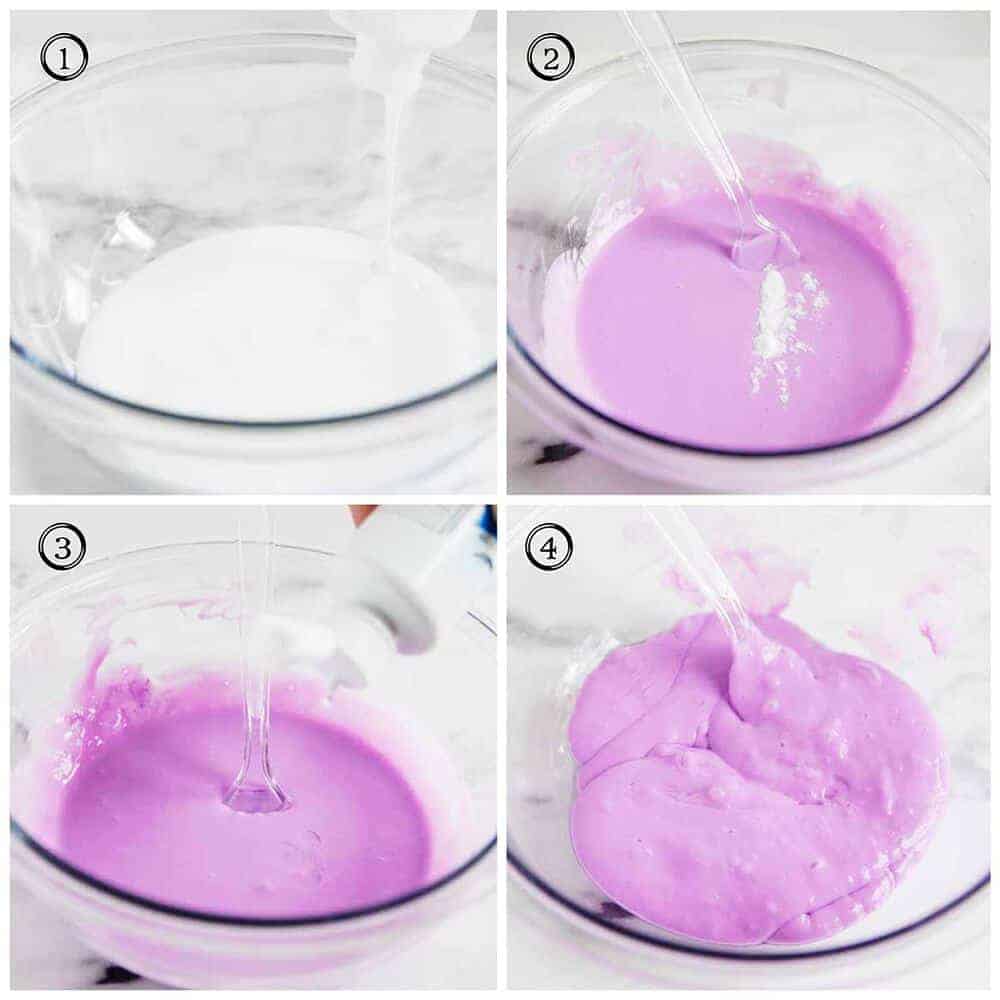
Every wizard’s apprentice starts with a basic spell, and in the realm of slime, it’s no different. Here’s the classic slime recipe to kickstart your adventure:
- 1/2 cup of white or clear school glue
- 1/2 cup of water (if you’re using white glue, match the amount of glue)
- 1/2 teaspoon of baking soda
- 1 tablespoon of contact lens solution
- A few drops of food coloring (optional)
Step by step, here’s what you’ll do:
- Get your mixing bowl and pour in the glue.
- If you’re using white glue, add the water now and mix until fully blended.
- Add a few drops of your chosen food coloring and stir.
- Sprinkle in the baking soda and mix thoroughly.
- Finally, pour the contact lens solution into the mix and stir until the slime starts to form and pull away from the sides of the bowl.
- Knead the slime with your hands for a few minutes to get that perfect, stretchy texture.
Voila! You’ve made your very first batch of classic slime. Isn’t it satisfying? Once you’ve mastered the fundamentals, you can start to play with different variations and add-ins to personalize your slime!
Colorful Slime Delights
Why stop at one color when you can make a rainbow? Here’s a twist on the classic recipe to make your slime even more magical:
- 1/2 cup of clear school glue for more vivid colors.
- 1/2 teaspoon of baking soda as before.
- 1 tablespoon of contact lens solution, the slime activator.
- Liquid food coloring: Choose several different colors.
- Glitter or confetti (optional) for extra sparkle.
- In separate bowls, mix the glue and baking soda just as before.
- Add a different color of food coloring to each bowl and stir until vibrant.
- Add the contact lens solution to each bowl and stir until the slime forms.
- If you’re adding glitter or confetti, now’s the time to sprinkle it in and knead it into your slime.
- Now, lay out each color of slime side by side and twist gently to create a rainbow effect.
Mixing the colors creates an eye-catching swirl that will have the kiddos (and maybe you too!) mesmerized.
Get ready, because we’re not done yet! Keep reading to discover more sensational slime recipes, including fluffy, crunchy, and glow-in-the-dark variations that guarantee hours of fun for the whole family. Crafting homemade slime together creates not only a delightful mess but also timeless memories that stick around way after the slime has settled. Let the good times roll, and let’s keep the slime party going!

5 Essential Tips for Parents Preparing Slime Recipes
Let’s sprinkle some important advice into our slime-filled journey! Here are five things all parents should know when preparing for these easy, breezy slime recipes:
- Safety First: Always supervise your kids during the slime-making process, especially with younger children who may be tempted to taste the slime. Use non-toxic ingredients, and pick recipes that fit your child’s age and maturity level.
- Prep Your Play Area: Slime-making can get messy — and that’s part of the fun! But to keep the chaos contained, cover tables or floors with newspapers, plastic sheets, or disposable tablecloths. Have wet wipes and paper towels within reach for quick cleanups.
- Experiment with Textures: Along with these recipes, feel free to explore ingredients that change the feel of your slime. Add shaving cream for fluffiness, cornstarch for a thicker ‘putty’ texture, or foam beads for a crunchy feel. Keep in mind that some add-ins might change the way your slime behaves, so keep the base recipe handy for troubleshooting.
- Customize with Care: Whether it’s glitter, food coloring, or scents, personalize your slime responsibly. Certain ingredients might stain surfaces or clothing, and others might cause allergic reactions. Choose safe, washable, and preferably eco-friendly options when possible.
- Storing the Goop: Playtime is over, but your slime isn’t done! To keep it fresh, store your slime in an airtight container or Ziploc bag. If it starts to dry out, a little warm water or contact lens solution can help revive its stretchiness. Remember, if the slime begins to smell or look different, it’s time to discard it and concoct a fresh batch!
Fluffy Cloud Slime Recipe
It’s time for some puffy, fluffy fun! Follow this recipe for a super soft and stretchy cloud slime that feels like a dream:
- 1/2 cup of white glue
- 3-4 cups of shaving cream for fluffiness
- 1/2 teaspoon of baking soda
- 1 tablespoon of contact lens solution
- Food coloring (optional)
- In your mixing bowl, combine the glue and shaving cream. The more shaving cream you add, the fluffier it will be!
- Add in your food coloring and mix until you achieve your desired hue.
- Sprinkle the baking soda into the bowl and combine it with your fluffy mixture.
- Stir in the contact lens solution and continue mixing until the slime forms and starts to pull away cleanly from the bowl.
- Knead with your hands until the texture is even and cloud-like.
Crunchy Bead Slime for Sensory Play
Enjoy a crispy texture with this simple crunchy bead slime recipe that’ll add an extra element of sensory play:
- 1/2 cup of clear glue for transparency
- 1/2 teaspoon of baking soda
- 1 tablespoon of contact lens solution
- Plastic or foam beads for the crunch
- Mix clear glue and baking soda in your bowl until well combined.
- Pour the beads into the mixture and stir to distribute them evenly.
- Add the contact lens solution and start mixing until the slime takes shape.
- Knead with your hands, working the beads into the slime until the consistency is right and the beads are secure.
Stretch, squish, and listen to the satisfying pop and crunch as your kids explore this unique texture.
Remember, the most important ingredient in all of these recipes is a dash of imagination and a cupful of smiles. Keep experimenting, and you’ll find that the possibilities with slime are as limitless as your creativity. Happy sliming!
See more great Things to Do with Kids in New Zealand here. For more information see here
Disclaimer
The articles available via our website provide general information only and we strongly urge readers to exercise caution and conduct their own thorough research and fact-checking. The information presented should not be taken as absolute truth, and, to the maximum extent permitted by law, we will not be held liable for any inaccuracies or errors in the content. It is essential for individuals to independently verify and validate the information before making any decisions or taking any actions based on the articles.


