
Stretch Into Fun: Easy Slime Recipes for Joyful Parent-Child Crafting
Hello there, wonderful parents and guardians! Are you ready to embark on a delightful and squishy adventure with your little ones? Well, earmark this page because you’ve discovered the ultimate treasure trove of easy slime recipes that will provide hours of fun and bonding with your children. Let’s not only create gooey masterpieces but also memories to cherish!
The Goo-reat Benefits of Making Slime with Your Kids
Before we jump into the slime pit of creativity, let’s take a quick look at the benefits of slime-making. Not only is it an incredibly fun activity, but it’s also educational and full of developmental perks! Did you know that playing with slime can enhance fine motor skills, promote sensory development, and even teach basic chemistry? Plus, it’s a fantastic way to strengthen the parent-child bond. Win-win!
Safety First: Slime-Making Tips for Parents
Our little ones’ safety is the top priority when it comes to crafting the perfect slime. Here are a few quick safety tips:
- Always supervise your children during slime-making activities.
- Use safe, non-toxic ingredients—and we’ll guide you through which ones!
- Keep slime away from small children who might be tempted to taste it.
- Avoid ingredients that can cause allergic reactions, and conduct a patch test beforehand if needed.
Let’s Get Started: Assembling Your Slime-Making Toolkit
Before the fun begins, we’ll need to gather our slime-making supplies. The great news is, many of these items are likely already in your home. Here’s a quick checklist:
- Basic white or clear PVA school glue – a slime essential
- Baking soda – a key ingredient to help our slime form
- Contact lens solution – make sure it contains boric acid and sodium borate for the perfect slime activator
- Food coloring – to make our slime as vibrant as a rainbow
- Glitter, beads, or confetti – for that extra sparkle and texture
- Bowls and mixing spoons – because keeping hands clean (for as long as we can) is nice
- Airtight containers – for storing our slime creations
All set? Great! It’s nearly time to dive into our slime recipes, but first, let’s make sure we’ve got a space ready that can get a little messy, because as we all know, creativity can sometimes spill over!
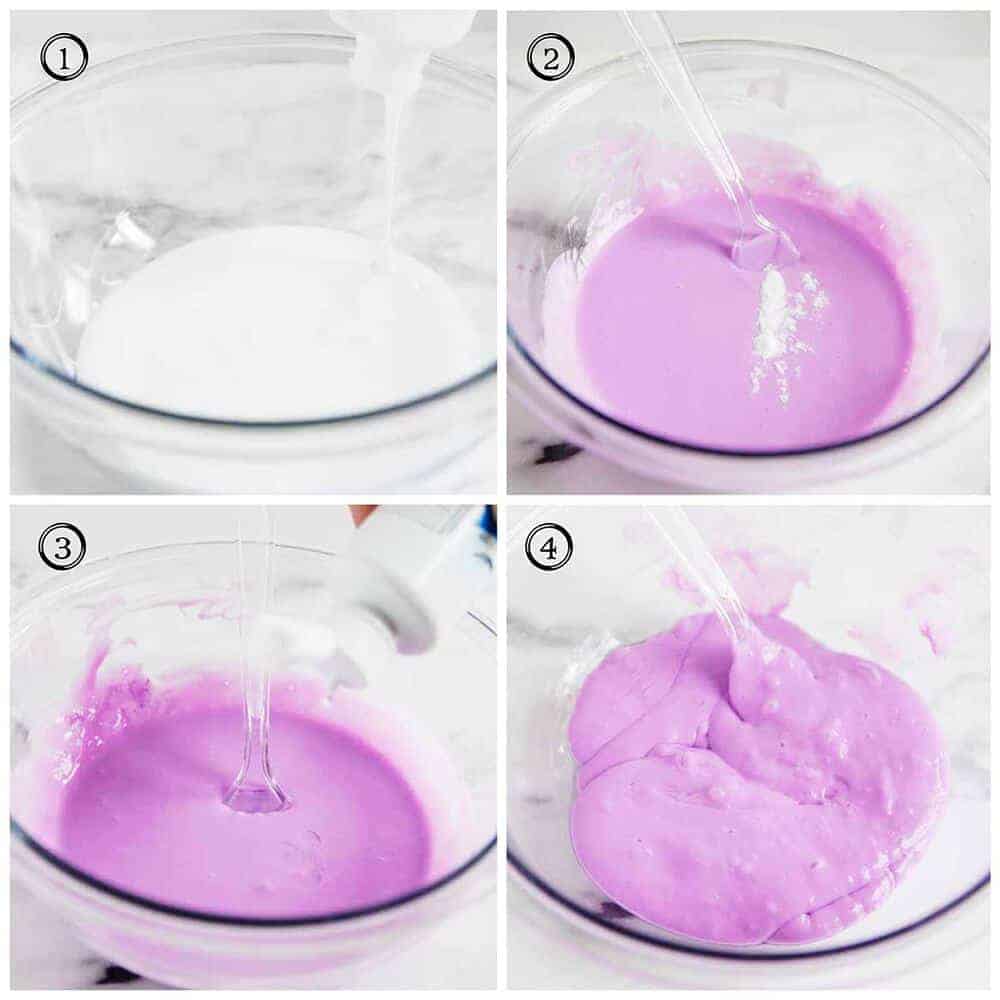
The Classic Slime Recipe: Your Go-To Starting Point
Every master slime creator started with the basics. With just a few ingredients, we can whip up a classic batch of slime that’s perfect for customization. So roll up your sleeves, and let’s get gooey!
Ingredients:
- 1/2 cup of PVA white glue
- 1/2 teaspoon baking soda
- 1 tablespoon contact lens solution (containing both boric acid and sodium borate)
- Food coloring (optional)
Instructions:
- Pour the PVA glue into a bowl.
- Add your choice of food coloring and stir until the color is fully mixed with the glue.
- Sprinkle in the baking soda and mix thoroughly.
- Slowly add in the contact lens solution and stir until the slime begins to form and pull away from the sides of the bowl.
- Knead the slime with your hands for about 30 seconds to a minute until it reaches the perfect gooey consistency.
Congratulations on making your very first batch of classic slime! But why stop there? Let’s explore even more exciting variations!

Five Things Every Parent Should Know Before Whipping Up Slime
Ready to become a slime maestro? Here are five pearls of wisdom to help ensure your slime-making session is as smooth as the slime itself!
1. Understanding the Science Behind the Slime
Slime is not just fun goo; it’s a fascinating example of a non-Newtonian fluid, which means it doesn’t follow Sir Isaac Newton’s Law of Viscosity (steady flow). The change from liquid to semi-solid is a cool chemistry lesson for kids, showing how certain ingredients mixed together create a brand-new substance. Explain the role of each ingredient as you go along to sprinkle some education into the mix!
2. Age-Appropriate Modification
Slime recipes are not one-size-fits-all. For younger kiddos, choose recipes without small beads or glitter to eliminate choking hazards. As for the older slime enthusiasts, feel free to experiment with more exotic additions and textures. Always tailor the recipe to the age and skills of your child to keep things safe and enjoyable.
3. Prep Your Space
Choosing the right spot for your goo-creation station is crucial. Find a place where you’re comfortable with things potentially getting messy, like a kitchen table covered with newspaper or a plastic tablecloth. Non-porous surfaces are best as they make clean-up a breeze!
4. Allergies and Sensitivities Matter
Your child’s safety is the main ingredient in any recipe. Be aware of any skin sensitivities or allergies before starting. For example, the classic slime recipe includes borax, which some find irritating. If that’s the case for your child, opt for a borax-free recipe, and always wash hands after play. When in doubt, patch test an ingredient on the back of your child’s hand.
5. Time is of the Essence
Good things take time, and slime is no exception. Don’t rush the process, as the ingredients need time to react with each other fully. Encourage your kids to be patient as they mix and blend their slimes to perfection. This is also a great opportunity to teach them about the virtue of patience and the rewards it brings!
Variety is the Spice of Slime: Exciting Recipes to Try
The classic slime recipe is just the beginning. As you get more comfortable, you can dive into a variety of recipes that will thrill your mini chemists. Let’s take a look at some delightful variations that you can experiment with.
Glitter Galaxy Slime
Have you ever wanted to hold a starry galaxy in your hands? Galaxy slime is as close as it gets, and it’s spellbinding!
Ingredients:
- 1/2 cup clear PVA glue for that glassy cosmic backdrop
- 1/2 teaspoon baking soda to keep it firm
- 1 tablespoon contact lens solution for perfect stickiness
- Multiple colors of glitter to mimic the stars and planets
Instructions:
- In a bowl, mix the clear glue with plenty of glitter. Go wild with colors and shapes!
- Add the baking soda and mix gently until well incorporated.
- Finally, add the contact lens solution a bit at a time, stirring continuously until you achieve that magical, gloopy consistency. Watch as the kids marvel at their sparkly universe!
Fluffy Cloud Slime
Yes, you can even make fluffy slime that feels like touching a cloud! This recipe introduces a new ingredient: shaving cream.


