
Unlock the Ooey-Gooey Fun: Easy Slime Recipes for Families
Hey there, creative parents and curious kids! Are you ready for an adventure in the wondrous world of slime-making? This fun-filled, tactile activity is not only a blast for children, but it’s also a fantastic way to introduce them to basic science concepts and sensory play. Whether you’re planning a rain-soaked afternoon craft or looking for an engaging party activity, our guide to making slime will provide you with all the easy, safe, and kid-friendly recipes to create the ultimate gooey experience right at home!
Discover the Joy of Homemade Slime
Why buy store-bought slime when you can make an even better version together with your little ones? Homemade slime allows for endless customization, ensuring each batch is as unique as your child’s imagination. Plus, it’s a sneaky way to keep those curious minds learning. So, let’s dive into the basic supplies you’ll need and some foolproof recipes for a slime-tastic time!
Essential Slime-Making Supplies
- Glue: The base of most slime recipes. White PVA glue (like Elmer’s) is perfect.
- Borax: A common activator that, when dissolved in water, helps to create slime’s unique texture.
- Contact Lens Solution: Another activator choice, which contains boric acid and sodium borate.
- Baking Soda: Helps to firm up the slime and provides consistency.
- Food Coloring: For that burst of color, because who doesn’t love a vibrant slime?
- Glitter or Beads: To add some sparkle and texture to your creation.
- Bowls and Spoons: For mixing and mashing your ingredients together.
Classic Glue & Borax Slime
Let’s start with the classic: a simple glue and borax slime that’s easy to make and incredibly satisfying to play with.
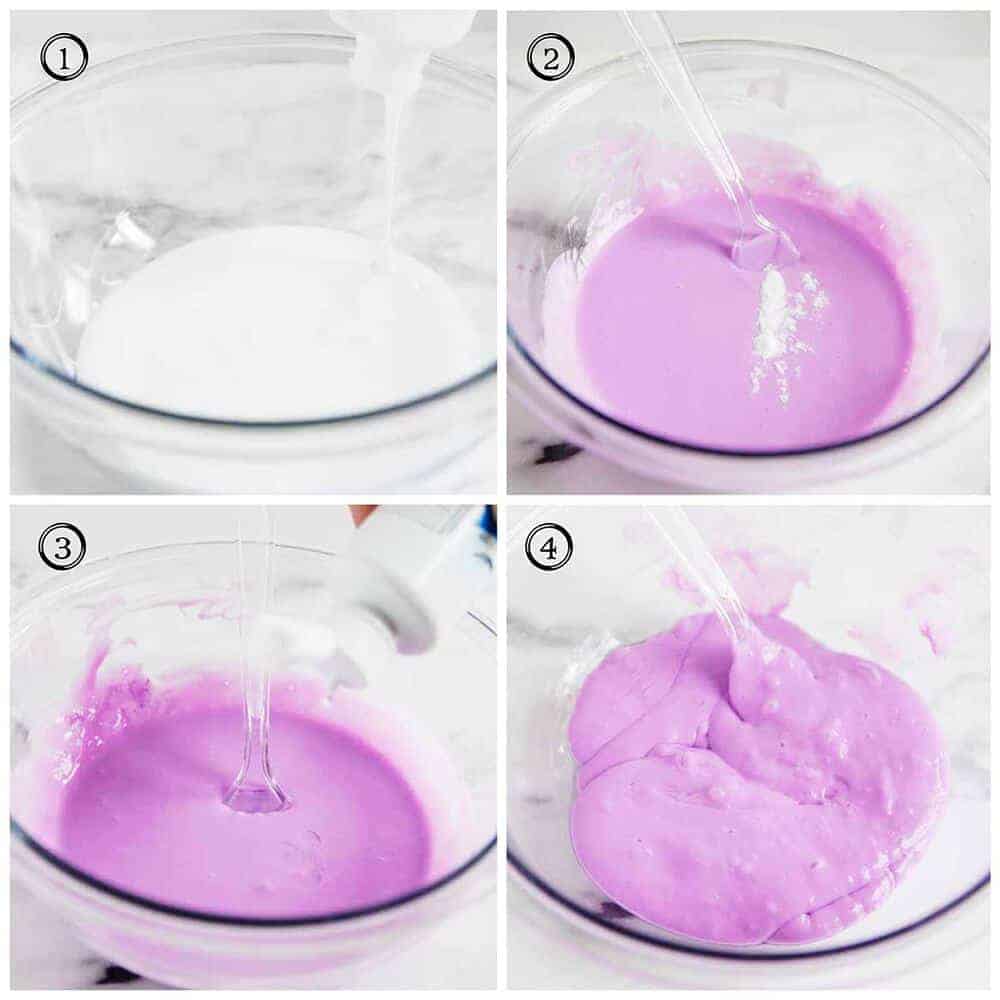
- In a bowl, mix 1/2 cup of white PVA glue with 1/2 cup of water until well combined.
- Add a few drops of your favorite food coloring and mix;
- In a separate container, dissolve 1 teaspoon of borax powder in 1 cup of warm water.
- Slowly add the borax solution to the glue mixture, stirring constantly. You’ll see the slime start to form instantly.
- Keep stirring until the mixture pulls away from the bowl and starts to become less sticky.
- Knead the slime with clean hands until it reaches the desired consistency. If it’s too sticky, you can add a bit more borax solution.
Voila! Now your slime is ready for stretching, poking, and squishing to your heart’s content. Store it in an airtight container to keep it fresh for more fun later on.
Safety Tips
Before we dive further into more exciting recipes, let’s talk safety. Slime-making is generally safe, but it’s important to follow these tips to ensure a joyful and secure experience:
- Always supervise children during slime-making. The process is fun, but it’s not intended for consumption.
- Use kid-friendly, non-toxic ingredients and keep chemicals out of reach when not in use.
- Consider allergy-friendly recipes if your child has specific sensitivities, like using cornstarch or yogurt as base ingredients.
- Wash your hands thoroughly after playing with slime, especially before eating.
Creating slime is more than just the end product; it’s about the experience. So, enjoy those moments of laughter and amazement as you and your children uncover the joy of slime-making. Stay tuned for more recipes, including fluffy slime and edible slime, and find out how you can turn slime time into a learning opportunity!

5 Things Parents Should Know Before Making Slime
1. The Right Environment is Key
Choose a space where you and your kids can get a little messy and creative. A kitchen table covered with newspaper or a washable tablecloth, or even a tiled floor, can be the perfect slime lab. This way, you won’t stress over spills and splashes, keeping the focus on fun.
2. The Importance of Measurements
Slime is quite forgiving, but for the best results, sticking to the recipe measurements is a good practice—especially when it comes to the activator. Too much borax or contact lens solution can lead to a stiff, rubbery mess, while too little might not allow the slime to form at all.
3. Allergies and Skin Sensitivities
Know your child’s allergies and skin sensitivities before starting. For instance, borax can sometimes irritate sensitive skin. In such cases, look for alternative slime recipes that use cornstarch or laundry detergent, or consider making an edible slime with ingredients like marshmallows or gummy bears.
4. The Learning Aspect
Slime isn’t just play—it’s a science experiment. You can teach your children about chemical reactions and material properties in a fun and interactive way. Discuss with them how the glue (a liquid) turns into slime (a non-Newtonian fluid) when an activator is added, changing it on a molecular level.
5. Storage and Clean-Up
Store your slime creations in airtight containers to keep them from drying out. For clean-up, vinegar is a great way to dissolve slime residue, especially from clothing or fabric. Always have paper towels and warm soapy water ready for those unexpected spills, and teach your young scientists to help with the tidying up.
Slime Variations and Recipes
Fluffy Slime
For a lighter, fluffier texture, add shaving cream into your mixture. Simply mix the shaving cream with glue before adding in your activator. This variant is bound to be a hit with its unique feel and squish-ability!
- Combine 1/2 cup of white PVA glue with an equal amount of shaving cream in a bowl.
- Stir in food coloring or glitter as you like.
- In a separate bowl, mix 1/2 teaspoon of baking soda with a few squirts of contact lens solution.
- Mix the activator solution into your glue and shaving cream mixture until slime begins to form.
- Knead with hands until you reach the preferred consistency, adding more contact lens solution if needed.
Edible Slime
Worried about little ones who tend to taste everything? Try this safe, edible slime recipe made with food ingredients.
- Mix 1/4 cup of cornstarch with 2 tablespoons of sugar and 1/2 cup of coconut milk in a pot.
- Cook over low heat while stirring until the mixture thickens.
- Let it cool down, then knead it with your hands, adding food coloring if desired.
Remember, these edible slimes are safe to eat but aren’t exactly delicious! However, they’re perfect for very young children who are still exploring the world with their taste buds.
Whether you opt for the traditional borax and glue variety or venture into fluffy and edible slime, there is a recipe out there for every family. Each version promises a delightful experience full of learning, bonding, and most importantly, fun. So, roll up your sleeves, gather your ingredients, and get ready to make some slime magic with your kids!
See more great Things to Do with Kids in New Zealand here. For more information see here
Disclaimer
The articles available via our website provide general information only and we strongly urge readers to exercise caution and conduct their own thorough research and fact-checking. The information presented should not be taken as absolute truth, and, to the maximum extent permitted by law, we will not be held liable for any inaccuracies or errors in the content. It is essential for individuals to independently verify and validate the information before making any decisions or taking any actions based on the articles.


