Craft the Perfect Easter Hat: A Parent’s Guide to Spring Creativity
Welcome, crafty parents, to your ultimate guide on creating Easter hats that will put a spring in your little bunny’s step! From charming bonnets to playful paper hats, get ready to hatch some fun with your kids as we dive into a world of creativity, festivity, and family bonding. Whether you’re crafting for a parade, an egg hunt, or just for kicks, we’ve got all the tips and ideas you need to make this Easter an unforgettable one. So, grab your glue sticks, gather your glitter, and let’s hop into some serious Easter hat crafting!
Why Easter Hats Are More than Just Fun
You might be wondering why crafting an Easter hat with your child is such a big deal. It’s not just about the final product—it’s about the memories you make along the way. Crafting Easter bonnets is a great way for family bonding, it encourages creativity and self-expression in your child, and it can even help with the development of fine motor skills. Not to mention, it’s a fantastic opportunity to learn about traditions and cultures. So, let’s start by understanding what makes an Easter hat so special!
Understanding the Easter Hat Tradition
The tradition of donning Easter hats goes back centuries, with various cultural significances tied to it. For many, the wearing of new attire on Easter Sunday is symbolic of new life and redemption—a practice rooted in Christian belief associated with the resurrection of Christ. Over time, the Easter bonnet became a symbol of this renewal, often adorned with flowers and ribbons to reflect the blossoming of spring.
Today, children around the world continue this joyous practice through Easter hat parades at schools and community events, expressing their creativity and the vibrant spirit of the season. And you, dear parents, are about to become part of this colorful tradition!
Getting Started with Your Easter Hat Project
Ready to craft? Great! Here’s what you’ll need.
Essential Materials for Your Easter Hat
- Base Hat: This could be a bonnet, a cap, or even a paper plate fashioned into a hat shape. Pick a base that will be comfortable for your child to wear and easy to decorate.
- Decoration Supplies: Think Easter vibes! Flowers, pastel ribbons, fluffy chicks, bunnies, and, of course, eggs. Felt, cardboard, glitter, and pom-poms are also popular choices.
- Adhesives: A hot glue gun, stick glue, or double-sided tape will do the trick when it comes to securing decorations.
- Tool Kit: Scissors, craft knives (for adults’ use only), and markers are handy for customizing and adding detail to your creations.
Now that you’ve got your materials sorted, it’s time to think about the design. Here are a few ideas to get your creative juices flowing!
Easter Hat Designs to Inspire Your Creativity
- The Classic Bonnet: A timeless option decorated with faux flowers, ribbons, and a hint of lace or tulle for an elegant touch.
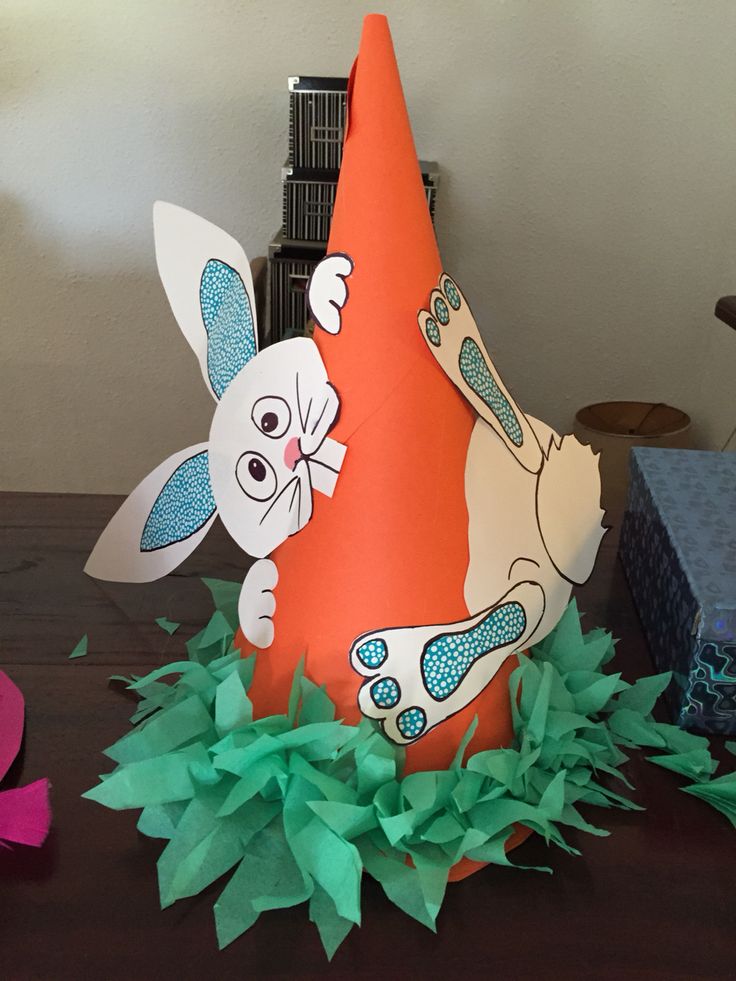
- The Bunny Cap: Transform a simple cap into a bunny haven with ears, a cute face, and even a fluffy tail at the back!
- The Nest Hat: Create a bird’s nest atop a straw hat using twigs and craft grass, complete with little chocolate eggs or feathered friends.
Remember, the goal is to have FUN! Don’t worry about making it perfect; it’s all about the creative process and seeing your child’s imagination come to life. So, take a deep breath, and let’s get crafting.
In the next section, we delve into step-by-step instructions on how to assemble these delightful Easter creations with your kiddos. Stay tuned, and get ready for an egg-citing crafting adventure!

5 Things Parents Should Know in Preparing for Easter Hats
As you prepare to dive into the world of Easter hat crafting, there are a few things to keep in mind to ensure a smooth and enjoyable experience. Let’s look at the top five tips to get ready for a hoppin’ good time!
1. Plan Ahead for Less Stress
Before you start, have a brainstorming session with your kids. Look up some pictures online for inspiration or think back to Easter parades from previous years. Think about your child’s interests—perhaps they love dinosaurs or are into outer space. Could you imagine a T-Rex with bunny ears or an Easter rocket ship? Drawing out a few designs can help you choose which materials to buy, saving you time and preventing last-minute rushes to the craft store.
2. Choosing the Right Base is Crucial
Every great Easter hat starts with the perfect base. Consider the weight and size of the decorations you plan on adding when choosing your base. You’ll want something that will stay put on a little one’s head without causing discomfort. A lightweight straw hat or a sturdy paper plate can be excellent choices that allow for lots of creativity without weighing down their small heads.
3. Safety First
Remember to prioritize safety when crafting, especially with younger children around. Keep sharp objects like scissors and craft knives out of reach when not in use, and be mindful of smaller decorations like beads that could pose a choking hazard. When using a hot glue gun, ensure it’s handled by an adult or under close adult supervision if older children are using it. Also, look for non-toxic materials, especially when it comes to adhesives and paints.
4. Embrace the Mess
Crafting can be messy, and that’s okay—it’s part of the fun! Cover your crafting area with newspapers or a tablecloth that can be easily cleaned or disposed of afterward. Have some wipes or a damp cloth handy for sticky fingers, and wear old clothes that you don’t mind getting a splash of creativity on. Embrace the mess and enjoy the process without worrying about a bit of glitter in your hair or paint on your hands.
5. Encourage Individuality
The beauty of DIY Easter hats is that they reflect the unique personality and imagination of each child. Encourage your kids to express themselves, whether that means a hat covered in feathers or one that incorporates their favorite action figures. The sky is the limit, and every hat can be as unique as the child who creates it. Celebrating their individuality will make this experience even more memorable for them.
Keeping these five tips in mind will set the stage for a fantastic Easter hat crafting session. Now let’s move on to the detailed fun part: the step-by-step instructions for making your very own Easter hats!
Step-by-Step Guide to Making Your Easter Hat Creation
Let’s create an Easter hat that is sure to be the hit of the spring season! We’ll take you through the process step-by-step so you can craft with confidence. And remember, while the instructions are a helpful guide, there’s always room for improvisation. Let your and your child’s creativity lead the way!
Step 1: Preparing Your Base
First things first, prepare your base. If you’re using a paper plate, cut a hole in the center large enough for your child’s head and trim the brim to the desired size—it could be round, scalloped, or even zig-zag for a fun effect. For a straw hat or cap, you might not need to make any adjustments to the base itself, just ensure it’s clean and ready for decorating.
Step 2: Designing Your Theme
Next, decide on your theme and start laying out your decorations on the hat before affixing them. Play around with the layout. Should the largest flower be at the center or off to the side? How do you want the ribbon to flow? Will the bunny ears stand straight up or flop over adorably? Once you’re happy with the look, it’s time to start gluing.
Step 3: Affixing Decorations Securely
Using your chosen adhesives, begin securing decorations to the hat. Work in sections and give each part time to dry, ensuring that nothing will fall off mid-parade. This might mean applying a flower and waiting a few minutes before adding the next. Patience is key here!
Step 4: Adding Finishing Touches
Once all the major elements are on the hat, it’s time for the finishing touches. Add a sprinkle of glitter, draw on some details with markers, or apply a few stick-on jewels for that extra sparkle. These little details can make your child’s Easter hat truly stand out.
Now, with sparkles in your eyes and possibly a little glitter in your hair, you’ve created not just an Easter hat but a treasure trove of memories. Through laughter, a touch of chaos, and a splash of creativity, you’ve crafted something that will shine brightly in your child’s Easter experiences.
As we round up this guide, remember that the bond you’ve nurtured and the joy you’ve shared in this creation is the true masterpiece. Be proud of yourselves, for you’ve done more than craft an object—you’ve woven love and happiness into your child’s heart, which is the most precious Easter gift of all.
…But wait, your crafting journey doesn’t have to end here! Continue to explore and enjoy abundant crafting opportunities with your little ones, and keep an eye out for more guides and inspiration to feed your family’s creative spirit!
For more great articles please see here. For more information see here
Disclaimer
The articles available via our website provide general information only and we strongly urge readers to exercise caution and conduct their own thorough research and fact-checking. The information presented should not be taken as absolute truth, and, to the maximum extent permitted by law, we will not be held liable for any inaccuracies or errors in the content. It is essential for individuals to independently verify and validate the information before making any decisions or taking any actions based on the articles.


