
Craft Your Own DIY Christmas Tree for a Special Holiday Touch
Oh, jingle bells, jingle bells, jingle all the way to a fantastically festive DIY Christmas tree! Whether you’re looking to add that personal touch to your holiday decor or seeking a fun family project, creating your own Christmas tree from scratch is a merry way to make memories that will glisten for years to come.
Why Opt for a DIY Christmas Tree?
Before we dive into the branches of crafting your very own tree, let’s chat about why a DIY Christmas tree can be a ho-ho-whole lot better than the store-bought kinds:
- Eco-Friendly: By choosing to DIY, you can reduce your holiday’s environmental footprint. Reuse, repurpose, and recycle materials for a greener Christmas spirit!
- Customizable: Your tree, your rules! Match your DIY creation to your home’s color scheme or let your creativity run as wild as a reindeer.
- Cost-Effective: Save your pennies for those stocking stuffers! DIY trees can be significantly cheaper, especially when you use materials readily available at home.
- Family Fun: Spread the cheer by including the whole family. Kids will love the hands-on fun, and it’s a perfect opportunity to bond and bask in the joy of the season.
Gather Your Materials for Christmas Tree Craftsmanship
Every great DIY project starts with the right tools and materials. Here’s a basic list to start your tree-making adventure:
- Base material: Could be anything from cardboard for a flat tree, a wooden ladder for a rustic vibe, or PVC pipes for a modern twist.
- Decorating supplies: Think green! Felt, paper, fabric, or even old clothes can be transformed into festive foliage.
- Adhesives: Hot glue guns, tape, or string to hold your masterpiece together.
- Embellishments: Lights, garland, baubles, and all the sparkle you can find to give your tree the wow factor.
- Tools: Scissors, safety cutters, or a saw, depending on your chosen materials.
Exact supplies may differ based on the type of DIY tree you decide to embark on, but having the basics will get your sleigh, I mean, project, off the ground.
Step by Step Guide: Creating Your DIY Tree
Now the fun really begins! Roll up those sleeves and let’s get to the nitty-gritty of tree assembly:
1. Deciding on the Type of Tree
First thing’s frosty, you need to pick the type of DIY Christmas tree that best fits your space and style. Here are some ideas:
- Wall-mounted Tree: Perfect for tight spaces or minimalist aesthetics. Use lights, garlands, or washi tape to outline a tree on the wall.
- Pallet Tree: Grab some wood pallets, and with a little sawing and nailing, you can create a rustic, charming tree that’s sturdy and reusable.
- Bookshelf Tree: Stack books in a tree shape and string some fairy lights for a literary spin on the classic tree.
2. Building the Base
Your tree needs a solid foundation, so here’s how to create a stable base with a few different materials:
- For a cardboard tree, cut out and assemble a triangular shape with a wide base.
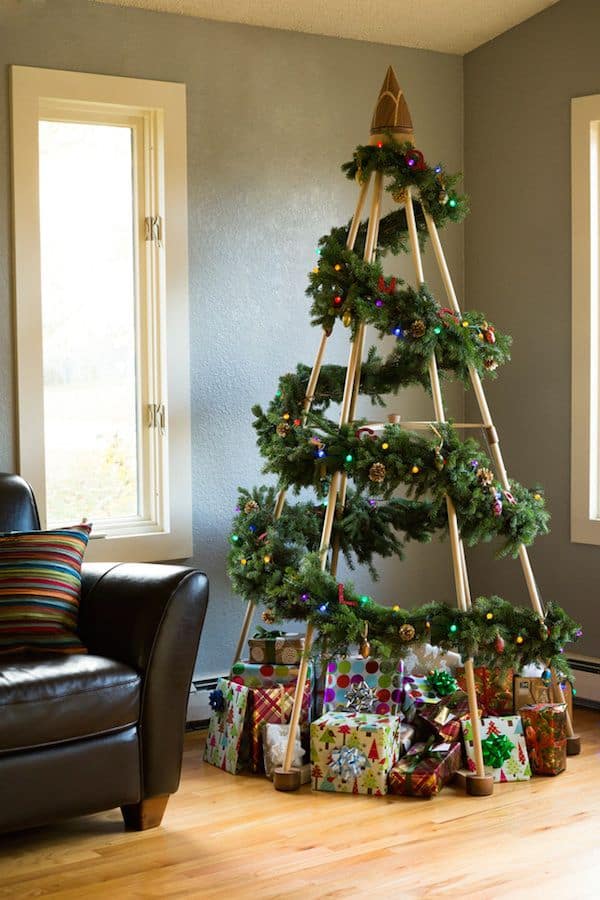
- For a wooden ladder tree, set up the ladder and secure it. The rungs will act as your branches.
- For a PVC pipe tree, construct a conical frame with horizontal pipes decreasing in length as you go up.
Remember, safety first! Ensure your base is secure to prevent any holiday mishaps. Now, aren’t you feeling excited? Just the thought of your living room adorned with a tree that’s not only beautiful but made with the love and laughter of your family warms the heart. But don’t put away your elf hat just yet, because we’ve only just begun. Grab your tinsel, summon your inner Santa’s helper, and stay tuned for the next part of our DIY Christmas tree adventure!
5 Things Parents Should Know When Preparing for a DIY Christmas Tree
As we tangle ourselves in the thrills of crafting, let’s unwrap some important tips for parents preparing to construct a DIY Christmas tree:
1. Safety is the Star on Top
While we’re creating magical moments, safety is paramount. Keep sharp objects and hot glue guns out of reach of little elves. When using lights or electrical decorations, check for frayed cords and always supervise children to ensure a safe and joyful experience for everyone.
2. Plan and Prepare
What’s Santa without his list, right? Planning ahead can help make your tree-making as smooth as a one-horse open sleigh ride. Sketch out a design, measure your space, and ensure you have all the necessary materials before you begin. This will save you from any mid-project dashes to the craft store, keeping spirits bright.
3. Embrace the Mess
Crafting can get messy, but that’s all part of the fun! Dress for the occasion with aprons, or old clothes that can handle some glitter and glue. Set up in an area where you can easily clean up afterwards—this will help you keep the holiday cheer even when the tinsel hits the fan!
4. Age-Appropriate Tasks
Involve your kids in age-appropriate ways. Little ones can help with painting or sticking on decorations, while older children can take on more complex tasks like cutting or assembly (with supervision). Clearly define tasks to keep everyone engaged and avoid any reindeer games… I mean conflicts!
5. Time Management
Remember that Rome wasn’t built in a day, and neither is the perfect DIY tree. Allocate enough time to enjoy the process without rushing. Set aside an afternoon or a weekend to complete your project, and remember to take breaks for some hot cocoa and cookies.
With your preparations in place, let’s branch out into the art of decorating your DIY Christmas tree!
Let’s Decorate: Bringing Your DIY Christmas Tree to Life
Once your DIY tree is up and standing tall, it’s time to deck those makeshift branches with an abundance of holiday cheer! Here’s how to sprinkle some magic on your creation:
Decorating with Love and Sparkle
Start by wrapping lights around your tree. If you’ve chosen a non-traditional tree like a bookshelf or pallet tree, strategically place lights to illuminate your design. Next, drape garlands or ribbons for added fullness and texture. Then, let the ornament placement be a family affair—hang baubles, homemade crafts, and cherished keepsakes that tell your family’s story.
Top It Off
No tree is complete without a crowning glory. Whether it’s a classic star, a sweet angel, or something quirky that represents your family, placing the topper is a special moment. Let everyone have a turn each year to make it fair and fun.
Your DIY Christmas tree is not just a centerpiece for your home; it’s a symbol of love, creativity, and family. It’s a reminder that the holiday season is about spending time together and creating joy, no matter what form that takes. So take a step back, admire your handiwork, and bask in the glow of your very own DIY masterpiece. Happy crafting and merry Christmas!
See more great Things to Do with Kids in New Zealand here. For more information see here
Disclaimer
The articles available via our website provide general information only and we strongly urge readers to exercise caution and conduct their own thorough research and fact-checking. The information presented should not be taken as absolute truth, and, to the maximum extent permitted by law, we will not be held liable for any inaccuracies or errors in the content. It is essential for individuals to independently verify and validate the information before making any decisions or taking any actions based on the articles.


