
Crafting Fun for the Family: Painted Cactus Rocks
Hey there, awesome parents and craft enthusiasts! ?? Are you ready to dive into a new, exciting activity that’s perfect for family bonding and home decoration? Let’s roll up our sleeves and explore the whimsical world of painted cactus rocks! This DIY project is not only a blast to do with the kids, but it’s also a fantastic way to bring a splash of color and creativity to your home or garden.
Welcome to the ultimate guide where we’ll walk through the step-by-step process of transforming ordinary stones into colorful, fun, and amazingly cute cactus creations. So, gather your little artists, grab your painting supplies, and let’s get started on this delightful adventure!
What You’ll Need to Make Painted Cactus Rocks
- Smooth, flat rocks (your future cacti friends)
- Acrylic paint (think cactus greens, flower pinks, and pot browns)
- Small paintbrushes (for those finer details)
- White paint pen or marker (to make those cactus spikes pop)
- Protective varnish or sealant (we want these cuties to last forever)
- Optional: tiny pots or a garden area to display your creations
Choosing Your Perfect Rocks
Finding the ideal rocks is like a treasure hunt—it’s part of the fun! When scouting for rocks, search for shapes that resemble cactus silhouettes. Flat and smooth surfaces work best for painting. And don’t worry, they don’t have to be perfect; imperfections give each cactus its unique character! If rock hunting isn’t your thing, remember that you can find suitable rocks at local craft stores, garden centers, or online.
Painting Your Cactus Rocks: A Step-by-Step Guide
Step 1: Wash and Dry Your Rocks
Before you start, make sure to give your rocks a good wash to remove any dirt or grime. Then, dry them thoroughly. This helps the paint adhere better and ensures your rock cacti look sharp and clean.
Step 2: Base Coat
Begin by applying a base coat of green paint to your rocks. You might need to do a few layers to get a nice, even color. Let each layer dry completely before adding another. Patience is key!
Step 3: Add Details
Once the base coat is dry, it’s time to get creative! Add darker green lines to mimic the ridges of a cactus. Use a fine brush or a paint pen to add delicate flowers or bright dots to represent blossoms. And don’t forget those classic spiky details!
Step 4: Protective Sealant
After the paint has dried, it’s essential to apply a protective varnish or sealant to your cactus rocks. This step ensures that your painted rocks can withstand the elements if you choose to display them outside, and it gives them a lovely, polished look.
Creating painted cactus rocks is more than just an artistic endeavor; it’s an opportunity to make lasting memories with your kids and instill in them a love for crafting. As you bond over selecting rocks, mixing colors, and designing patterns, you’re also teaching valuable skills like hand-eye coordination, color recognition, and patience. Plus, everyone will feel a sense of pride and accomplishment once they see their finished masterpieces!
Crafting these painted cactus rocks together with your children is an experience brimming with laughs, learning, and love. So, stay tuned for more tips, tricks, and fun ideas to take your painted cactus rock creations to the next level!
Arranging Your Painted Cactus Rocks
Now that you have your beautifully painted cactus rocks, the next fun step is to find a creative way to display them. Here are a few fabulous ideas:
- Miniature Rock Garden: Choose a corner of your home, or a segment of your outdoor space, and create a small rock garden by arranging your painted cactus rocks amongst sand, pebbles, and other succulents for a desert-like vibe.
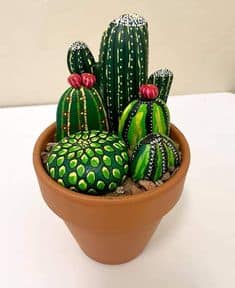
- In Pots: Place them in tiny clay pots filled with pebbles for a cute, potted cactus look. These can adorn windowsills, desks, or shelves.
- Outdoor Accents: Nestle them in your outdoor garden to surprise and delight anyone who comes across them.
5 Things Parents Should Know in Preparing for Painted Cactus Rocks
Before you dive into this joyous project, there are a few essential tips parents should keep in mind:
- Safety First: Use non-toxic paints and sealants, especially if younger children are involved. Also, ensure your crafting area is well-ventilated if using products with fumes.
- Dress for Mess: Have aprons or old clothes ready for your kids (and yourself!) since crafting can get messy and paint might splatter.
- Time Management: Understand that painting and drying take time. Plan your crafting sessions, so you’re not rushed and can enjoy each step.
- Task Appropriation: Assign age-appropriate tasks to your kids to keep them engaged and safe. For instance, let younger ones pick colors while older kids can handle the more intricate painting or sealing job.
- Enjoy the Process: The goal is to have fun and bond, so stay positive and encouraging, even if the results aren’t picture-perfect on the first try.
Alternative Uses for Painted Cactus Rocks
Your cactus rocks don’t just have to be decorator items; they can take on a variety of roles:
- Interactive Story Stones: Use your painted rocks for storytelling prompts during creative play or reading time.
- Weighted Bookends: Larger, heavier cactus rocks can serve as whimsical bookends for your children’s bookshelf.
- Thoughtful Gifts: Personalize a rock cactus with a friend’s favorite colors or add a kind message for a special handmade gift.
- Learning Tools: Teach about plant species, colors, and art techniques through the process of painting and displaying your rocks.
- Garden Markers: Use them to label your plants in the garden, adding a touch of charm to your outdoor space.
There’s no end to the fun and use of your cactus rock creations. Whether they find a home on your desk, in your garden, or as a part of playtime, these adorable rock cacti are sure to add cheer wherever they go. Let’s get those brushes dancing, and turn what was once a simple stone into a stunning work of art!
See more great Things to Do with Kids in New Zealand here. For more information see here
Disclaimer
The articles available via our website provide general information only and we strongly urge readers to exercise caution and conduct their own thorough research and fact-checking. The information presented should not be taken as absolute truth, and, to the maximum extent permitted by law, we will not be held liable for any inaccuracies or errors in the content. It is essential for individuals to independently verify and validate the information before making any decisions or taking any actions based on the articles.


