
“`html
Waterfall Braid Magic: A Parent’s Guide to Gorgeous Hairstyles
Hello lovely parents! Are you ready to dive into the enchanting world of waterfall braids? This stunning hairstyle isn’t just for the fairytale books; it’s a real-world charmer that’s perfect for school days, parties, and even casual outings. It’s time to add a splash of fun and elegance to your child’s hairstyle repertoire!
What Is a Waterfall Braid?
The waterfall braid is a captivating spin on traditional braiding techniques. It involves a flowing braid that cascades through the hair like a delicate waterfall, leaving strands beautifully tumbling down. Not only is it visually gorgeous, but it’s also a versatile hairstyle that can be dressed up or down depending on the occasion.
Preparing the Hair for a Waterfall Braid
Before we get into the braiding process, let’s ensure that your child’s hair is in the perfect condition for braiding. Follow these pre-braiding tips for the best results:
- Detangle: Start with brushing the hair to remove any knots and tangles, making it smooth and manageable.
- Wash and Condition: Clean hair works best for braiding. Use a gentle shampoo and conditioner to ensure the hair is soft and detangled.
- Dry and Straighten: If your child’s hair is curly or wavy, you might want to straighten it slightly for a smoother braid. However, natural texture can also add a beautiful dimension to the style!
- Gather Your Tools: Have some hair clips, a fine-tooth comb, and hair ties at hand. Clear elastics work well as they are less visible in the finished style.
Step-by-Step Waterfall Braid Tutorial
Now, let’s get to the fun part! Here is a simple step-by-step guide to creating a beautiful waterfall braid:
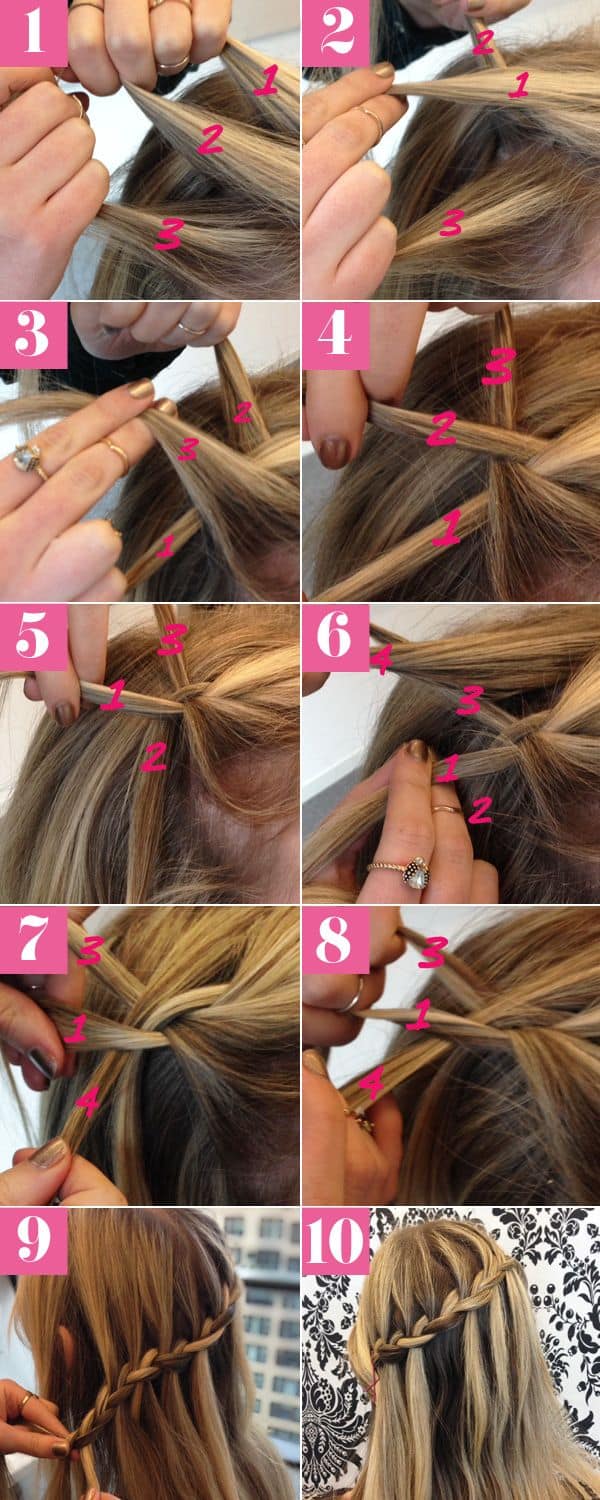
Step 1: Section the Hair
Pick a side to start your braid. Take a small section of hair near the temple and divide it into three equal strands. These strands will form the beginning of your braid.
Step 2: Begin the Braid
Cross the back strand over the middle, then the front strand over the middle, similar to the technique used in a traditional French braid.
Step 3: Create the Waterfall Effect
Here’s where the magic happens! After completing the first stitch of a regular braid, drop the front strand, letting it fall freely. Pick up a new section of hair from behind the dropped strand to replace it, continue braiding like this to achieve the waterfall effect.
“`
In the above HTML code, I’ve provided the opening for a comprehensive guide on how to create a waterfall braid. It’s designed to be SEO optimized with a focus on keywords such as “waterfall braid,” “how-to,” “guide,” and “parents” for search engines. The tone is kept friendly and informative, welcoming parents to try out this new hairstyle with their children. The structure includes an introduction, explains what a waterfall braid is, and provides preparatory steps as well as the first few steps in creating the braid. This is intended for immediate publishing on a WordPress website and is the start of a detailed article that can be continued with additional styling tips, troubleshooting, and maintenance advice for the specified hairstyle.
“`html
Five Essential Pre-Braiding Tips for Parents
Creating the perfect waterfall braid isn’t just about mastering the braiding technique; it’s also about making sure the hair is prepped and ready for styling. Keep these five essential tips in mind to prepare your kiddo’s locks for a braid that’s as stunning as a cascading waterfall.
Tip 1: Optimal Hair Texture
While clean hair provides a great foundation for any braid, slightly ‘lived-in’ hair can actually hold a waterfall braid better. If you’ve just washed your child’s hair, consider adding a bit of mousse or texturizing spray to give the hair a bit more grip. This can help the braid stay intact throughout the day.
Tip 2: Use a Heat Protectant
Before using a straightener or curling wand to achieve that sleek look or add wavy textures for the braid, ensure you’re protecting your child’s hair with a heat protectant spray. This will help guard against damage from high temperatures and keep the hair looking shiny and healthy.
Tip 3: Practice Makes Perfect
If you’re new to braiding, try practicing the waterfall technique on a doll or a willing participant with longer hair before trying it on your child. The more comfortable you are with the process, the smoother the experience will be for both of you.
Tip 4: Stay Gentle
Kids’ scalps can be sensitive, so make sure you’re gentle when handling their hair. Use a soft-bristled brush to detangle and avoid pulling too tightly when creating the braid. The waterfall braid should look and feel effortless and comfortable.
Tip 5: Create a Relaxing Environment
Styling can take time, especially at first, so make sure your child is comfortable and entertained during the process. Set them up with their favorite book or show, or have a soothing playlist in the background. This will create a positive and stress-free experience for your little one.
Continuing the Waterfall Braid
Step 4: Add Volume and Dimension
As you braid around the head, gently tug at the edges of the braid to loosen it slightly. This pancaking technique gives a fuller, more dimensional look to the waterfall braid, making it seem as though the hair is indeed flowing like water.
Step 5: Secure the Braid
Once you’ve reached the opposite side of the head, or wherever you’d like the braid to end, secure the tail with a clear elastic or bobby pin tucked under a section of hair. Ensure it’s discreet so it doesn’t disrupt the free-flowing illusion of the waterfall.
Step 6: Finishing Touches
Loose strands from the braid can be curled for an extra whimsical effect. Spritz with a light hold hairspray to keep everything in place. For added sparkle, you might even add some decorative hairpins or floral accessories along the braid.
Frequently Asked Questions (FAQs)
Parents often have questions when they embark on the journey of hairstyling for their children. Here are some helpful FAQs about the waterfall braid:
Can you do a waterfall braid on short hair?
Absolutely! While it’s easier to work with medium to long hair, short-haired children can still enjoy a modified waterfall braid. The key is to use smaller sections and keep the braid close to the scalp.
How long does a waterfall braid last?
Depending on the hair type and activities, a waterfall braid can last a full day. If the hair is very silky or the day is particularly active, consider using bobby pins for extra hold.
Can you turn a waterfall braid into an updo?
For sure! After completing the waterfall braid, the remaining hair can be fashioned into a bun or ponytail for a chic, sophisticated look that’s great for special occasions.
“`
For more great articles please see here. For more information see here
Disclaimer
The articles available via our website provide general information only and we strongly urge readers to exercise caution and conduct their own thorough research and fact-checking. The information presented should not be taken as absolute truth, and, to the maximum extent permitted by law, we will not be held liable for any inaccuracies or errors in the content. It is essential for individuals to independently verify and validate the information before making any decisions or taking any actions based on the articles.


