Puppy Drawing Made Easy: A Step-by-Step Guide for Creative Parents and Kids
Welcome, artistic families! Ever wanted to bring the joy of puppies into your art without the hassle of a wiggly pup? You’re in the right place! Our step-by-step guide on easy puppy drawing is paw-fect for parents and children looking to spend quality creative time together. So grab your pencils, and let’s bring some puppy love to paper!
Why Drawing With Your Kids Is a Tail-Wagging Experience
Drawing is not just about creating beautiful art; it’s about bonding, learning, and expressing creativity. Engaging in drawing sessions with your little ones can help develop their fine motor skills, improve concentration, and boost self-esteem as they watch their puppy come to life on paper. And what’s more adorable than a puppy to spark that interest?
Materials You’ll Need for Your Puppy Drawing Adventure
Before we begin, let’s make sure you have all the art supplies ready. Don’t worry, the list isn’t long, and you’ll probably have most, if not all, of these items at home:
- Pencil: Any standard pencil will do, but HB or 2B pencils are great for sketching.
- Eraser: Just in case of any oopsies! A kneaded eraser is excellent for a clean finish.
- Drawing Paper: A blank sheet of drawing paper or even regular printer paper works fine.
- Coloring supplies: Bring in some color with crayons, colored pencils, or markers – whatever you have on hand.
- Sharpener: Keep those pencils sharp for the perfect sketch.
- Patience and Imagination: The most critical supplies of all!
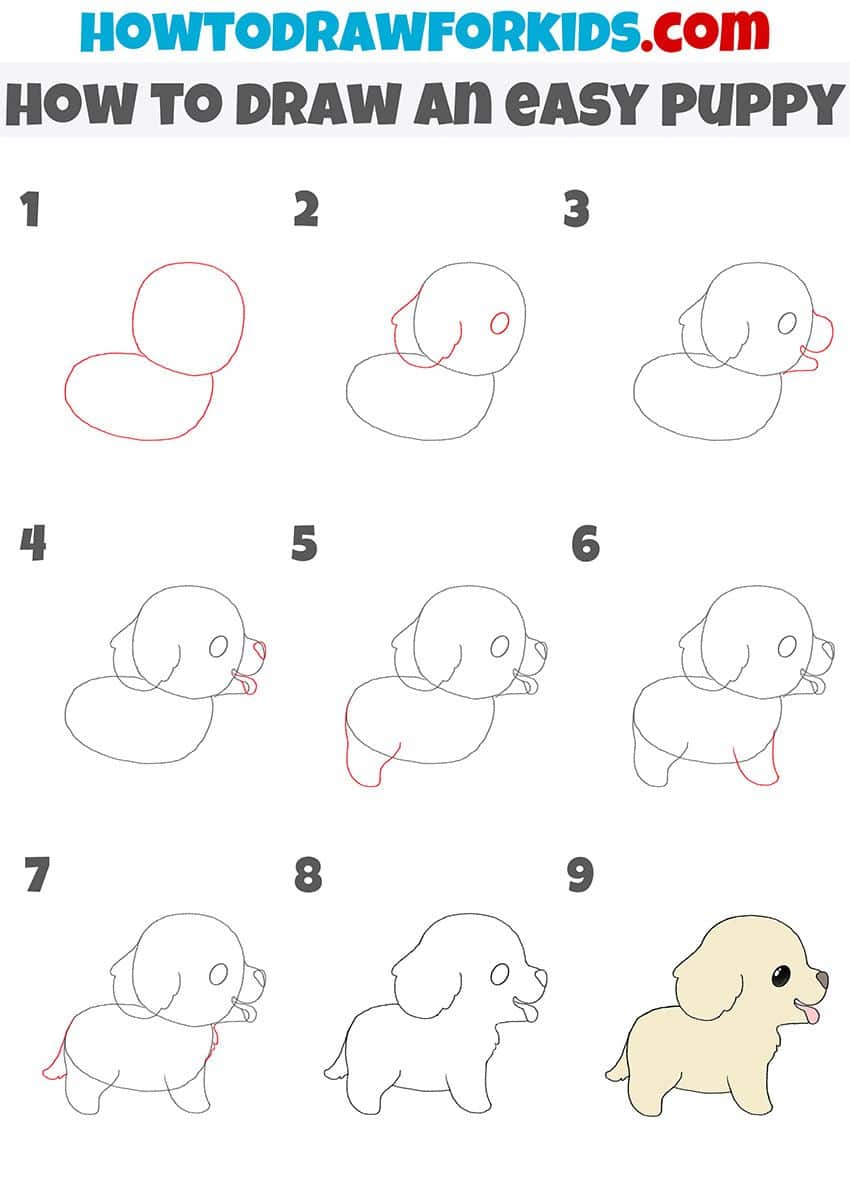
Step 1: Starting with Basic Shapes
Like all great artists, you’ll start with some basic shapes to form the structure of your puppy. Follow these tips:
- Every puppy starts with a circle. Draw a medium-sized circle for the head.
- Add an overlapping oval for the body. This should be larger and slightly tilted to the right or left, depending on which way you want your puppy to face.
- For the legs, draw two small rectangles under the body oval. These will be your little pup’s front legs!
- Don’t forget the paws! Small ovals at the end of each leg rectangle will be just the ticket.
- Sketch in a pair of floppy ears by adding two curved lines at the top of the head circle.
Remember, these shapes are just a guide. They don’t need to be perfect since you’ll be refining them as you go.
Step 2: Refining Your Puppy’s Form
Now let’s start turning those geometric shapes into a cuddly puppy!
- Starting with the head, round off the circle to create a softer look and form the cheeks and chin
- Refine the body oval to suggest the puppy’s back and belly, smoothing out any harsh lines.
- For a touch of realism, add a little curve to represent the puppy’s hind legs – hinting at a playful or seated posture.
- Transform the front leg rectangles into sturdy, adorable puppy legs with paws at the end.
- Let’s not forget that wagging tail! Draw a cute, curved shape protruding from the body’s rear – as lively or as still as you want it to be.
It’s shaping up to be quite a character, isn’t it? These lines start to define your puppy, making it more lifelike and fluffy.
Step 3: Adding Character to Your Puppy’s Face
What gives your puppy personality? Its face, of course! It’s time to draw in those charming facial features.
- Two small circles above the snout area should suffice for those sparkling eyes, with smaller circles inside for the pupils.
- Craft a soft triangular shape for the nose at the bottom center of the face and add a little shine with a tiny circle within the nose.
- A simple curved line from the nose down and another curving upwards form the smiling mouth and give your pup the happiest of expressions.
- Time for some fluffy ears – refine those earlier lines, adding a bit of fur texture.
- Lastly, don’t forget those charming little eyebrows which can add tons of expression, be it a curious tilt or a joyful lift.
With each new feature, your puppy’s personality bursts forth – from playful scamps to sweet angels, your puppy’s face says it all.

Puppy Drawing Made Easy: A Step-by-Step Guide for Creative Parents and Kids
Hello there, creative clans! Is your family ready to embark on a whimsical journey of drawing an adorable puppy? Worry not, as we have constructed the perfect guide to assist parents and children alike in sketching a cute little canine companion. So, gather around with your drawing tools, and let’s trot our way into a delightful drawing session!
5 Preparation Tips Before Embarking on Your Puppy Drawing
Prior to diving into the artistic process, here are five essential things parents should keep in mind to ensure a smooth and enjoyable puppy drawing experience:
- Create the Right Environment: Choose a comfortable and well-lit space to work in. A calming environment can help children focus better and enjoy the drawing process fully.
- Educate on Simplicity: Let your child know that the aim is not perfection but enjoyment. Starting with simple shapes builds confidence and provides a strong foundation for developing their drawing skills.
- Equip with the Right Tools: As mentioned, having the correct pencils, paper, and erasers at hand makes the process run smoothly. A well-prepared toolkit can spark excitement and a sense of professionalism in young artists!
- Keep the Discussion Open: Engage with your child about what kind of puppy they wish to create. Is it a spunky poodle or a mellow beagle? This conversation can stir creativity and personal connection to the art piece.
- Be Ready for Mistakes: Assure your little one that it’s okay to make errors, as they are a natural part of the learning process. Keep the eraser handy and approach each mistake as a stepping stone to improvement.
Step 4: Fine-Tuning and Adding Details
Now that we have the basic structure and character of our puppy, it’s time to concentrate on the finer details that truly bring our artwork to life!
- Add tiny lines around the mouth, eyes, and nose to simulate fur texture. This will give your puppy a more three-dimensional and realistic appearance.
- Detail the ears with light shading or more fur lines to add depth and a sense of movement.
- Refine the legs and paws, adding claws and perhaps even a bit of shading beneath the body to create the illusion of your puppy sitting or standing on a surface.
- Gently erase the initial guiding shapes, so the final contours of your puppy stand out without distraction.
- Consider drawing a background — a dog bowl, bone, meadow, or park — to place your puppy into a setting that tells a story.
Each stroke adds to its charm, turning your collective effort into an adorable masterpiece!
Step 5: Bring Color to Your Puppy
With the pencil work complete, let’s infuse some life into your puppy with color!
- Choose appropriate colors for your puppy’s coat, considering if it’s a golden retriever or a dalmatian, for example.
- Start with a lighter base color for the puppy’s body and gradually add darker shades to areas that would naturally be shadowed.
- Use a gentle touch with colored pencils or crayons to build up layers and avoid oversaturating the paper.
- Pay attention to the direction of your coloring strokes, as this can simulate the natural flow of fur.
- Highlight the puppy’s mischievous sparkle in the eyes by leaving some white spots uncolored or using a lighter color for that magical gleam.
The act of coloring is not only enjoyable but also gives your child a sense of the textural world of art, deepening their appreciation and understanding of this creative realm.
See more great Things to Do with Kids in New Zealand here. For more information see here
Disclaimer
The articles available via our website provide general information only and we strongly urge readers to exercise caution and conduct their own thorough research and fact-checking. The information presented should not be taken as absolute truth, and, to the maximum extent permitted by law, we will not be held liable for any inaccuracies or errors in the content. It is essential for individuals to independently verify and validate the information before making any decisions or taking any actions based on the articles.


