
How to Make a Pompom: A Fun and Easy Crafting Guide for Parents
Hey there, crafty moms and dads! Are you looking for a delightful activity to share with your kiddos that’s both easy and enjoyable? Look no further, because making pompoms together is a blast! Not only will you create colorful fluff balls, but you’ll also make memories to last a lifetime. So, get ready to dive into the world of pompom-making with this step-by-step guide that will have you crafting like a pro in no time!
What You’ll Need to Create Your Pompom
- Yarn (the more colors, the merrier!)
- Pompom makers or cardboard (we’ll explain how to use both)
- Scissors (sharp ones work best)
- A little bit of patience and a lot of enthusiasm!
Getting Started: Choosing Your Yarn
First things first, let’s talk about yarn! You can choose any color or type of yarn you’d like. Feel free to mix it up with different textures or colors to make your pompom extra special. If you and your little ones are feeling adventurous, why not try some glittery or glow-in-the-dark yarn for pompoms that stand out?
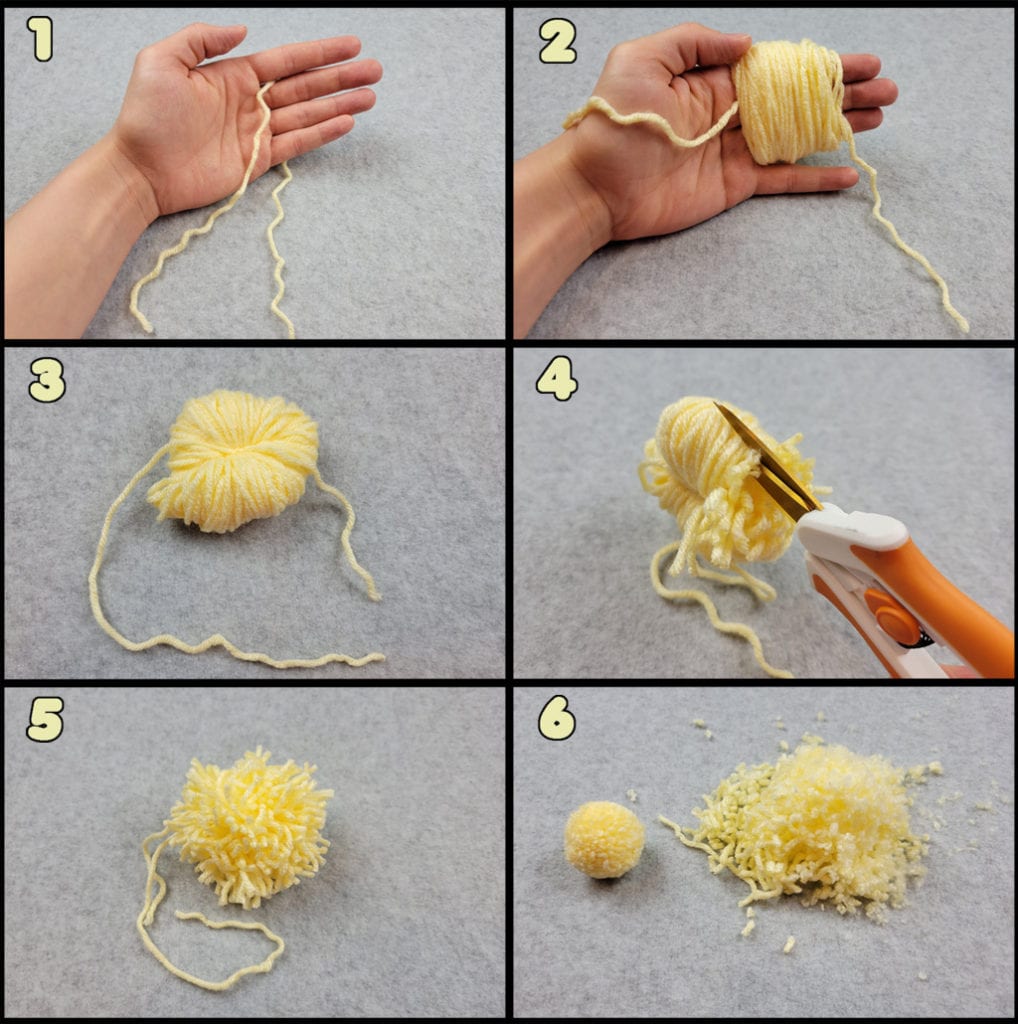
Step 1: Making Your Pompom Base
If you’re using a pompom maker, the process is super simple. But don’t worry if you don’t have one; I’ll also guide you through creating a pompom the classic way using cardboard.
Using a Pompom Maker:
- Open up both sides of your pompom maker. Each side will have two arms. Swing them out so that they’re perpendicular to the central body.
- Hold the end of your yarn against one set of arms and start wrapping! You’ll want to wrap the yarn around the pompom maker evenly until it’s nice and full. The more yarn you wrap, the fluffier your pompom will be!
- Repeat the process on the other set of arms.
Making a Pompom Using Cardboard:
- Cut two cardboard circles the size of the pompom you desire. Each cardboard piece should have a central hole, like a mini donut. The outer circle’s diameter will be the size of your finished pompom.
- Place the cardboard circles together and start wrapping your yarn. The process is similar to using the pompom maker: wrap the yarn around the cardboard until it’s deliciously thick.
Step 2: Cutting and Shaping Your Pompom
This is where your fluff comes to life!
- For the pompom maker, once your yarn is wrapped, close up the arms and snip along the groove in the maker. Be sure to cut all the way around.
- If you’re using cardboard, simply cut the yarn around the edge between the two pieces of cardboard. It’s a bit trickier but just as fun!
- Tightly tie a separate piece of yarn around the middle of the wrapped yarn. For the pompom maker, you’ll find a gap for this purpose. If using cardboard, tie the yarn between the two discs. Knot it securely.
Now that you’ve tied the middle, you can remove the pompom from the maker or the cardboard. You’ll likely have a shaggy-looking sphere at this point, which is perfect! It’s time to give your pompom a haircut to make it nice and round. Don’t be afraid to be a bit aggressive with the trimming – the more you trim, the denser and rounder your pompom will be.
Tips for the Perfect Pompom Shape
- Tip #1: Always leave the tying string long – it’s useful if you want to attach your pompom to something else, like a beanie or a keychain!
- Tip #2: Dunk your pompom in water and give it a blow-dry for extra fluffiness. Just make sure it’s completely dry before you fluff it out.
There you have it, fellow crafters! The foundations of pompom-creating mastery! Whether you’re snuggling up for a quiet afternoon at home or looking for an activity for a playdate or birthday party, pompoms are sure to add that extra sprinkle of fun.
But wait, there’s more to discover in the wonderful world of pompoms. In the next installment of our guide, we’ll delve into creative uses for your newly made pompoms, and how to involve your children in every step of the process. Stay tuned for more fluffy fun, and happy crafting!
Remember, the key to a perfect pompom is just like the key to a happy life: it’s all about what you put into it. So go fill those pompoms with love, laughter, and lots of color!
Five Things Parents Should Know When Preparing to Make a Pompom
1. Safety First!
Before you get started, consider the age and skill level of the children involved. Sharp scissors are a must for cutting yarn and trimming your pompom, so always supervise little ones closely. To keep the project safe and fun for everyone, you might opt for child-friendly scissors that can do the job without the risk of cuts.
2. Yarn Selection Matters
The type of yarn you choose can affect how your pompom turns out. Thicker yarn will make a fluffier pompom faster, but you’ll use more of it. On the other hand, thinner yarn requires more wrapping but can yield a pompom with fine, dense fibers. Consider the end use of your pompom when choosing your yarn – for instance, a softer yarn may be better for a pompom destined to sit atop a cozy hat.
3. Creating a Smooth Working Surface
It’s a good idea to clear a large space to work on. Pompom making can get a little messy, especially when it comes to the cutting and trimming stages. A clean, flat surface will make it easier for you and the kiddos to spread out and create without feeling cramped.
4. Having Extras on Hand
You might find that making pompoms is more addictive than you anticipated! It’s not uncommon for kids to want to make pompom after pompom. Make sure you have extra yarn and materials on hand so the fun doesn’t have to stop.
5. Patience is Key
Pompom making is a fantastic opportunity to teach patience and perseverance. Your first few pompoms might not turn out perfectly round or as full as you’d like, but that’s okay! Encourage your children to keep trying, as each attempt will improve their skills and understanding of the craft. Plus, a little imperfection adds character!
Let’s Put It All Together!
As you embark on this pompom crafting adventure with your kids, these five tips will ensure you’re well-prepared for a fun and fulfilling experience. Gather your supplies, clear some space, and get ready to wrap, cut, tie, and fluff your way to pompom perfection. And don’t forget, the most important ingredient of all is to have fun and enjoy the time spent together creating something unique and joyful. Happy pompom making, everyone!
Remember, the key to a perfect pompom is just like the key to a happy life: it’s all about what you put into it. So go fill those pompoms with love, laughter, and lots of color!
See more great Things to Do with Kids in New Zealand here. For more information see here
Disclaimer
The articles available via our website provide general information only and we strongly urge readers to exercise caution and conduct their own thorough research and fact-checking. The information presented should not be taken as absolute truth, and, to the maximum extent permitted by law, we will not be held liable for any inaccuracies or errors in the content. It is essential for individuals to independently verify and validate the information before making any decisions or taking any actions based on the articles.


